Monday, October 13, 2014

Oven-Roasted Mojito Chicken

This is an easy chicken dish that's full of vibrant but mild flavors.  I found it in the Dinosaur BBQ cookbook, and even though I had never seen had it at their restaurant in many dozens of visits there, I could tell that it had potential.  Some combination of the garlic, the slowly sauteed onions bathed in drippings, and the citrus-tenderized chicken made this dish hard to beat, and able to stand on its own as a centerpiece or complement a latin feast, as I did last night.

The name of the dish refers to the sauce that is used as a marinade for the dish.  There are a couple of kinds of mojo sauce, much like the words "curry" or "salsa" can be confusing, but we're focused on the Cuban variant here.  Searching for some backstory has led me to others that will be featured in future recipes.  Traditionally served over pork and/or yuca when referring to the Cuban mojo sauce, this is most commonly defined by a mixture of bitter orange juice, garlic, olive oil, and oregano.  Omit the oregano and you get mojito marinade, not to be confused with the minty rum drink.  This recipe does contain oregano, it's not enough to dominate the flavor, so I won't change the title to indicate the parent sauce.  Also, since I have never seen bitter oranges for sale, I stick to a ratio of 8 parts regular OJ to 1 part lime juice, and freshly squeezed for both whenever possible.


Wednesday, September 10, 2014

Pasta alla Norma

Many years ago I traveled with my family to our homeland of Sicily to see where the family was from.  We toured around the island, tracking down birth certificates and marriage licenses.  It was an amazing trip, punctuated with unforgettable meals.

Sicilian food isn't the same heavy cuisine as the northern parts of the country; instead, the food of the island represents a melting pot of influences and a culture that has thrived on meager existences.  This classical dish, pasta alla norma, took us by surprise at how much flavor was packed into such few ingredients, cooked just barely enough to bring out the essence of each one.  I think that this dish could represent the humble beginnings of tomato use in Italy, coming over from the Americas and passed by the Spaniards to the Italian islanders.  In the beginning, tomatoes were often barely cooked rather than being pureed into sauces, and were often tossed with some form of grain and maybe a couple of other vegetables.  So this dish is essentially a trip backwards in time through the history of the Italy's "golden apple".


I present a very classical recipe, not unlike ones I found by Mark Bittman and Mario Batali.  You can plate this however you like, but I relish the crudeness of the ingredients and prefer to serve this as large bites of everything, an homage to the basic vegetables that would go on to form the much more eloquent language of an entire cuisine over the centuries.

Crusty Chicken Thighs in Mushroom Sauce

They say never to apologize for your cooking, and unless someone dies from hysterical tastebud euphoria or E. coli, I never will.  In fact, the first time I tried this, I ruined the sauce so badly that I had to improvise into a cream sauce, which became delightfully unapologetic.  And okay, this recipe is staggeringly similar to that accidental recipe, crispy chicken thighs in a mushroom cream sauce, which I won't usually repost.  But since it took me three tries to get this right, I'd like to post the recipe and process that inspired this whole adventure, given that it is actually delicious when done correctly.  Plus, this original recipe has no added fat or carbs, making it relatively healthy.  I'm still amazed by this style of cooking chicken - dry, with the lid on, yet yielding a crispy delicious skin that rivals the best hand-battered southern fried chicken.  Unreal.

Having made this now enough times to get the method sorted out, I will modify the original recipe slightly with double the chicken, so that you can serve twice the number of meals.  But you can't crowd the pots, so shoot for 4 thighs per cooking vessel unless you have the world's largest dutch oven.


Wednesday, August 6, 2014

Quick Stewed Okra and Tomatoes

I just got back from Charleston, SC, where I had an amazing time and ate way too much food.  If you haven't been there, I can describe the food as French-influenced low country cooking with a healthy dose of Southern backbone.  So take all of the soul food you love - fried chicken, fried green tomatoes, shrimp and grits, collards - and put it alongside po' boys, remoulades, beignets, and all manner of creole food.  There's a kind of third culture mixed in - the Gullah people - who descended from slaves in South Carolina and Georgia.  They too are technically creole people, so it should come as no surprise that they also claim dishes like shrimp and grits, fried okra, and a wide variety of other dishes that come from some hazy part of the South that I can't quite seem to put a dotted line around.

The point of this ramble is simple - they have excellent food in Charleston.  And the trip there reaffirmed my love of okra, an underappreciated vegetable here in the North.  For the first time, I tried a new dish I hadn't heard of before - stewed tomatoes with okra - that I thought was spectacular.  Served alongside eggs, bacon, and the best grits I've ever eaten, this dish would replace a broiled tomato or a bowl of stewed tomatoes, which I have historically despised.  But if you add in okra's earthy vegetation and change up the texture of tomatoes by adding in the okra pods and seeds, it becomes something entirely different.  I made a version of this dish tonight based on what I thought it should taste like, and while the dish wasn't as brightly red colored as the one I had at Kitchen 208, they were also plated more thoughtfully, and had the same amazing flavor I've been craving for a whole week since my return.  So don't be afraid of okra, brave cooks, and push yourself to tackle this otherwise forgotten mallow.


Sunday, August 3, 2014

Blackberry Chutney over Pork Medallions

If you're lucky, where you live is berry season right now.  You're probably seeing them popping up in the grocery store on sale - $2.99 for a 6 ounce tub, trucked in from nobody knows where (aka Mexico).  But a better alternative is getting up to a farm to buy them right off the bushes, or even to pick your own.  We went up this weekend and bought 10 pounds, adding to our 10 pounds of blueberries and 5 pounds of black raspberries from an earlier trip.  You may think that this sounds like too many, but I assure you, it is not.  We now have blueberry jalapeno jelly, raspberry jam, blackberry preserves, blackberry muffins, enough frozen berries to make smoothies through the year, and this gem.

Worried for about 5 minutes that maybe we went overboard with the blackberries, we went looking for recipes.  Good old Martha Stewart came through in a pinch, bringing us an assortment of about 20 different recipes ranging from desserts through drinks, with one savory dinner option.  This dish, pork medallions with a blackberry chutney, caught my eye, since I am a huge fan of the sweet / savory pairing, as well as the meats / sweets pairing.  The recipe looked easy, and we even had a couple of shallots lying around, so it was calling to us.  And the result was fantastic - tart, sweet, and with mellow caramel undertones from the molasses and sauteed shallots, we loved the blackberry chutney so much that we're trying to figure out what else we can serve it with.  So I have chosen to rearrange the name of this dish to showcase the chutney, which was by far the star in tonight's dinner.  It came together quickly, and had a short ingredient list, although you really do want good fresh berries, so some of the ingredients can be a bit fussy.  Don't make any substitutions beyond that, and you'll do really well with this dish.


If you can find it, get a pork tenderloin.  Not loin, that's too big and tough.  Tenderloin will do you well, and will cut up and cook easily.  We couldn't get our hands on one tonight, and used pork sirloin instead, which I think is a great runner up.  Otherwise, we followed Martha's recipe verbatim, which I reprint here.

Just a small fraction of the local blackberries we picked ourselves this weekend


Monday, July 14, 2014

Curried Cauliflower with Chickpeas and Tomatoes

Every week I got to my local farmer's market, and pick up food for the week.  Greens, eggs, bread, apples, whatever.  But there are plenty of things I stroll on past, like the homemade dips, mini pies, and piles of cauliflower.

You know how if you see the same thing hundreds of times, even if you don't really like it, you start to think about it?  Well, that must have been what happened, because last week I suddenly thought "we need to buy one of these heads of cauliflower and see if we can make something with it."  Naturally, I didn't go for the white cauliflower, I had to get the purple kind (which is apparently high in anthocyanins and their cancer-fighting powers) because it looked more weird.  I found an old recipe I have kept in reserve until I found myself with a head of the stuff for whatever reason, and filled in the rest of the ingredients.

This dish was delicious, and had us coming back for more.  I think it was from one of Tyler Florence's cookbooks since I found the identical recipe on one of his pages, but I couldn't identify the scanned page.  Slightly spicy, filling, nice mixture of texture, and velvety from the reduced tomato sauce melding with the ghee - an Indian clarified butter.


Once again, I implore you to use dried chickpeas with this dish as opposed to canned.  Cheaper, better, and more healthy, these are far superior and only require minimal extra effort and probably an extra hour (or 13 if you pre-soak) of prep time.

The dish comes together quickly, and only requires a single pot - I reused the one from boiling the soaked chickpeas.  We are new converts to cauliflower, so expect more recipes using it soon.


Sunday, July 13, 2014

Oxtails Braised in Red Wine

When I was in college, my friend and I took a trip to Atlantic City for the evening.  We didn't have much of a plan, we just went there and figured we'd do some gambling and drinking, and then head back.  Before we went off to lose our shirts, we looked around for a decent restaurant, and found a Cuban place called Cuba Libre.  It's still there, by the way.  So we sit down to eat, and we each decide to order some kind of oxtail stew they have on special, figuring that it would be interesting.  I hadn't had oxtail before, and thought it might be a great place to check it out, having fondly remembered a number of other Cuban beef stews.  But it wasn't just interesting - it was delicious.  So much so that we cleaned our plates from this massive feast, which included not only a healthy quantity of meat but also rice, plantains, and a variety of other things that have since disappeared into a haze of pan drippings and caramelized vegetables.

We never gambled that night - we stumbled into the casino, half-drunk on meat, and played slots for 5 minutes before we decided to turn back.  On a whim, I put $40 on red at a roulette table which hit and, having recovered the cost of my dinner, realized that we had won that night, big time.

This recipe is the first of two oxtail dishes that I will make - this being the more simple, more American version, cooked down slowly with red wine and root vegetables, and a future recipe being the Cuban oxtail stew, or rabo encendido.  I just found this version on the New York Times recipe page and gave it a shot, replacing a non-latin variant on this recipe I made years back because this had more wine in it, and let's face it, that's going to make it much better.  Turned out to be a winner, although it doesn't hold a candle to our Cuban feast that night.

Every bit as delicious as a chuck roast or short rib stew, if not more so.


Thursday, July 10, 2014

Thai Pumpkin in Red Curry (Kaeng Phet Fak Thong)

This is a great dish to make in the fall, which is actually when I made this, despite taking forever to post it.  I had always wanted to try making a pumpkin curry after I tried one at the very excellent Thai X-ing, an off the beaten path restaurant literally in someone's living room in Washington, D.C.  The pumpkin curry dish surprised me with how much flavor it packed in - the standard pungency of a curry sauce, but with the smoothness and slightly sweet and nutty overtones from the stewed pumpkin (in that case, acorn squash).  So the first fall that came around, when fresh squash reared their heads, I made it a point to try this out.

I highly recommend kabocha squash to make this dish instead of other squash or pumpkins.  It holds up well, is fairly easy to work with, and seems to be the traditional gourd preferred by many Thais, in addition to being one of the mystery orange vegetables in an order of Japanese tempura.

Don't be misled by the name, this dish is non-vegetarian given the addition of some boneless pork to round out the protein content of the dish.  After all, squash and pork chops seem to go together, so why not pork with squash curry?


Wednesday, July 9, 2014

Nikujaga (Japanese Beef and Potato Stew)

I don't remember where I found the book on slow cooker dishes that contained this recipe - it was collecting dust in someone's house, and I was bored and flipping through to pass the time.  While looking at soggy chicken stews, and "stir-fries" that you cooked 8 hours, I was despondent.  But somewhere in the back, buried way beyond the potato soups and the poached fish with mustard dishes, and just before the wine-soaked pears, I found this gem, which is most definitely authentic, and which does very nicely in the slow cooker.

Nikujaga is an interesting dish if you know Japanese food, mostly because it's got a lot of western influence.  I can't name too many Japanese dishes that have whole potato chunks - possibly golden curry, and some kind of croquette called a korokke, which I may now have to make after having looked it up.  But I assure you, mention Japanese beef and potato stew to someone from Japan and they will say "NIKUJAGA!!", which I have tried a couple of times with great results.


I really like the flavors in this dish, which is slightly sweet, very rich, and incredibly filling and warming.  And there's very little to this process - you chop everything, throw it in the slow cooker for the day, and come back later to eat a delicious meal.  I first tried this in the pressure cooker, which took an hour, and then tried it in the slow cooker, which took 6-8 hours, and which I thought tasted nearly identical but was ready when I walked in the door.  Your call.  Also, if you really want to get fancy, brown the meat first in a bit of olive oil, and then continue.  It will be notably better, although totally non-essential.


Saturday, July 5, 2014

Saffron Chard Potato Omelette

Another winner from Yotam Ottolenghi's book Plenty, we made this at a cooking class and then were able to reliably duplicate it at home.  A delicious herbed omelette loaded with a filling of potatoes and swiss chard cooked in saffron, which is so good that you could eat it for just about any meal, and you could even eat the filling on its own.  Make sure you have a good non-stick pan to make your life easier, and don't skimp on the herbs or the saffron, both of which are essential to the dish.


Chickpea, Sausage, and Kale Pasta

I was skeptical of this dish at first - it seemed like it might be chalky or dry given the chickpeas mixed with pasta.  But using dried chickpeas instead of canned gives this a wealth of surprisingly fresh flavor, and the mixture of cheese and a snap of lemon juice really gives this dish a lot of energy to complement the inherent deliciousness that is spicy Italian sausage.  I felt like I had done something productive with my night after eating this, and didn't slip into the usual food coma.

Digging around online, I found a very similar recipe to this one from Martha Stewart by Mark Bittman, who instead of Italian sausage uses chorizo, and instead of pasta uses bread crumbs.  He cooks the chickpeas for a more significant amount of time, more like 10 minutes instead of 3.  I might try this variant next time, plus this dish would probably be equally delicious just substituting chorizo for Italian sausage.

Let me implore you to use dried chickpeas in this dish.  Canned chickpeas taste like a whole lot of nothing now that we've tried both fresh and dried, which are staggeringly close to each other in flavor after the dried peas have been soaked overnight.  They're cheaper than canned, they're easy to find almost anywhere (check the latin or Indian section of your store), they have less salt, and they're generally superior.  At the very least, buy a test bag and soak a few overnight, then eat them raw.  If you don't switch over after eating one, I will be amazed.


Wednesday, July 2, 2014

Savory Rosemary Gruyere Bread Pudding

Back when the Food Channel still had cooking shows, I remember watching an episode of Emeril Live where he made savory cheesecakes.  And I thought, "we need to tell the Cheesecake Factory, they're sitting on a gold mine".  While I have still never seen one in person, I started questioning all of my dessert beliefs: can I eat this earlier in the meal, before I hate myself?  Can't I find a way to avoid a diabetes-inducing amount of sugar and still have a delicious baked good?  And, most importantly, can I find a way to put more bacon in this?

And now, you can.  As I was staring down about $5 of unused, questionable rosemary bread from the farmer's market, The idea struck me like a stale loaf of bread to the dome.  This was not to be another farmer's market total loss.  So I sliced the bread up into large cubes in anticipation of my further pleasure.

What ensued was, quite possibly, one of the most delicious things I have ever made.  Crispy, rich, smoky, and with that pine forest smell from the rosemary both baked into the bread and freshly added to the dish, you could easily get lost in this "pudding", which I would describe as either the best stuffing you've ever had, or a meal that combines the best of breakfast, dinner, and dessert.


I will confess that I lifted a few components of this recipe from a fellow blogger here, but then went and updated with a better process and a few ingredients, not the least of which is bacon.  I highly recommend you do two things - use stale bread (slice it up one day before it's too hard to slice, then cube it and leave it in a bowl to dry), and let the custard mixture soak into the bread for at least 8 hours.


Rosemary-Gruyere Bread Pudding

  • 5 cups of cubed, stale Rosemary or French bread, crusts removed
  • 1 tablespoon butter, plus more for greasing pan
  • 3/4 cup chopped sweet yellow onion such as Vidalia
  • 1/4 cup of chopped shallots, or 1 large
  • 1 teaspoon of minced garlic, about 2 cloves
  • 1 tablespoon of chopped fresh rosemary
  • 1 teaspoon of salt
  • 1 healthy pinch of black pepper
  • 2 thick-cut slices bacon, preferably applewood smoked
  • 1.5 cups of milk (I used 2%)
  • 1 cup of heavy cream
  • 4 eggs, beaten lightly
  • 1 cup of coarsely grated Gruyere cheese, separated in half

A few days to a few hours before, cube the bread into 1" cubes and place in a bowl to dry.  Toast bread cubes just before using to remove remaining moisture and brown slightly, and place in a large bowl.  In a medium bowl, beat eggs and add in milk and cream.

Toasted bread cubes, next to the egg custard soak.  Treat this as you would a delicious pan perdu, or French toast

In a large saute pan, melt butter and cook onion and shallots over medium heat, stirring occasionally, until translucent, about 3-5 minutes.  Add some of the salt partway through to pull out some moisture.  Now add rosemary and garlic and stir in for 1 minute.  Remove all from pan, and cook bacon until slightly crispy.  Drain on paper towels, then chop bacon into 1/4" pieces.


Into a large bowl, place toasted bread cubes, vegetable mixture, bacon pieces, egg - milk custard mixture, and half of the cheese.  Toss well to combine but don't stir so aggressively that you break up the bread cubes.  Cover with plastic wrap and place in fridge for 1-8 hours.

Before the long rest and soak

After an 8 hour rest in the fridge.  Totally soaked up the egg mixture, fat and happy and ready for the oven

When ready to cook, grease an appropriate casserole with butter, and heat oven to 350 F.  Lightly spoon in bread pudding mixture into the dish (do not pack this in tightly, it will get mushy), and place in oven, uncovered, for 40 minutes.  After 40 minutes, top with remaining grated cheese, and return to oven for 10-15 minutes longer, until browned and melted.  Allow to cool for 15 minutes and serve.


Served simply, where the bread pudding can be the star

Saturday, June 28, 2014

Pad Khing Gai (Thai Ginger Chicken Stir-Fry)

This recipe is a definite staple in Thai restaurants, and very easy to make.  Sometimes called ginger chicken, or chicken with baby ginger, this Chinese-influenced recipe is very mild (if you omit the chile peppers, which recommend) and gives you tons of sweetness and rich flavor with just a whisper of Thai flavors.  This dish is not too different from cashew chicken in terms of the end result, but it's a heck of a lot easier to get there.  If you can find it, look for jars of preserved sliced baby ginger in brine, which has a much more subtle ginger flavor that won't take your breath away quite as much.


So now, to help you understand how to order this in a restaurant if you find yourself in one of the few parts of Thailand where someone nearby doesn't speak English, let's revisit:

Culturally Insensitive Language Training

In my post for pad prik khing gai, I gave a few Thai translations of interest, which are still valid.  Here they are again.
"Pad" - stir-fried.  Not an especially helpful word.
"Gai" - chicken.  Pretty straightforward.
"Khing" - ginger.  Wait, galangal.  Actually, I believe it means "rhizome", which covers both.  But in this context, unlike in pad prik khing, it means ginger.
So, this dish has a name eerily similar to pad prik khing, with the distinction being the inclusion of the word "chile".  And man, what a huge difference you get in the dish when you add that one little word.

Monday, June 23, 2014

Lemon and Eggplant Risotto

Another hit from Yotam Ottolenghi's book Plenty, this risotto dish makes me realize how much variety there is to cooking eggplant.  And this was a first for me - cooking the eggplant two ways in same the dish.  The resulting flavor was a bit of smokiness and a bit of sweetness between the eggplant cooking styles, balanced by the tang of lemon and the peppery snap of fresh basil.  Add in the richness of the creamy risotto, butter, Parmesan cheese, and about 4 cups of reduced stock, and it's hard to find something wrong with this one.  At least, so long as you're the diner, not the chef.  That's another story, and I suggest keeping extra wine on hand.

Pay no attention to the fact that we took a perfectly good vegetarian entree and served it with a chicken leg - that was an emergency plan that we didn't end up needing, as this dish stood up incredibly well on its own.  Definitely worth making, although you will have a few steps and need to be careful on quite a number of things to not screw up the finished product.


Lemon and Eggplant Risotto
by Yotam Ottolenghi, from Plenty

  • 2 medium eggplants
  • 1/3 cup extra light olive oil
  • 3 tbsp extra virgin olive oil
  • coarse sea salt
  • 1 medium onion, finely chopped
  • 2 garlic cloves, crushed
  • 7 oz risotto rice (carnaroli or arborio)
  • 1/2 cup dry white wine
  • 3.25 - 3.5 cups hot vegetable stock
  • Grated zest of 1 lemon
  • 2 tbsp lemon juice (from 1 lemon)
  • 1.5 tbsp butter
  • 1/2 cup grated Parmesan (about 2 oz), or other mature, hard cheese
  • black pepper
  • 1/2 cup torn basil leaves


Start by prepping the eggplants - char the heck out of one of them over an open flame, turning just before you burn the house down.  Remove from the heat, cut down the center lengthwise, and scrape out the fleshy goodness inside, discarding the skin.  Coarsely chop this flesh and set aside.  If you were to basically mix in a few spices at this point, as if you were making hummus but ran out of chickpeas and only had a delicious eggplant, you'd have baba ghanoush, FYI.  But that's another recipe, for another time.


Dice the remaining eggplant into 1/2" pieces.  Heat up a heavy (I recommend cast iron) pan, and once hot add the 1/3 cup of light olive oil - light so that it has a higher smoke point and won't scorch during this operation.  Pan-fry the diced raw eggplant in 2 batches, turning a few times to get some good browning going.  Remove to a colander and sprinkle with salt.


In a large risotto-sized pot or pan, heat up the 3 tbsp extra virgin olive oil over medium heat, then saute the onion for a few minutes until translucent.  If it's browning, you're getting too carried away.  Add the garlic and continue to cook for 2-3 more minutes.  Then increase heat to high and add the rice, stirring to toss with oil, for 2-3 more minutes.  Add the wine to deglaze, and cook over high flame for yet another 2-3 minutes until nearly evaporated.  Now the fun begins.

Lower the heat to medium, and add a ladle (about 1/2 - 3/4 cup) of the hot vegetable broth to the rice mixture.  Now stir, you fool - stir for all you're worth.  Never stop stirring.  Stir even until there's almost no broth, and add some more, a ladle at a time.  And then when you think you're done stirring, stir some more.  Because this dish only achieves creamy perfection when you dislodge all of the starchy, gooey deliciousness that is the outer layer of a grain of cooked rice, and knock it into the resulting "sauce" that forms from this disembodied starch.  Keep tasting as you stir, and when the rice is cooked through, stop adding broth.  You may need more than 3.25 cups, you may need less.  This is mostly a factor of how old your rice is, and what temperature you're cooking at.

Coat the rice in oil to get heat to all of the grains evenly

Stir constantly to knock surface starch into the mixture and promote creaminess.  Same ideas as with avgolemono soup.  This is almost done, but only tasting it will tell you if it's finished or not.

To finish the dish, remove the pot from the heat, and stir in the chopped eggplant flesh, lemon zest, lemon juice, and most of the cheese.  I recommend zesting the lemon right into the pot, or else the essential oils from the skin will go flying everywhere but into your food, and it just won't be as good.  Crack in 3/4 tsp salt (if using homemade stock, or maybe skip if using store-bought) and some fresh black pepper to taste.  Sprinkle with the diced eggplant, remaining Parmesan, and the torn basil, and grate some additional lemon zest on if you have any remaining.

Shakshuka (North African Eggs Poached in Peppers and Tomatoes)

Shakshuka apparently means "mixture" in Arabic slang, and that's exactly what you get with this delicious and unique vegetarian dish.  Served for lunch more than it is for breakfast, this poached egg dish boasts an incredible amount of healthy flavor and a pleasing array of silky textures achieved by slowly cooking the eggs in a bed of unbelievable flavors.  It's a common dish in Morocco and Tunisia among other places.  Think of it as a much more delicious, much more Middle Eastern version of huevos rancheros, if you've ever had that.


We found this worldly delight at a vegetarian cooking class based on Yotam Ottolenghi's book Plenty.  Yotam was recently on an episode of Anthony Bourdain's Parts Unknown, so he's a credible source now that he's been on TV, for as John Cleese once said at a talk of his I attended, "I don't have to be an expert, but I am a celebrity".  If you have the patience in the morning to simmer this dish while you wait for epic mealtime, I highly recommend you give this a shot.  He's a very passionate chef with a great approach to his vegetarian dishes, and I definitely encourage you to not only try this, but have a look at his book.


Shakshuka
from Plenty, by Yotam Ottolenghi


  • 1/2 tsp cumin seeds
  • 3/4 cup light olive oil
  • 2 large onions, sliced
  • 2 red bell peppers, cut into 3/4" strips
  • 2 yellow bell peppers, cut into 3/4" strips
  • 4 tsp raw sugar
  • 2 bay leaves
  • 6 thyme sprigs
  • 2 tbsp parsley
  • 2 tbsp chopped cilantro, plus more for garnish
  • 6 ripe tomatoes, roughly chopped
  • 1/2 tsp saffron threads
  • pinch cayenne pepper
  • salt and black pepper
  • 8 eggs
In a large heavy pan, toast the cumin seeds on high heat for 2 minutes.  Add the oil and the onions, and saute for 5 minutes.  Add the peppers, sugar, and herbs, and continue cooking on high heat for 5-10 minutes further.


Add the tomatoes, saffron, cayenne, and some salt an pepper.  Reduce the heat to low and cook for 15 minutes, stirring occasionally.  Make sure not to overcook; add water as necessary to maintain a thick sauce consistency with minimal evaporation.  This should be incredibly potent and thick at the end of this process.


If placing into individual serving pans, divide mixture into 4 deep frying pans.  Remove the bay leaves, then make small wells in the mixture.  Crack the eggs into a small dish one at a time, and pour the eggs gently into the wells in the mixture in 8 spots.  Sprinkle with salt and cover the pan(s) with lids.  Cook on very low heat for 10-12 minutes, until the eggs are just set.  Don't cook this too fast, or the eggs will be tough.

Sprinkle with chopped cilantro and serve.


Monday, June 2, 2014

Moroccan Chicken Tagine with Preserved Lemons and Olives

The only time in my life that I tried preserved lemons was in an iced fermented lemon drink at a Vietnamese restaurant, and it was one of the worst experiences of my life.  So when I saw this, I thought: let's spend a month making these and eat them again!  Well, when you go to the culture that invented the stuff, it turns out they are used in much more pleasant ways, such as this delicious chicken tagine.

Tagines, known by their namesake ceramic or cast iron conic cooking devices famous in Moroccan culture, are nothing more than a stew of protein and vegetables or fruit, often featuring goat, lamb, or kid, but in some cases using chicken, or even chickpeas.  This one features preserved lemon, which is an interesting way of keeping lemons for long periods that involves packing them in salt.  The flavor is extra tart, slightly sour from the fermentation, and only good in small doses.  But man, do they add an interesting flavor to complex sauces like what is created in this dish.

We modified the recipe ordering slightly to be more practical, and I may go back and revise this to use chicken quarters instead of a whole chicken, which we think would be faster and better.  Regardless, this dish was well worth the effort, and had so much going on that we were completely floored by how unique it was.  Highly recommended if you have some time to make preserved lemons on your own, which are actually very easy.

Preserved lemons are incredible in sauces, and not to be eaten out of the jar as a condiment

Moroccan Chicken Tagine with Preserved Lemons and Olives
Modified from Morocco, by Jeff Koehler

  • 3-4 cups cooked white long-grain rice
  • 1 cup plain greek yogurt
  • 3 tbsp milk
  • Salt
  • 1 tbsp finely chopped fresh mint or 1 tsp dried
  • 4.25 lb chicken
  • 1 preserved lemon
  • 2 garlic cloves, minced
  • 3 tbsp finely chopped flat-leaf parsley
  • 3 tbsp finely chopped cilantro
  • 1 tsp ground ginger
  • ½ tsp turmeric
  • Generous pinch saffron threads, dry-toasted and ground
  • Salt and freshly ground white pepper
  • 2 tbsp olive oil
  • 2 tbsp fresh lemon juice
  • 2 medium red onions, finely chopped
  • 1 tbsp butter or smen
  • 1 cup green olives, pitted


Scrape the pulp out and preserve the peel for making garnishelater

Quarter the preserved lemon lengthwise, rinse, and remove the seeds.  Without breaking the ppel, scrape away the pulp with a spoon, reserving the peel.  Finely chop the pulp.  In a small mixing bowl, add the lemon pulp and any juices, garlic, parsley, cilantro, ginger, turmeric, saffron, salt and white pepper, olive oil, lemon juice, and 2 tbsp water.  Blend well.


Clip off the chicken wing tips and the tail, and trim any excess fat.  Rinse the chicken and pat dry with paper towels.  In a large pot that will comfortably hold the chicken, create a bed of the red onions.  Set the chicken breast-side up on top of the onions and rub with the saffron mixture, pushing some of the mix under the skin without tearing it.  Add butter to the onions and pour 1 cup of water down the sides of the pot, avoiding the chicken.  Cover and cook over medium heat for 20 minutes.


Turn the chicken breast-side down, cover, and reduce heat to low, and cook for another 20 minutes.  Then add 1 more cup water, loosely cover, and simmer until chicken is very tender, about 50 minutes.  Stir in water as necessary to keep sauce from drying.

While chicken cooks, preheat oven to 350 F.  Prepare the yogurt sauce by whisking together yogurt, milk, a pinch of salt, and the mint in a small bowl.  Cover and refrigerate until ready to serve.  Trim preserved lemon peel segments into cool shapes.

After chicken is tender, remove to a plate for a few minutes, pouring juices back into pot / tagine.  Rub chicken with remaining ½ tbsp. butter, place on a baking sheet, and bake in oven for 10 minutes, until crispy.  At same time, heat pot to high, add olives, and cook sauce uncovered until thickened slightly.


Transfer chicken to serving dish and lay cut lemon peel pieces on breast.  Spoon sauce and olives around chicken.  Serve with rice in one bowl and yogurt sauce in another on the side.


Tuesday, March 18, 2014

Fresh Pho Bo. Or, How I Turned 6 Pounds of Bones into Pure Awesome

12/10/12: Not too long ago, when I was just getting started with this whole blog thing, I was still posting some recipes that, to most of us, would appear sane.  This included a recipe for 'fast pho', cutting out the longer steps of pho creation so that it could be made in about 45 minutes.  But sometimes you have to throw hours at a dish, just to know what it could be if you didn't get lazy.  This recipe is that result.  Real, no kidding pho, just like what you can get for a few bucks at most Vietnamese restaurants.  Why would I do this at home, you ask?  Because I am, as they say in Vietnam, off my nut.

Update 3/18/14: it's been 15 months since I posted this, and I've now made this dish 3 times with increasing success.  This time we discovered the convenience of buying the pre-sliced beef from the Asian grocery store, along with the correct pho rice noodles for the first time, which come vacuum-sealed in the refrigerated section, and are ready to go as soon as you dunk them in the hot broth for 5-10 seconds.  Saved tons of time in the serving stage, and the only real effort was in the stock making, which has become a fairly painless process that we did while we had company over.  So maybe you don't have to be crazy to do this after all.


If I had no job and no other hobbies, I would stay in and make things like this all the time.  Unfortunately, like many of us I don't often have time to sit around for 6 hours and cook this dish.  Which is too bad, because this pho is as good as any restaurant's, and I know exactly what went into mine.  Fresh ingredients, very little salt, lean meat, and a mix of exotic and common spices and sauces.

I want you to make this recipe.  I really do.  And post on here about your experience.  Tell me what you changed, what you used.  I'll try to make it easy for you to follow, but it's still a long process that requires some special equipment and ingredients.  Most likely, you'll need an Asian grocery store nearby to even entertain this idea.  Here's what else you'll need, in decreasing order of cost:
  • A meat slicer, a really sharp knife, a friendly butcher, or a decent Asian grocery store
  • A large (3+ gallon) pot
  • A second large (2+ gallon) pot
  • A large colander or strainer
  • A fine mesh strainer spoon or skimmer
  • Cheesecloth
My recipe is adapted from a collection of different recipes I found online, complemented by techniques from my earlier fast pho recipe, and adjusted based on taste testing during cooking.  If you don't like it, reply and tell me why not.  I'm probably going to make it again, on a day when it's cold and rainy and I'm trapped in the house, much like this adventure.


Beef Pho (Pho Bo) Vietnamese Noodle Soup
Inspired by Viet World Kitchen, cobbled together by me


The stock:
  • 3 medium yellow onions (about 1 pound total)
  • 4-inch piece ginger (about 4 ounces)
  • 5-6 pounds beef bones (marrow, knuckle, calf's foot) - look for some variety, and bits with tendons that will break down, as opposed to just bone
  • One 8" daikon, peeled, cut into 5 large chunks
  • 15 star anise
  • 8 whole cloves
  • 3-inch cinnamon stick
  • 1 tsp whole black peppercorns
  • 3 tbsp salt
  • 6 tbsp fish sauce
  • 2 tbsp sugar, or 1 ounce yellow rock sugar (duong phen)

The dish:
  • 1.5-2 pounds small (1/8-inch wide) dried or fresh banh pho (rice stick) noodles
  • 1/2 pound raw eye of round, brisket, sirloin, or other tender, lean beef, sliced very thinly across the grain
  • Thai basil (hung que)
  • Cilantro
  • Bean sprouts (about 1/2 pound)
  • 1 jalapeno, thinly sliced
  • Lime wedges
  • Hoisin sauce
  • Sriracha sauce

The setup.  Are you kidding me, look at all of the bones!

Char onion and ginger.  Cut your onions in half, peel off the papery outer layer, and set over an open flame with the unpeeled ginger on a grill or gas stove.  I repurposed the rack from my oven and placed over the gas burners to make a large cooking surface.  Let the skin burn, rotating occasionally.  After about 15 minutes, they will soften and become fragrant.  Let cool, and rub off the blackened parts off the onions under running water.  Peel the ginger.  Set aside.

Char the root vegetables over an open fire

After you char the vegetables, rub off some of the blackened char and throw this into the stock

Parboil the bones to clean off 'impurities'.  This was a commonly encountered step online, so I didn't skip it.  Place bones in large stockpot (minimum 12-quart capacity) and barely cover with cold water.  Boil vigorously over high heat for 2 to 3 minutes.  Now dump the bones into a colander and rinse with warm water.  Scrub out your pot and return bones to the pot.

Rinse dem bones!

Now make your soup base.  Make a small herb pouch by placing the cinnamon, cloves, peppercorns, and anise in cheesecloth and tying into a pouch - this will prevent excess grit from accumulating in the soup.  Toast your spices in a dry saute pan before putting them into the soup, which really brings out their flavor.  Put the bones, the herb pouch, the onions, and ginger in the stockpot, and add 6 quarts of water.  Bring to a boil over high heat, then lower flame to a simmer (not a boil).

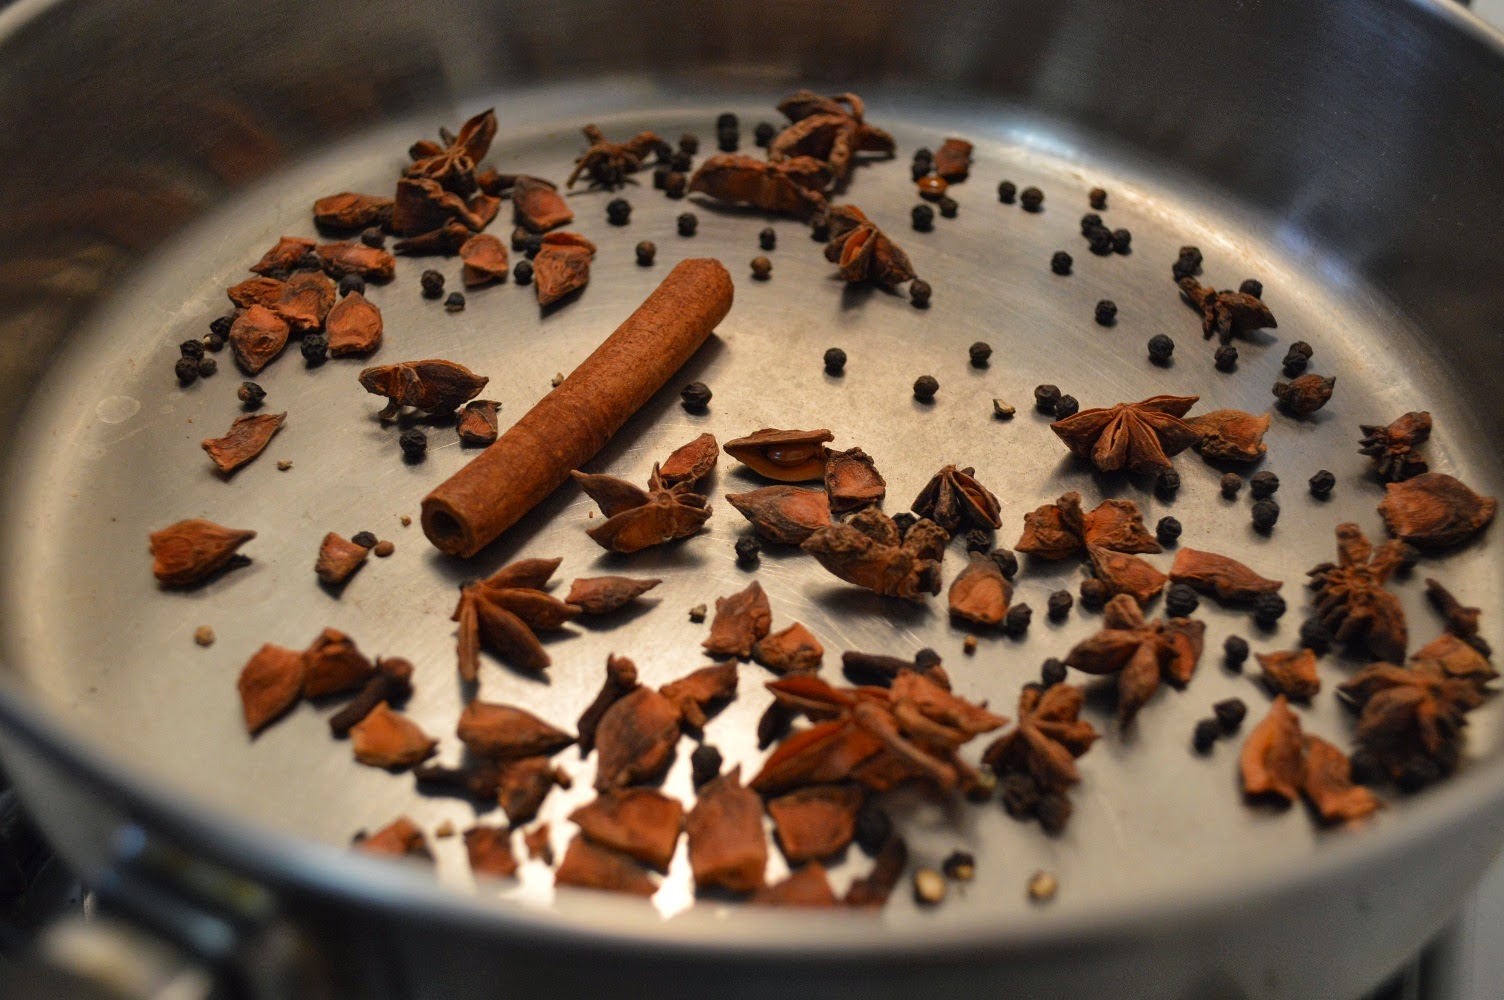
Toast your spices in a dry pan to bring out extra flavor
You know you want a pouch like mine.

For the next hour or so, use a skimmer every 10 minutes to remove any scum that rises to surface.  What happens if you don't skim this?  You get all kinds of weird protein foam that bubbles up, called "colloidal juice".  And since this looks about as appetizing as it sounds, you probably don't want this in your soup, because if you leave it it will dissolve back into the stock, making it cloudy.  It's also got some of the fat and impurities in it according to the CIA, so it pays to grab it and get it out of there.  But the jury is out on whether that last part is true or not.  Anyway, here's what I'm talking about:

Got a skimmer?  If not, consider investing in one if you make stock.
Every 10 minutes or so, get that foam out of there.  It will go from this...
...to this.  Much better, isn't it?  Trust me, it will pay off big time by being clear and delicious

Skim and continue simmering for a total of 90 minutes, then add the daikon and continue cooking for another few hours.  How long?  Until you're tired of cooking it, that's how long.  I would say a minimum of 3 hours, and a maximum of 5 (total, not from this point).  While cooking, taste periodically and adjust seasonings thusly - if it's too bland, add more salt, 1/2 tbsp at a time.  If it's not tart enough, add more fish sauce, 1 tbsp at a time.  If it's too tart, add more sugar, 1 tsp at a time.  You want it a bit concentrated, because you'll be adding unseasoned ingredients to the final product, like noodles and sprouts.  Don't worry if it tastes a little salty, this will cancel out the fact that you're adding a ton of unseasoned beef and noodles at the end.  When you're comfortable with the finished product, pour out the broth through a colander into a medium (2 gallon) stockpot to remove the large solids, then pour back to your large pot and, in the process, strain through a strainer lined with cheesecloth.

This is what was left of those bones.  What was once collagen is now a delicious gelatin dissolved into the soup base, good for strengthening your nails and making your soup deliciously rich and unctuous.  Word of the day!

If you're impatient, go ahead and continue to the next step.  Go on, do it.  I won't judge you.  But if you can afford to wait a day, you can let the soup base cool down, and have all of the fat rise up to the top for you to scrape off and discard.  If you did things right, this broth will have enough gelatin to choke a horse, and will look like it should be served in a small glass bowl at the hospital.  It would probably make the patients feel better, I tell you what.

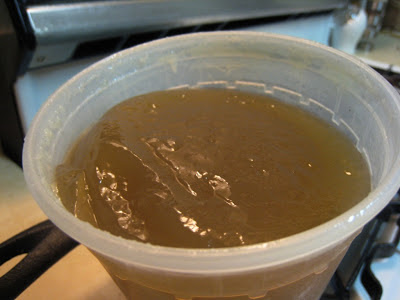
This is the soup, cooled down with fat removed.  It is not moving at all in this picture.

When ready, assemble pho bowls.  This is where you can screw up and get yourself in trouble.  What happens next is a bit of cooking (and thermodynamics) magic, wherein raw meat is instantly cooked by pouring scalding hot broth all over it.  So you want the meat to be paper-thin, and you need for there to be enough thermal mass between the broth, the noodles, and the bowl to ensure that the meat gets cooked.  How much mass?  Well, I could get out my heat transfer book and tell you to within a few ounces, or we could just go with "a lot of broth", which is a slightly less scientific but still valid answer.

Slice your raw beef of choice as thin as you can get it.  A meat slicer comes in handy.  Shoot for something the thinness of deli roast beef.  Before slicing, chill the meat for 15-60 minutes: more if you have a real slicer, less if you're going at it by hand like some kind of tissue dissection.  Either way, set it aside and let it warm up a bit.

Got a meat slicer?  Hope so.  If not, talk up your butcher and see if they can cut it like this.  Also, most Asian grocers carry pre-sliced beef round in the frozen section, ready to go specifically for this purpose

Heat the pho broth to a boil, and prep your noodles.  Get two pots going - one with just water for the noodles, one with the broth.  Follow the directions on the noodle package, which will basically tell you to soak in hot water for 15 minutes, rinse, and then throw into a pot for a few minutes, until cooked.

Prep your sprouts and noodles

Heat up some bowls in the microwave, ensuring they are plenty warm before you start.  You really want to get a lot of heat into this, so the meat cooks.  Put a serving of noodles into the bowls.  Next, throw in bean sprouts, which you can cook for 30 seconds in your noodle water to take out some of the raw flavor, and warm them up.  Place in the bowl, or on the garnish plate.

Now add your meat - place the thin strips over the top of the noodles.  Pour the boiling broth over and watch the magic... the meat will cook instantly as you pour, turning from red to gray.

Prep for this really cool process by laying out the raw meat over the cooked noodles.  Then just pour on the boiling broth...

...and watch the fun!  Want to see it again?

Before...

...after.

Serve your pho with a garnish plate consisting of cilantro, bean sprouts, jalapeno slices, and Thai basil.  Also set out hoisin sauce and sriracha (not homemade, sorry) to pour in.  Now savor every bit of your hard work, or that of the person you bribed into making this for you.


And with that, I'm tired.  I'm going to bed.

LinkWithin

Related Posts Plugin for WordPress, Blogger...