
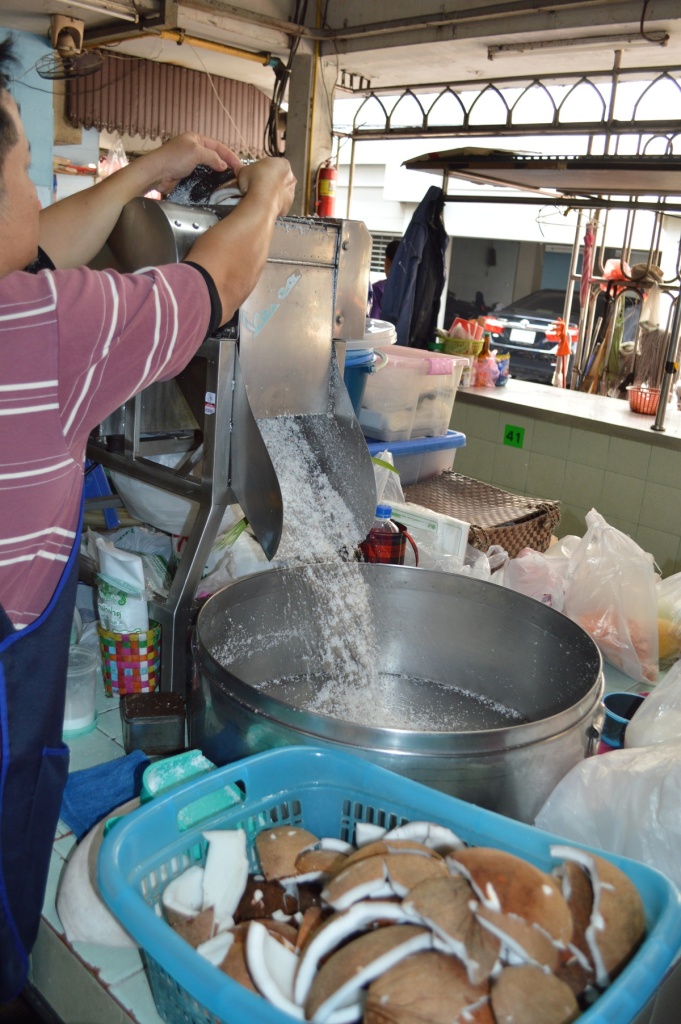
On our trip to Thailand a few years ago, I was captivated by the freshness of the ingredients. The Thai markets are filled with fresh produce and all manner of slaughtered animal parts, which is impressive enough, but then there are the prepared foods - the curry pastes, the sausages, the shrimp chips, and of course, the coconut milk. I had no idea that this was made on a small scale, but after seeing the operation, it made sense - coconut flesh could be shredded quickly, and then a small hydraulic press can crank out a few quarts of fragrant coconut milk every few minutes. We had multiple occasions to taste this fresh coconut milk (and coconut cream, will explain later), and it was starkly different from the thick, somewhat savory canned coconut milk we commonly get in the U.S. Most notably, when you smell homemade coconut milk, it smells like... coconuts! There's no plastic, fatty smell from the preservation of the liquid necessary to get it into cans and across the ocean. The freshly made milk makes no mistake in letting you know what it is, and, as I would soon learn, offers exactly the same unapologetic, coconutty brashness when made back at home with a questionably old coconut. So I watched this process, enthralled by the heavy machinery nestled within the small farmer's market, bound and determined to try replicating this at home with hand tools.

The story wasn't actually that simple. I started out thinking that the magic was all in the paste, with no appreciation for the coconut milk. Coming home armed with curry paste recipes, and having sat on the floor smashing herbs in a mortar and pestle for a few hours, I assumed I was an expert in paste making. But more than a few failed attempts back home led me to realize that those little old Thai ladies sitting around smashing up garlic all day really know what they're doing. Homemade curry paste is truly an art, and I do not have the magic just yet. Maybe it's the freshness of the ingredients, I don't know. All I know is that my pastes are too coarse and lack the depth of the ones made fresh in Thailand, or even the ones from a can here. So after one too many mediocre curries, I broke down conceded defeat, requiring much more practice to this day. Instead, I dug into the process of making homemade coconut milk. Thankfully, the gear required isn't too extensive, but it is somewhat challenging to actually do this, if you use the method I used.
We decided to use the coconut milk as part of a matsaman curry, which we really liked when we made it in Chiang Mai. Matsaman, also written massaman, means "muslim", and isn't actually a Thai word at all - it's a Thai interpretation of the Persian dish, referred to in the 19th century as "mussulman" curry, which is a dated term for Muslim. The analog of this dish is American tex-mex food: it's the native culture's interpretation of what an international dish tastes like, adapted somewhat to the local methods. In this case, the dish borrowed the spices brought to Asia by the Muslim spice traders, including cinnamon, cardamom, cloves, bay leaves, cumin, and star anise, but mixed into a paste and then fried with coconut milk, like so many other Thai dishes. It's said to be favored by westerners because of its more familiar spice palette, but honesty I don't like it any more than a good red (kaeng phet) or green (kaeng khiao wan) curry.

This recipe explores a big hack in the process - how much does homemade curry paste matter? And which is more important, high quality coconut milk, or high quality curry paste. The short answer is both, but the longer answer is that you can get a good curry paste from a pouch, but there is no substitute for homemade coconut milk. Using a commercial paste I brought back with me, the finished dish was so spectacular that I have to question if a mediocre homemade paste is in any way a substitute for a reputable packaged paste. What's more, the fresh coconut milk elevates the dish to a floral, magical level, with the subtle fruity perfume that really takes your mind to the tropics. This doesn't happen with a great curry paste and mediocre coconut milk, by converse. Given this and the other curious additions that make up matsaman curry, I'm going to advocate for skipping the paste pounding step in lieu of making your own coconut milk from now on, so long as you agree to use a decent quality paste. Agreed? Okay, let's move on.
Matsaman Thai Curry with Chicken (Gaeng Masaman Gai)
from our Thai cooking class, modified and translated out of broken English by me
- 1/2 pound chicken breast, diced into bite-sized pieces
- 1 cup coconut milk (see recipe at end)
- 1 cup coconut cream (see recipe at end)
- 1/2 pound Korean or Japanese daikon, cut into large cubes
- 3 tbsp + 1 tbsp matsaman curry paste
- 1 tbsp ginger, julienned
- 1 tbsp tamarind concentrate cut with 2 tbsp water
- 1 tbsp palm sugar
- 1/2 tbsp fish sauce
- 1/2 cinnamon stick
- 1-2 white cardamom pods
- 1 clove
- 1 star anise
- 2 medium shallots, sliced thinly
- 3 tbsp + 2 tsp canola oil, separated
- 2 tbsp roasted peanuts
- jasmine rice, for serving
 |
| It doesn't have to be homemade, but it should at least be decent |
In a small pot, place the daikon, 1 tbsp curry paste, and enough water to cover. Simmer until tender, reserving cooking liquid.
Heat a wok until smoking. Add the 2 tsp oil, and quickly fry the curry paste for 15-30 seconds, until fragrant but not turning darker. Add the coconut cream, a little at a time, waiting for the oil to separate out of it ("cracking" the coconut) before adding more. You should be left with a thin layer of red oil on top when you're done.
 |
| Try to "crack" the coconut cream by heating it in small batches and simmering until the oils separate from the rest of the liquid |
Add the coconut milk, palm sugar, fish sauce, and aromatics - ginger, tamarind, cinnamon, clove, cardamom, and anise. Allow to mix for a minute, then add the chicken. Add the pre-cooked daikon to the curry, stir to spread out, then reduce to simmer and leave it alone.
 |
| Stir in chicken, aromatics, and the daikon |
While the chicken cooks, fry the shallots. You could do this in a small pot, but I did it in the microwave, placing the shallots in a glass bowl covered with the remainder of the canola oil in 30 second increments until nicely browned. Either way, remove to a paper towel and reserve.
The chicken should only take about 5-10 minutes if it is sufficiently small and close to room temperature when starting. Add some of the simmering liquid if the coconut milk is looking a bit low in the wok. You might want to reduce the water/paste mix before adding, to avoid diluting too much. 1-2 minutes before the curry is done, add the peanuts.
To serve, place in a serving bowl and garnish with the fried shallots. Serve with jasmine rice.
Coconut milk and Coconut Cream
Makes about 1 cup of each
- 1 medium mature (not fresh) coconut
- hot water
It is noteworthy that for this process, you will need the following tools:
- Electric drill with medium (~1/4") drill bit
- Coconut grater
- A heavy knife with a wide section on the non-cutting edge, like a cleaver or large chef's knife
- Cheesecloth
- Strainer
- Large bowl
- Heavy squishing object
It is also noteworthy to define the different products that coconut can yield. First of all, coconut milk is not the liquid inside the coconut. That's coconut water, and while it is delicious, and full of electrolytes, we will not be using it. On the plus side, in the process of making coconut milk you end up with some coconut water, which you can drink to replenish the energy you lose grating up the rest of the coconut.
What we will be using instead is actually the flesh of a mature coconut. Why mature? Because young coconut has a jelly-like flesh that still contains too much water, and doesn't form the right product. As it matures, the flesh firms up and squeezes the moisture into the inside, leaving a more fat-dense flesh that can be grated and turned into coconut milk. And what about the coconut cream? Well, that's the best-pressed output of the flesh. Think of it like the extra-virgin olive oil of the coconut - it's the stuff you get from the first pressing, highest in fat, creamiest, and the most delicious. The coconut milk is either from a second pressing, or it will separate out from the cream if you let it sit for a few minutes, depending on how good of a job you do. Coconut cream is not to be confused with *sweetened* cream of coconut - the nasty stuff you put into piña coladas, with so much sugar added that it's practically grainy. DO NOT USE THIS stuff here, it's not what the recipe calls for.
First, open the coconut by drilling holes in the darkest eye + one other, and pour out the coconut water for other purposes. Next, with back of a heavy knife, smack along the widest circle of the coconut, between the eyes and opposite end. Separate halves and scrape out flesh, breaking into smaller chunks and prying out with a knife if necessary.
 |
| Power tools in the kitchen! Yes! |
 |
| You won't need this coconut water, but it is delicious and shouldn't be wasted |
 |
| A few good whacks with a heavy knife around the fattest part of the coconut will let you get it open, no prying required. Just roll it in your hand and give a good smack to the midsection (the "equator" of the thing, assuming the holes are the north pole) |
 |
| Good enough to get in there |
Finely grate the coconut pulp by any means except a blender. I used a hand grating tool, which took a few minutes, and was kind of fun. You may want to chop it more finely before the next step - the smaller the pieces, the more easy it will be to extract the fat and proteins from the flesh. Note the difference to the industrially grated flakes in the picture above. Place grated coconut pulp in a vessel, and pour hot water over the pulp. For proportions, 1 cup of hot water could be added to 1 cup of grated coconut pulp. Leave the contents in the vessel for around 5 minutes, making sure that the contents in the vessel have cooled down sufficiently before handling.


In the traditional process, the soaked coconut pulp is pressed by hand to extract the liquid. In the Thai market, this was done by an awesome hydraulic press. Some cooks place another heavy squishing object in the primary vessel to do the pressing, extracting the fatty liquid from the flesh. This is what I would advocate, in my case using a glass measuring cup. Either way, squish at the flesh for as long as you can stand, trying to extract as much goodness from the flesh as possible. You'll know that you're done when the water stops looking like skim milk and starts looking opaque, plus it should coat a spoon, taste delicious, and have a nice velvety sheen to it. When this occurs, take a fine sieve, cheesecloth, or nut milk bag, and strain the liquid, keeping out the coconut flesh. Press on the bag to extract the liquid. This extract is coconut cream. It is noteworthy that in my process, I only did one pressing, and since it wasn't maximum extraction but I got tired, I ended up with about half milk and half cream, which then separated. This should work out fine for your purposes.
 |
| Take out your aggression on the coconut. Do this as long as you are comfortable, but at least 5 minutes. Get in with your hands too, if you want. You won't hurt it, and you'll just end up getting a better extraction the more you work it. |
 |
| Two layers of cheesecloth should do it. I have since ordered "nut milk bags", an unfortunately named product, from Amazon |
 |
| Wring out the moisture from the grated coconut flesh |
 |
| Note the separation between the layer of cream and the layer of milk. I've already used quite a bit of the coconut cream at this point |
Let's assume, however, that you really went to town on the coconut, and got mostly cream out in the first step. To forge ahead and make coconut milk, repeat the process of adding hot water and squeezing out the liquid created by this second extract. The first extract that is taken is quite thick in consistency and is more suitable for recipes that need coconut cream. The second extract would be a bit thinner and is ideally suited to be used as coconut milk. You will soon get the ideal proportion of coconut pulp and milk after following this coconut milk recipe a few times.


No comments:
Post a Comment