Sunday, November 9, 2025

Sichuan pork and pumpkin stir-fry over crispy noodles

I found this recipe on a fellow blogger website - thanks 3 Hungry Tummies - but had to make some changes to make this a bit more of a full meal, with some extra greens, larger quantities, and some improved methods. As I mentioned in the beef and bok choy over crispy noodles recipe, this is an extreme comfort food dish for me, but even more so than the beef and bok choy version, this one has the noodle I remember but adds some new and intense flavors that make this dish really satisfying. It's spicy, sweet, savory, salty, warming, crunchy, chewy - there's a lot going on here.

I really recommend trying the noodles in the air fryer, which helps them come out perfectly. I tried many times in a pan or wok, but the hot air really gets this the right level of crispy throughout, in a way that could only be achieved by deep frying otherwise.


  • 1/2 lb frozen lo mein noodles, cooked till al dente, drained, refreshed with cold water and drained again
  • 1/2 lb wedge of pumpkin (less than half of a pie pumpkin's worth), peeled and diced
  • 1/2 lb ground pork (coarse if you can get / make it)
  • 3 garlic cloves, chopped
  • a small knob of ginger (appx 1 tbsp), chopped
  • 10 dried Chinese chiles
  • 2 cups chopped bok choy or other Chinese greens, stems and leaves separated, cut into 1/2" strips
  • 2 tbsp of doubanjian (hot bean paste)
  • 2 tbsp of oyster sauce
  • 1/2 tbsp light soy + 1 tsp for marinating
  • 1/2 tbsp of dark soy
  • 2 tbsp of sugar
  • 1/2 tbsp Chinese cooking wine + 1 tsp for marinating
  • 1 cup of chicken stock
  • 1 tbsp cornstarch dissolved in 1 tbsp water, for thickening + 1/2 tbsp for marinating
  • 1 tsp sesame oil, for marinating
  • 1/4 tsp white pepper, for marinating
  • 4 spring onions, cut into 2 in lengths then cut lengthwise
  • 1/2 tbs of Sichuan peppercorn, lightly roasted and crushed/ground
  • Canola oil, for stir-frying.


Cook the lo mein noodles per the instructions, then rinse, drain, and toss in 2 tbsp neutral cooking oil like canola. Follow the process from beef and bok choy over crispy noodles.

Dice the pumpkin and prepare the garlic and spring onions.

Marinate minced pork with the smaller quantity of light soy and Chinese cooking wine, the white pepper, and the smaller quantity of cornstarch. Toss to coat, allow to sit 5 minutes, then add the sesame oil last to seal in the marinade slightly while cooking.

Pre-heat an air fryer to 385 F for a few minutes, then make a small noodle cake no larger than the area of your air fryer, and not more than a few noodles thick, and throw in for 8 minutes. Once browned, remove, and repeat with remaining noodles. This should make 2-3 patties, but scale up as desired.

Fry the diced pumpkin in canola oil over high heat until slightly charred. Remove to a bowl. Add more oil, then brown the minced, marinated pork with a little more oil when the wok heats up again, breaking up large lumps as you go. Remove to the bowl with the pumpkin.

Reheat the work over medium-high heat, add more oil, and quickly stir-fry the bok choy stems for a minute or so until starting to char slightly. Add the chopped garlic, ginger, and Sichuan peppercorns with a little more oil and stir-fry for 30 seconds. Return the pork and pumpkin to the wok, but push out to the sides. Add in the dried chiles and hot bean paste and cook until the oil turns a little red.

Incorporate the pumpkin and pork into the stir fry and toss on high heat for a minute, adding the sauce base (sugar, light soy, dark soy, cooking wine, oyster sauce) at the end.

Add stock, bring to a simmer, cover, and cook until the pumpkin is tender, which could be 5-15 minutes depending on the pumpkin. As the pumpkin is nearing doneness, add the bok choy leaves and stir to incorporate. Thicken with the cornstarch slurry, bring to a boil to ensure the cornstarch does its job, and add in the spring onions.

Pour the spicy sauce over the crispy noodles and enjoy.

Wednesday, October 15, 2025

Texas Hot Links

When I think of BBQ, I picture ribs, brisket, pulled pork, maybe the oddball turkey breast. If you asked me "what defines Texas BBQ", I would probably have said beef ribs. But apparently there's a kind of smoked sausage there that I have been missing out on for my whole life, called a Texas Hot Link. It's a beef sausage, cured and smoked, a bit like a NY style "half smoke" but I think a bit more spicy and probably quite a bit more heavy on the smoke. Twice as smoked, if you go by just the name. I had the good fortune to try this recently while enjoying a combo plate we know as a "hog bucket" at our local BBQ restaurant, and was instantly a fan. So of course I had to try making this at home, because all rational people decide to make forcemeat dishes when they find ones that taste good, right?

Searching for a recipe pulled up more colorful names for this - hot links, hot guts, and also just "guts". Not the best name, hopefully that's not how you would have to order a sausage platter in, say, Austin, though that probably wouldn't be the strangest part of your day even if that's what it came to. But the general premise seemed easy enough - grind up fatty beef with spices and a curing salt, stuff, rest overnight, smoke, feast, food coma. Done. Sounds easy, right?

Well, not so much. This turned out to be an exercise in not having the right equipment at the right location. I was looking forward to using my sausage stuffer, but discovered that the tubes weren't in the box, and after tearing the house apart concluded that they were donated along with an old meat grinder. So getting the meat into the casings required two people wrangling equipment, shoving with full force down the throat of a KitchenAid meat grinder, which was woefully inadequate and kept getting gummed up. I also had no good way to hang the sausages in the smoker, and the makeshift rack caused the links to slip down and knock into each other, slowing things down and causing uneven smoke coverage. Finally, the probes to my thermometer weren't the thin kind that I could leave in one of the sausages, so I kept opening the smoker every hour or so to poke at them as I became increasingly starving, annoyed, and frankly, hostile towards the unsuspecting links. They didn't cause this.

In the end, the two day experiment put dinner on the table at a reasonable 10:30 at night. But all of the frustration melted away into greasy, spicy, smoky bliss after trying just one bite. I would say this was a huge success, and plan to make a much larger batch for a party, since this should scale pretty well in the right smoker. And the smells in the house even the day after carried happy memories of sausages past, which was a nice bonus to wake up to. I will say that for adults, the flavor is great, but for kids, I'd knock down the amount of cayenne, which was pretty intense.

Last time we bought these from the restaurant, any survivors from the initial dinner ended up in a sausage, kale, and potato soup, which we will make soon and post with stragglers from the current batch.

Here's the list of crazy tools I used (or should have) to make this work:

  • Stand mixer
  • Meat grinder
  • 5- to 10-pound sausage stuffer
  • Vertical smoker with offset smoke chamber
  • Needle tip probe thermometer
  • Very precise kitchen scale
  • Spice grinder
The other thing I highly recommend is a pack of Instacure #1, also known as Prague Powder #1. This is the curing salt that is used in making hotdogs and other cured meats, and it's incredibly unsafe if handled wrong, possibly fatal if consumed plain, maybe toxic, and makes for totally delicious sausages. Follow the directions for its use exactly! 5 lbs of meat translates to just under 1 tsp of this curing salt. I happened to have some from back in my sausage-making days after taking a butchering class in college (land grand schools rock!), but if this product is new to you, don't be scared of it, but do be careful.

The recipe was lifted almost verbatim from the Thermoworks website minus the use of ground mace, which we were out of.

After 4 hours in a 200 F smoker

The finished product. I think the color is about right, but I'm no expert

5-pound vertical sausage stuffer. Not helpful when you LOSE THE STUFFER TUBES!!! Ugh.


The setup - heavy on the spices and equipment on this one

Be careful with the curing salt (the pink-colored salt at about 11 o'clock in this photo)!

Mixing the meat and spices with water will unravel the proteins and make a good paste for stuffing. Not the best for getting through the grinder chute, but good once it's in the casing. If only I had a sausage stuffer....

Thread the casings onto the stuffer tubes, tie a knot, and go wild. Oh, and good luck finding casings this century - had to go to many grocery stores before I found them. Check with a butcher if you have one nearby, or order online if you don't.

I twisted these as they came off the tube, but you could do one long rope and then twist. Spin in alternate directions or they will unravel. Keep pressure on the casings still on the tube to control the fill speed, and poke holes in the filled sausages with a toothpick to pop air bubbles, as needed.

Ready to be rested overnight in the fridge to cure

24 hours after stuffing, into a 200 F smoker for 2-4 hours

Towards the end of smoking. The color doesn't reflect the finished product in the first photo.


Texas Hot Links
Modified slightly from Thermoworks.com blog post

  • 3 lb lean beef eye of round is perfect. Or use 80/20 ground beef.
  • 1 lb beef fat not rendered, such as brisket trimmings. I used very fatty pork belly, since I don't have a good butcher at the moment
  • 6 g paprika (NOT smoked!!)
  • 8 g cayenne pepper (maybe less if you want a more family-friendly flavor)
  • 5 g mustard powder (ground fresh in the spice grinder)
  • 7 g garlic powder
  • 5 g onion powder
  • 25 g ground black pepper (ground fresh in the spice grinder, though I've read to maybe do some fine and some coarse)
  • 90 g dry milk powder, used as a binder
  • 40 g salt
  • 5 g Prague powder #1 AKA Instacure #1 curing salt. My packet's instructions quote this as just under 1 teaspoon, which is what I use for a 5 pound batch of meat.
  • 1 ½ cup cold water
  • Hog casings
Cube and chill the beef and beef/pork fat, then chill them in the freezer for about 30 minutes, alongside your grinder. Grind with a medium disc into a bowl set into a larger bowl of ice.

Mix the seasonings, milk powder, and cure together in a small bowl. Put the meat into the bowl of a stand mixer, and sprinkle on the cure/seasoning mix. Make sure the meat is still below 40 °F.

Mix the meat with the paddle attachment, adding the water as you go, until it forms a sticky, fibrous mass that clings to the walls of the mixer and the paddle.

Stuff the meat into casings (not too tight or they will burst!) and twist it into links. Pop any bubbles in the casings with a toothpick as needed.

Allow the links to sit, uncovered, in the refrigerator overnight to cure and dry out just a little.

The next day, preheat your smoker to 200°F. Put the sausages in the smoker, insert a needle probe into one of them if you have one, and close the lid. Cook to 155 - 160 °F. It should take a few hours.

If saving the sausages for later, plunge them into an ice bath to chill and stop cooking. Otherwise, slice and eat fresh off the smoker.

Monday, September 15, 2025

Dry-fried sichuan long beans

Ever had the wrinkly, dry-cooked green beans from a Chinese restaurant and wondered how it's done? Here's how. This dish is readily available on the internet, but I'm reposting a version I like. It tastes nothing like what I've had at Americanized Chinese restaurants, but that's not a bad thing.

The trick to this dish is the dry-frying method, which isn't exactly "dry". It's frying for a very long time until dry, in a bit of oil. It requires very good temperature control, so hopefully you know your cooktop, whatever heat source it is. There are a number of workaround methods - Kenji Lopez recommends broiling instead of dry-frying, Woks of Life has one version talking about shallow-frying in 1/4 cup of oil, restaurants tend to just deep fry the things - but the traditional method is to fry with a minimal amount of oil and a healthy amount of patience, and I think the reward in consistency and flavor is worth the attention.

It took me many trips to different grocery stores to find the right preserved vegetable, so have a look at the picture and look for "ya cai" when you think you've found it. Otherwise you might end up with something too sweet. This has almost a peppery, pungent flavor unlike most other Chinese condiments I've cooked with. I'm not convinced that this $1.00 bag of product is the best version of itself, and may investigate either sourcing or making a fresher, less commercial version of this to see how it improves the dish.

This version uses purple Thai long beans from the garden, but you could use any string bean you have available, as long as it's fresh and not frozen.


All of the ingredients, including the ya cai. Look for this darker-hued product, not the brightly colored preserved stems. Both are in the refrigerated section


Sichuan Dry Fried Green (or Long) Beans
Lifted from https://redhousespice.com/dry-fried-green-beans/

  • 12 oz long beans or green beans, trimmed to 2" lengths
  • 2 tbsp neutral oil, divided in half
  • 1/2 tsp salt
  • 6 Chinese dried chiles
  • 1 tsp sichuan peppercorns (but recommend far fewer if they're freshly picked, me)
  • 1/4 lb ground pork
  • 1 tsp Shaoxing wine
  • 1 tbsp minced garlic
  • 1 tsp minced ginger
  • 1.5 tbsp ya cai preserved mustard greens
  • 1 tsp regular soy sauce
  • 1/2 tsp dark soy sauce
Rinse the ya cai and squeeze out the moisture until the water runs clear - this has an overly pungent flavor to the preserving liquid that overpowers everything. Set aside.

Trim beans and massage with 1 tbsp oil and salt to evenly coat (this trick works great for fried rice as well!). In a large wok, cook beans over medium heat, tossing regularly, for 10-15 minutes, until wrinkled and thoroughly cooked. Remove to a plate.

Still on medium heat, add the remaining 1 tbsp of oil and toss in the sichuan peppercorns and chile peppers to lightly toast them. Before these burn, which is nearly instantly, add the pork and stir-fry quickly. As this finishes, add the Shaoxing wine to rehydrate, and allow it to cook off slightly. Then add the garlic, ginger, ya cai greens, and the soy sauces, and toss to combine.

Add the beans back in, quickly toss to combine, and plate!

Dry frying on an induction wok, a new toy I bought after one too many failed stir-fries on the stove. I eventually reduced the temp to 375 and had no regrets.

Here's what the prep area looks like after cooking the beans

The seasoning mix, which really just elevates the beans with a complex flavor. Probably a bit too much meat here, and the peppers got a little too charred in just a matter of seconds. Be careful with your temperatures


Thursday, September 11, 2025

Paloma with Oleo Saccharum

I recently had my first Paloma cocktail, which was a revelation. Apparently I don't hate grapefruit after all, because this drink made me basically do away with drinking margaritas and switch to these instead. Think of it as a slightly more sweet, more complicated margarita, that's also pink. Palomas can be made with grapefruit soda, or they can be made with fresh grapefruit juice. And since I was trying to figure out why I needed to learn to make an oleo saccharum, once I started thinking through the drink I realized this was the right opportunity to learn.


Serve with a tomato-groundcherry salsa and some chips, and feel no shame in forgetting to make dinner afterwards


Oleo saccharum is a cool trick to extract essential oils from citrus peel, where you put the peels in with sugar and beat them up a bit until they soak into the sugar and create an infused syrup to use in cocktails. I've mostly seen lemon used in this way, and tried this once, but wasn't sure what to do with it other than make limoncello. The grapefruit version makes a really powerful grapefruit-flavor syrup that doesn't have too much extra bitterness, and it really amplifies the grapefruit flavor in the final drink. This can be made in a bowl and left overnight, but if you have a vacuum sealer and just need to have one of these as soon as possible, this can be made in a couple of hours.


The finished oleo saccharum after 2 hours under vacuum

I tried a bunch of variations on this cocktail - mixtures of tequila and mezcal, adding grapefruit bitters, charring the grapefruit on the grill first. In the end, some things helped with flavor, some with color, but a lot was overkill. I'm presenting the version I'm going to be making moving forward.

Completely pointless overkill. But the drink did come out a slightly darker color, with a bit more smoke flavor. I may revise if I oil the grapefruit first and get it over a higher flame.

I'm told by people in the know that the proper garnish on the rim of this drink is Tajin. I went with salt, but the swap certainly wouldn't hurt anything.

  • 2 oz tequila, with up to 25% replaced with mezcal
  • 1/2 oz fresh squeezed lime juice, from approximately 1/2 of one lime
  • 2 oz fresh squeezed grapefruit juice, from approximately 1/2 of one grapefruit
  • 2 oz club soda
  • 1 tsp grapefruit oleo saccharum, recipe below. Substitute agave, simple syrup, or whatever liquid sweetener your body can cope with
  • Coarse kosher salt, for rim of glass
Juice the citrus, saving the spent lime half. Rub this on the rim of your glass and allow to dry slightly, then dip rim in salt.

Into the glass, pour the tequila/mezcal, citrus juices, and oleo saccharum. Stir to combine. Add ice, top with the club soda, lightly stir again, and enjoy.


Oleo Saccharum

  • Peels from 2-3 grapefruits
  • Equivalent amount of superfine sugar, by weight, compared to the peels

Peel the grapefruit in large strips, being careful not to grab too much of the white pith layer. If you have superfine sugar, put the peels and the sugar into a bowl, or a vacuum sealer bag. If you have regular sugar, consider throwing into a blender for a few seconds, to make into finer sugar - this will help the liquids and oils more thoroughly dissolve the sugar, otherwise there's a crystallized layer of sugar that will form and be less useful. If placing in a bowl, bash up with a spoon or muddler for a while, then leave bowl overnight to extract the oils. If using a vacuum sealer, leave for 2-3 hours, or refrigerate for up to a week, no bashing necessary.

Friday, June 20, 2025

Chao Dan (Omelet with Chinese sausage and snow peas)

I had this dish at a random place in the middle of the Pennsylvania Dutch heartland, as one does when they head into Amish country. It's a riff on an open-faced omelet with influences from throughout Asia, that I have reconfigured in many ways. It's a great way to use up fresh spring greens from the garden - I've used sliced snow peas, fava bean leaves, garlic scapes, and spinach so far, and I'm sure many other possibilities would be fantastic. It has Chinese sausage (lap cheong) in all variations I've made, and is fairly similar to the more common sausage fried rice (chow fan) but with more egg and no rice.

I'm having a hard time pinning down where exactly this dish is from - Thailand, or China. It's also similar to the Vietnamese Bánh Xèo crepe that isn't an omelet at all, in terms of the filling. The name seemingly just translates as "scrambled eggs", the most common of which being the egg-tomato dish popular in China. This disappointing, because I feel like this variant deserves its own name.

Garnish however you like, but I've had it with fried shallot, sliced Thai basil, and a drizzle of a thinned oyster sauce over the top, which brings a lot of big flavors to the table. 


This recipe makes TWO omelets. Make the whole thing in series - no need to cook all of the filling at once and remove, because these are open-faced and cook quickly.
  • 2 Chinese sausages (lap cheong), sliced diagonally 1/8" thick
  • 3 eggs
  • 1 cup snow peas or fava leaves, cut into strips
  • 4-5 garlic scapes chopped, if you have them, or 2 cloves of garlic, chopped
  • 1 shallot, chopped
  • 2 tbsp neutral oil, divided
  • 1 tbsp dark soy sauce
  • 1 tbsp Shaoxing wine
  • White pepper
  • 1/4 cup Thai basil leaves, julienned
  • 1/4 cup fried shallots
  • 2 tbsp oyster sauce, thinned with 2 tbsp water
Beat eggs with white pepper and dark soy sauce. Gather remaining ingredients and have ready. In large non-stick pan over medium heat, briefly saute half of the garlic scapes and shallot to remove raw flavor. Add half of the sliced snow peas and toss for about a minute. Add half of the Shaoxing wine and cook until evaporated. Add half of the sausage and cook an additional 30 seconds.

Add half of the egg, swirling pan lightly to spread out fully. No need to fold this, just let it cook in a single layer on and around the filling, as in the picture below.

Slide onto a plate and garnish with half of the basil, half of the shallots, and a drizzle of the thinned oyster sauce. Repeat all steps above for second omelet.  


Saturday, May 3, 2025

Beef and Bok Choy Over Crispy Air-Fried Noodles

Jump to recipe

When I was growing up, there was a Chinese restaurant near me that served a few different stir-fries served in a "bird's nest". Although actual birds' nests are a thing, this is not what they served - it was shredded potatoes shaped into a bowl and then deep fried, usually served with a mix of seafood and vegetables in a rich, light colored but very garlic-heavy sauce. The dish has a lot in common with some versions of chow mein, which in some preparations is a bed of really crispy noodles with a very heavily sauced stir-fry plated over the top. Both are great, and the consistency is what really wins me over - crispy on the edges, but chewy and loaded with flavor as you work your way in, and as the noodles start soaking up the sauce from the outside in.

To try to replicate this, I bought a nest-frying tool, which is a strange contraption of two concentric hemispherical baskets that clamp together, and you load up the volume in between with potato and then deep fry the whole thing. Naturally, I've never used it. Instead, I've tried to make the noodle version of this dish a few times with minimal success, mostly because the crispy noodle cakes that serve as the foundation usually come out both squishy and burnt when trying to get heat into the center of a cake of pre-boiled noodles. On a recent attempt, after having a fit about ruining too many noodles, I gave up in a fit of rage and threw a small quantity of the noodles into my air fryer, which turned out to be the magic step - this turned a disaster of a process into a really easy one. And then today, based on a recent attempt at making a few Thai noodle soups from Serious Eats, I borrowed a technique where you make a garlic-infused oil and then use that as the oil to coat the noodles in, prior to air-frying. The result was better than any version I've had in a restaurant.

The toppings for this crispy noodle cake almost don't matter as long as there's enough of a decent, garlicky sauce to work its way into them at serving time. I tend to lean towards a beef with oyster sauce, so I liked the version that combines beef and bok choy from Omnivore's Cookbook, adapted to what was in the garden, and using some leftover rare rib roast and only lightly stir-fried. It's infinitely adaptable, so long as there's at least a cup of a thickened sauce to go over the noodles. If you get the timing just right, serving over the hot, freshly fried noodles will get them to sizzle audibly, and start soaking up that goodness right before you start eating.

A word on ingredients - use decent stuff. There's a good amount of oyster sauce in this, and Shaoxing wine is used in a couple of steps. Try to get a good quality version of these two things, which both make a difference. Try to find an oyster sauce that's actually got "oyster" as the first ingredient, and look for a wine that's got less salt and might be labeled "hua diao" or has aged a bit. This is going to change the flavor immensely, and took me a long time and many mediocre stir-fries to realize.

These are the versions of the key ingredients that I keep on hand. And yes, that's Japanese soy sauce, not Chinese.

Saturday, April 26, 2025

Ham Perloo (Purlow)

Jump to recipe

Easter has come and gone. And with that comes the true joy of the season - ridiculously cheap hams. I don't even like ham as a meal, but I somehow like ham if it's *in* something. This dish definitely scratches that itch, so every year we run out and grab a ham, to make this and some split pea soup.

This dish that seems to be common in the south, and has about ten names - pilau, perloo, pirloo, purlow, pilaf, plov - so I'm not going to bother guessing at the right spelling of this. The other fun thing is that recipes online range from incredibly bland (cook some rice in what's basically ham water) to incredibly complicated (something resembling jambalaya). The closest I found to something reasonable was one of Emeril Lagasse's recipes, but it needed a bit of tweaking to squeeze out a bit more flavor and cook things in the right order. The recipe below is therefore modified a bit from his website with a few extra ingredients and steps.

This ham purlow dish is far from fancy, but it is definitely memorable. I recommend it if you have leftover ham or want a more mild version of jambalaya.


Monday, January 17, 2022

Mandarin orange chicken stir-fry

Jump to recipe


It's not tangerine chicken, but it's pretty close. We'll save all of the remaining peels from that box to dry and use in future dishes.

You may notice that it's been quite a while since I've posted any new recipes here. Life has been pretty busy, and I've mostly used this recipe blog as a quick resource for myself instead of adding new dishes. If I have a ton of time one of these days, I'll get a few new winners up, though truth be told many of them are very minor tweaks to existing recipes, so they're just a standard repost like most of the internet has these days.


However, I just made a dish that was NOT a repost of any particular recipe, instead being a mix of a few different versions of a popular dish, and wanted to get it posted here, both for myself in the future and for others. Plus, it's a "Costco hack" that uses their frozen chicken bites, which is a great time-saver and somewhat of a compromise between a heavy, deep fried coating (fast-food style) and not being breaded at all (authentic Hunan-style preparation).


The reason I'm making this at all is that we went to Trader Joe's today to try to find a pack of their Mandarin Chicken, which is surprisingly good, but they were out. This ended up being an opportunity instead of a burden, because they had decent fresh mandarin oranges, so we gave ourselves a challenge and tried to make something better. I had recently been researching to try to figure out what this dish originally would have been inspired by, since most Chinese-American food is not authentic - orange chicken in particular, as it was invented by the founder of Panda Express some 30-ish years ago. I love the backstory on this, as I do for other fun facts on "Chinese food" after watching The Search for General Tso (which is really good and very short, highly recommend). With a bit of digging, I found that the actual dish that Mandarin chicken comes from is tangerine peel chicken (which I believe is chen pi ji if an internet search is accurate), and it isn't terribly hard to reproduce with the right ingredients. The dish doesn't use breaded chicken, and it includes prickly ash (sichuan peppercorn), which we like enough to grow in our yard and harvest for use in Sichuan dishes. So we made a kind of mash-up of different cultures and produced a dish that was somewhere in between the American and the Chinese dish from Hunan province. And, naturally, we used lightly breaded chicken, because we had it and it's delicious, and spared us the trouble of firing up the wok this time. I can't rightfully call this tangerine chicken because we couldn't find tangerines, but we did use real California mandarin oranges, both peel and juice, and those seem to be a close second on many websites. Also, mandarins are genetically one of the parent citrus fruits, so I'm going to just claim that this substitution isn't as blasphemous as, say, using pasteurized orange juice.


One point of note, as referenced above - we used Costco's Just Bare lightly breaded chicken, which is routinely cited as a knock-off of Chick-fil-A nuggets, but it also makes a fantastic base for coating in a glaze, be it teriyaki, pineapple, or this mandarin orange sauce. I highly recommend this substitution, which we cooked in our air fryer before tossing in the sauce.


I ended up using a whole bunch of kitchen electrics, as shown in this photo of my kitchen chaos, but you could probably get by with the basics if you have an oven and a clean coffee grinder.

Lots of gadgets involved that helped - air fryer (left), spice grinder (left of oranges), and rice cooker (right)

We'll probably adjust this dish quite a bit, since I plan to make it regularly in both breaded and unbreaded forms. I'll update to the best version we come up with, which may end up including black vinegar and Shaoxing wine in some form, which would be a bit more faithful to the real recipe. And we will try dehydrating mandarin peels instead of using them fresh, to see if this concentrates the flavor further (which I suspect it will).


Mandarin Orange Chicken (with Broccoli)

Created after modifying highly from Woks of Life version and reviewing historical recipes on chen pi ji


  • 1 lb lightly breaded chicken bites (we used Just Bare brand, but you could do a cornstarch-battered and fried breast chunk, or just use unbreaded chicken thighs stir fried with a bit of ginger and garlic, which would also be excellent)
  • 1 tsp sichuan peppercorns
  • 6 dried red chili peppers, whole
  • 4 mandarin oranges
  • 1 tbsp canola or peanut oil
  • 1/4 cup chicken broth
  • 2 tbsp rice wine vinegar
  • 2 tbsp sugar
  • 1 tbsp soy sauce
  • 1 tbsp cornstarch, dissolved in a small bowl with 1 tbsp water
  • 1 scallion
  • 1/2 lb broccoli florets

First, get all of the pieces ready. Steam the broccoli until par-cooked. Wash and peel the mandarins, reserving the peel of at least 2 (you only need 2 for the peels, possibly 4 to get enough juice). Try to get the peel off in large pieces. Scrape the white pith off of the inside of the peel with a serrated knife to reduce bitterness, and cut the two peels into long strips. Juice enough of the peeled mandarins to gather 1/4 cup of juice. In a large measuring cup, assemble the sauce liquids - the mandarin orange juice, chicken broth, vinegar, sugar, and soy sauce.

Cook the chicken using an appropriate method (for us, this was air-frying the breaded chunks) until done. Once the chicken has about 5 minutes remaining, heat a large frying pan (NOT nonstick, you need it ripping hot) and toast the sichuan peppercorns over high heat for 30 seconds or less, until it begins to release fragrance, and place in a spice grinder to cool for a minute before grinding to a powder. Slice the scallions on an angle, separating the pale white part from the green part.

Back in the empty and hot pan, add the chili peppers and mandarin peel strips for about 15 seconds. Then add the canola oil and the white part of the scallions, and toss all to coat for another 15 seconds. Now carefully add the juice mixture from the measuring cup - this will splatter, so be careful. Cook until this darkens and thickens, at least a minute, possibly more. You want to caramelize the flavor a bit, but not reduce this until it's a syrup.

Now, all within about 10 seconds of each other, add just enough of the cornstarch/water mix to thicken the sauce to a glaze (less is better here, and don't use all of this unless you really need to or else you'll make a paste), then add the cooked chicken and the par-cooked broccoli and toss all to coat. Throw in the green onion tops, toss again, and serve over rice.


Monday, November 14, 2016

Pasta Con Le Sarde (Sicilian Pasta with Sardines)

*Updated cooking method (again) 3/30/2020

Sicily, where my family is from, is a land of conquests. The Moors, the Romans, Berbers, Arabs, Persians, Byzantines - pretty much everybody has tromped through Sicily at some point in time, and has left some kind of mark on the people and the food. I believe that pasta con le sarde, a traditional Sicilian dish featuring sardines and pasta tossed with unheard-of flavor combinations, is one such example of what happens when you get such a diverse international palate influencing a cuisine. In this case, it's a Mediterranean cuisine, meaning you get to take fish and try to mix a bunch of flavors together. If you've ever experimented with cooking fish, you know that random flavors can often ruin a fish dish. I couldn't name any other dish that would combine raisins, saffron, fennel, and two kinds of salty preserved fish, but somehow this mix creates an incredible burst of salty and sweet, lightly perfumed, slightly floral, bizarrely colorful, and both crunchy and velvety from the mix of fried bread crumbs and silky pasta that's tossed quickly with its own cooking liquid. The closest thing I can think of to this dish would be a massaman curry, drawing again from influences of the Muslim / western world to work this into the existing (Thai) culture. But in many ways, this dish stands completely alone, and for that I have deep respect in a sea of pasta dishes that is Italian food.

Drawing from a rich supply of fresh fish, this recipe is probably spectacular with fresh sardines caught that day. But since most of us can't get that, I recommend that you invest in a couple of tins of very high quality sardines packed in olive oil. Tonight we used some from Portugal, and at $4-5 per box, it was totally worth it. Even if you don't splurge, at least be sure to get fish in pure olive oil, not a tomato sauce or water.

The dish traditionally calls for bucatini - a thin tube-like pasta - but we've done it both with this and with pappardelle. Both versions are shown in the photographs. I would strongly recommend a bronze die-cut bucatini as the pasta of choice, though, which will hold the sauce best.

Sunday, March 6, 2016

Jungle Curry (Kaeng Pa) // The virtues of obscure ingredients

When we went to Thailand, our travels through the northern part of the country landed us at a great cooking school in Chiang Mai. Here, we learned about the difference between northern Thai food, influenced heavily by other cultures and their significant distance from the coast, and southern Thai food, flavored heavily with coconut, fiery chiles, and plenty of fish. In the north, pork reigns supreme, and an interesting curry dish has emerged - jungle curry, known most notably for its absence of coconut milk from the sauce. Drawing on the other flavors of the countryside - fermented fish sauce, lime leaves, palm sugar, and a pungent red curry paste - mixed with chicken broth, it is a very enticing, filling, and yet surprisingly healthy alternative to the usual cholesterol-laden curry dishes from Bangkok and parts south. We cooked a decent version that day, which we carried home with us.

Fate being the cruel mistress that it is, we tried to replicate this dish following that recipe multiple times, to no avail. I tried making my own curry paste, finding different vegetable mixes to add, making Thai-infused chicken stock, buying a can of green peppercorns, and even growing my own kaffir lime tree to get things right. Nothing worked. Disgusted, embarrassed from one too many hosted dinner party failures, and on the verge of a breakdown, we tried one last time last night, with a careful eye on the exact ingredients called for.

The results were astounding. Somehow this dish rocketed from the bottom of our Thai repertoire to near the top, for a few reasons - it's healthy, it's easy, it's delicious, and it's exotic. This is the only dish I now make that has two very specific ingredients, which we had to learn (painfully) not to substitute for others. We didn't even have to make our own curry paste for this, just used the cans and it came out great. Still in shock, we may make it again tonight just to confirm that we have this one in the bag.

This is what the dish should look like

A prior attempt included making curry paste from scratch

I have no idea what I was thinking

Prep for the older version - too many substitutions, way too much effort, and an unbelievably disappointing meal. We will refer to this image shortly

So read on to learn about why this last photo is completely wrong, and how you can do this right.

Monday, February 15, 2016

Lasagna-stuffed spaghetti squash: a fun alternative

If you're looking for a way to take something totally unhealthy and turn it into something only mildly unhealthy, then look no further! This recipe converts the standard lasagna into one that uses spaghetti squash, a fun winter squash that pulls apart into threads (not unlike spaghetti) once sufficiently cooked. It may leave you wanting a bit, given the lower calorie count, but at least you won't hate yourself as much later that night. Plus, it's incredibly fun to eat.


Sunday, February 14, 2016

Matsaman Curry // Fresh coconut milk beats homemade curry paste any day


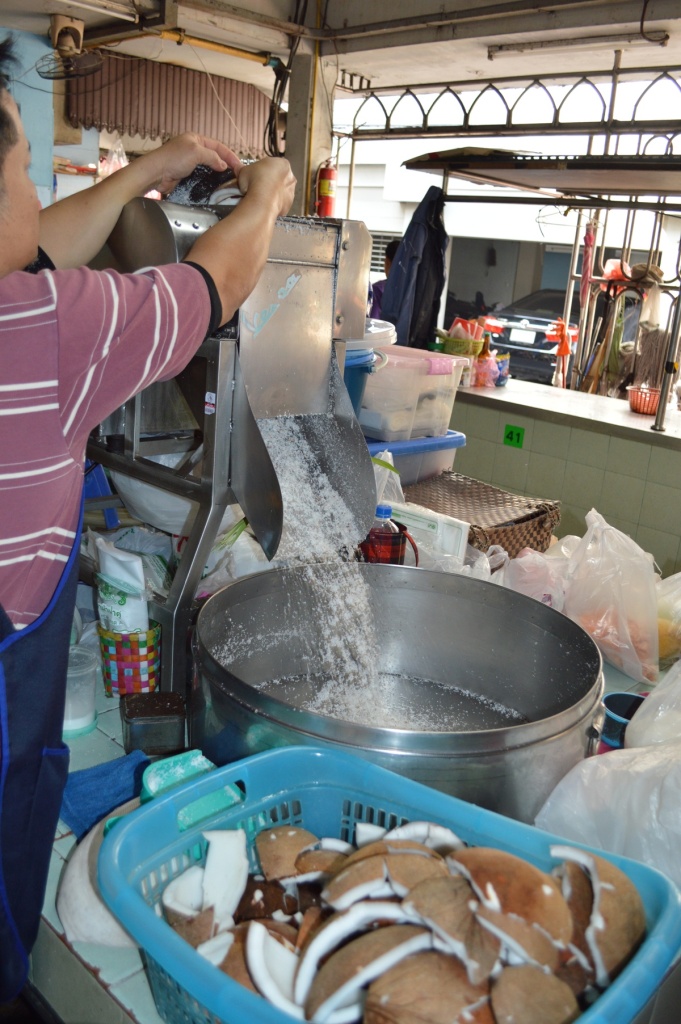
On our trip to Thailand a few years ago, I was captivated by the freshness of the ingredients. The Thai markets are filled with fresh produce and all manner of slaughtered animal parts, which is impressive enough, but then there are the prepared foods - the curry pastes, the sausages, the shrimp chips, and of course, the coconut milk. I had no idea that this was made on a small scale, but after seeing the operation, it made sense - coconut flesh could be shredded quickly, and then a small hydraulic press can crank out a few quarts of fragrant coconut milk every few minutes. We had multiple occasions to taste this fresh coconut milk (and coconut cream, will explain later), and it was starkly different from the thick, somewhat savory canned coconut milk we commonly get in the U.S. Most notably, when you smell homemade coconut milk, it smells like... coconuts! There's no plastic, fatty smell from the preservation of the liquid necessary to get it into cans and across the ocean. The freshly made milk makes no mistake in letting you know what it is, and, as I would soon learn, offers exactly the same unapologetic, coconutty brashness when made back at home with a questionably old coconut. So I watched this process, enthralled by the heavy machinery nestled within the small farmer's market, bound and determined to try replicating this at home with hand tools.


The story wasn't actually that simple. I started out thinking that the magic was all in the paste, with no appreciation for the coconut milk. Coming home armed with curry paste recipes, and having sat on the floor smashing herbs in a mortar and pestle for a few hours, I assumed I was an expert in paste making. But more than a few failed attempts back home led me to realize that those little old Thai ladies sitting around smashing up garlic all day really know what they're doing. Homemade curry paste is truly an art, and I do not have the magic just yet. Maybe it's the freshness of the ingredients, I don't know. All I know is that my pastes are too coarse and lack the depth of the ones made fresh in Thailand, or even the ones from a can here. So after one too many mediocre curries, I broke down conceded defeat, requiring much more practice to this day. Instead, I dug into the process of making homemade coconut milk. Thankfully, the gear required isn't too extensive, but it is somewhat challenging to actually do this, if you use the method I used.

We decided to use the coconut milk as part of a matsaman curry, which we really liked when we made it in Chiang Mai. Matsaman, also written massaman, means "muslim", and isn't actually a Thai word at all - it's a Thai interpretation of the Persian dish, referred to in the 19th century as "mussulman" curry, which is a dated term for Muslim. The analog of this dish is American tex-mex food: it's the native culture's interpretation of what an international dish tastes like, adapted somewhat to the local methods. In this case, the dish borrowed the spices brought to Asia by the Muslim spice traders, including cinnamon, cardamom, cloves, bay leaves, cumin, and star anise, but mixed into a paste and then fried with coconut milk, like so many other Thai dishes. It's said to be favored by westerners because of its more familiar spice palette, but honesty I don't like it any more than a good red (kaeng phet) or green (kaeng khiao wan) curry.


This recipe explores a big hack in the process - how much does homemade curry paste matter? And which is more important, high quality coconut milk, or high quality curry paste. The short answer is both, but the longer answer is that you can get a good curry paste from a pouch, but there is no substitute for homemade coconut milk. Using a commercial paste I brought back with me, the finished dish was so spectacular that I have to question if a mediocre homemade paste is in any way a substitute for a reputable packaged paste. What's more, the fresh coconut milk elevates the dish to a floral, magical level, with the subtle fruity perfume that really takes your mind to the tropics. This doesn't happen with a great curry paste and mediocre coconut milk, by converse. Given this and the other curious additions that make up matsaman curry, I'm going to advocate for skipping the paste pounding step in lieu of making your own coconut milk from now on, so long as you agree to use a decent quality paste. Agreed? Okay, let's move on.

Monday, February 1, 2016

Gambas al Ajillo (Spanish shrimp with garlic)

Complexity. Depth. Perfection. And certainly, unquestionably, with no possibility for ever changing, the best shrimp recipe I have ever made, or will ever make. Thank you, Kenji Lopez, for bringing joy to my shrimp experience tonight.

Gambas al ajillo is a staple Spanish tapa that simply means "shrimp with garlic". But this dish is so much more than that - it somehow extracts all of the flavor in every ounce of the shrimp and garlic, done so exquisitely that you wonder how you have ever eaten either of these things alone before.

I have wanted to make this dish for years, and almost did so with my brother last month. Fortunately, my new favorite recipe site, Serious Eats, brought us their version of this dish, which casts aside paprika often used to redden the oil in favor of making a garlic and shrimp shell infused oil and then quickly sauteing in that. The magic of the dish comes in the form of brilliant usage of the "three flavors of garlic" - a mellow, astringent, and savory mix created only by the careful application of heat to the garlic in three different cuts. I have never served a dish with garlic treated any more than a single way, but now I've tried it three ways, I instantly understand why this is a brilliant idea.


LinkWithin

Related Posts Plugin for WordPress, Blogger...