Showing posts with label braise. Show all posts

Sunday, February 14, 2016

Matsaman Curry // Fresh coconut milk beats homemade curry paste any day


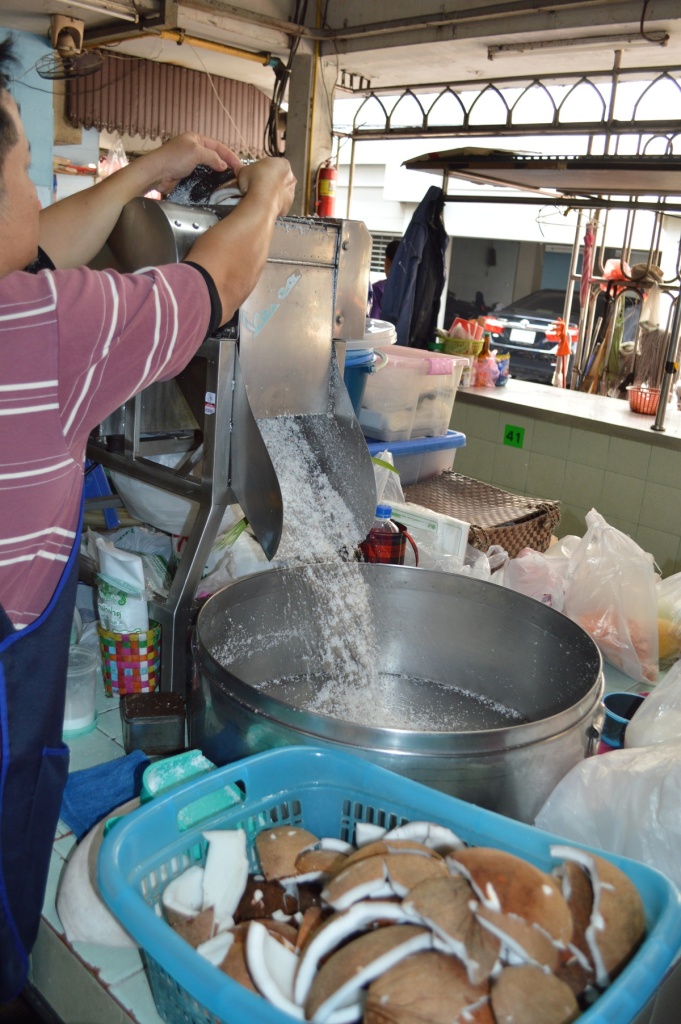
On our trip to Thailand a few years ago, I was captivated by the freshness of the ingredients. The Thai markets are filled with fresh produce and all manner of slaughtered animal parts, which is impressive enough, but then there are the prepared foods - the curry pastes, the sausages, the shrimp chips, and of course, the coconut milk. I had no idea that this was made on a small scale, but after seeing the operation, it made sense - coconut flesh could be shredded quickly, and then a small hydraulic press can crank out a few quarts of fragrant coconut milk every few minutes. We had multiple occasions to taste this fresh coconut milk (and coconut cream, will explain later), and it was starkly different from the thick, somewhat savory canned coconut milk we commonly get in the U.S. Most notably, when you smell homemade coconut milk, it smells like... coconuts! There's no plastic, fatty smell from the preservation of the liquid necessary to get it into cans and across the ocean. The freshly made milk makes no mistake in letting you know what it is, and, as I would soon learn, offers exactly the same unapologetic, coconutty brashness when made back at home with a questionably old coconut. So I watched this process, enthralled by the heavy machinery nestled within the small farmer's market, bound and determined to try replicating this at home with hand tools.


The story wasn't actually that simple. I started out thinking that the magic was all in the paste, with no appreciation for the coconut milk. Coming home armed with curry paste recipes, and having sat on the floor smashing herbs in a mortar and pestle for a few hours, I assumed I was an expert in paste making. But more than a few failed attempts back home led me to realize that those little old Thai ladies sitting around smashing up garlic all day really know what they're doing. Homemade curry paste is truly an art, and I do not have the magic just yet. Maybe it's the freshness of the ingredients, I don't know. All I know is that my pastes are too coarse and lack the depth of the ones made fresh in Thailand, or even the ones from a can here. So after one too many mediocre curries, I broke down conceded defeat, requiring much more practice to this day. Instead, I dug into the process of making homemade coconut milk. Thankfully, the gear required isn't too extensive, but it is somewhat challenging to actually do this, if you use the method I used.

We decided to use the coconut milk as part of a matsaman curry, which we really liked when we made it in Chiang Mai. Matsaman, also written massaman, means "muslim", and isn't actually a Thai word at all - it's a Thai interpretation of the Persian dish, referred to in the 19th century as "mussulman" curry, which is a dated term for Muslim. The analog of this dish is American tex-mex food: it's the native culture's interpretation of what an international dish tastes like, adapted somewhat to the local methods. In this case, the dish borrowed the spices brought to Asia by the Muslim spice traders, including cinnamon, cardamom, cloves, bay leaves, cumin, and star anise, but mixed into a paste and then fried with coconut milk, like so many other Thai dishes. It's said to be favored by westerners because of its more familiar spice palette, but honesty I don't like it any more than a good red (kaeng phet) or green (kaeng khiao wan) curry.


This recipe explores a big hack in the process - how much does homemade curry paste matter? And which is more important, high quality coconut milk, or high quality curry paste. The short answer is both, but the longer answer is that you can get a good curry paste from a pouch, but there is no substitute for homemade coconut milk. Using a commercial paste I brought back with me, the finished dish was so spectacular that I have to question if a mediocre homemade paste is in any way a substitute for a reputable packaged paste. What's more, the fresh coconut milk elevates the dish to a floral, magical level, with the subtle fruity perfume that really takes your mind to the tropics. This doesn't happen with a great curry paste and mediocre coconut milk, by converse. Given this and the other curious additions that make up matsaman curry, I'm going to advocate for skipping the paste pounding step in lieu of making your own coconut milk from now on, so long as you agree to use a decent quality paste. Agreed? Okay, let's move on.

Friday, January 22, 2016

Chicken Cacciatore

Nothing says winter cooking better than a good stew. Chicken cacciatore is an Italian chicken fricassee, with some added tomatoes, red wine, and olives bringing the Italian flavor on top of the usual mushrooms, onions, and garlic that are probably shared with almost all of the chicken stews out there. It translates as "hunter's style chicken", defined as having onions, garlic, and tomatoes. It actually has some commonality with Jägerschnitzel if you have tried it, given the addition of mushrooms and herbs in the sauce. And while I can't capture the smells in this post, I assure you that the combination of rosemary, onions, garlic, and sage make for some memorable comfort food.

I pulled my recipe from The Joy of Cooking, which is a great reference book for those getting started. The well-worn page of this recipe also contains Brunswick stew and coq au vin, making it easily the most used page in the whole book for me. But I'll repost the recipe here, with my notes on the process added. The recipe does state that the oil-cured olives are optional, but I highly recommend adding them, as it gives a briny, salty punch reminiscent of a good puttanesca sauce.


Sunday, July 13, 2014

Oxtails Braised in Red Wine

When I was in college, my friend and I took a trip to Atlantic City for the evening.  We didn't have much of a plan, we just went there and figured we'd do some gambling and drinking, and then head back.  Before we went off to lose our shirts, we looked around for a decent restaurant, and found a Cuban place called Cuba Libre.  It's still there, by the way.  So we sit down to eat, and we each decide to order some kind of oxtail stew they have on special, figuring that it would be interesting.  I hadn't had oxtail before, and thought it might be a great place to check it out, having fondly remembered a number of other Cuban beef stews.  But it wasn't just interesting - it was delicious.  So much so that we cleaned our plates from this massive feast, which included not only a healthy quantity of meat but also rice, plantains, and a variety of other things that have since disappeared into a haze of pan drippings and caramelized vegetables.

We never gambled that night - we stumbled into the casino, half-drunk on meat, and played slots for 5 minutes before we decided to turn back.  On a whim, I put $40 on red at a roulette table which hit and, having recovered the cost of my dinner, realized that we had won that night, big time.

This recipe is the first of two oxtail dishes that I will make - this being the more simple, more American version, cooked down slowly with red wine and root vegetables, and a future recipe being the Cuban oxtail stew, or rabo encendido.  I just found this version on the New York Times recipe page and gave it a shot, replacing a non-latin variant on this recipe I made years back because this had more wine in it, and let's face it, that's going to make it much better.  Turned out to be a winner, although it doesn't hold a candle to our Cuban feast that night.

Every bit as delicious as a chuck roast or short rib stew, if not more so.


Saturday, February 8, 2014

Italian Braised Pork Ribs with Tomatoes

Tired of your average BBQ ribs?  Looking for something new?  Search no further, I have the answer for you!  Trust in the Italians, those masters of piquancy and lovers of all things tomato (even though European explorers discovered tomatoes here in the Americas in the 1500s and introduced them to Italian cuisine only 600 years ago, but that's not the point).  There is a Roman dish called Italian Country Style Ribs, which I pull from the book Roma: Authentic Recipes from In and Around the Eternal City.  Don't worry, I looked at the reviews and you're not missing anything by not running out to purchase this book.  Let me rework this recipe that was reposted anyway, and you'll reap the rewards without trying to chase down the book.  I have modified it to avoid the use of the oven, and instead rely on my favorite of cooking methods - the pressure cooker.  If you are scared of the pressure cooker, first, shame on you, and second, you can bake at 350 F and wait around for dinner, and think about what you could be doing with those extra 2 hours of your life if only you were more courageous (I'm looking at you, Mom).


Italian Country Style Ribs with Tomatoes
From Roma: Authentic Recipes from In and Around the Eternal City


  • 1/4 cup olive oil
  • 3 pounds country style ribs
  • salt and freshly ground black pepper
  • 1 28-ounce can Italian plum tomatoes with purée or juices
  • 1 medium yellow onion, chopped
  • 1 medium carrot, diced
  • 1 rib of celery (with leaves), diced
  • 2 cloves garlic, minced
  • 1 teaspoon dried rosemary (or 1 tablespoon fresh)
  • 1 teaspoon sweet paprika
  • 1 bay leaf
  • 1/2 cup dry red wine
  • parsley, for garnish


Pat ribs dry with paper towel and season on both sides with salt and pepper. Heat olive oil over medium-high flame in a heavy cast iron skillet. Brown the ribs well on both sides, turning them a couple/few times, about 10 minutes total. Avoid crowding them in the pot. Meanwhile, pour tomatoes into a bowl roughly chop them.


Transfer ribs to a plate and reduce heat to medium. Add onion, carrot and celery to pot and cook for 5 to 6 minutes, stirring frequently to avoid burning. Stir in garlic, rosemary and paprika and cook until fragrant, about 45 seconds. Add wine, scraping up any brown bits, and cook until it’s almost evaporated, about 3 minutes. Dump all of this into your pressure cooker along with the ribs and any accumulated juices, arranging them in a single layer as much as possible. Pour chopped tomatoes and their juices over the ribs, working them in around the meat with a wooden spoon. Tuck the bay leaf into the tomatoes. Seal the pressure cooker, or, if you're baking, cover the pot you're baking in and transfer to the oven.


Braise ribs until very tender, 40-50 minutes for pressure cooker or 2 to 2-1/2 hours in the oven, carefully turning them about halfway through the cooking process if you're baking. Transfer ribs to serving platter as best you can - they may fall apart, as mine did. Serve with the sauce, over pasta such as penne, rotinin, or farfalle. Garnish with parsley, and have at it.


Wednesday, October 2, 2013

Braised Lamb Shanks with White Beans

I've always wanted to master lamb shanks.  Filling, complex, rich with collagen, and easily portioned into undisputable gargantuan helpings you just can't argue with, they are far too underappreciated in this country.  I only know a few cultures that cook lamb shanks well - the Greeks, and the Irish.  I suppose the French can do it to, and that's what I had a run at with this recipe, kind of a take on a cassoulet but without a variety of different meats (or as many beans).

I made this recipe a few months ago and as a result have forgotten exactly where I found it, but I believe I scavenged it mostly from Williams-Sonoma and then modified the spice blend slightly, to produce more of an herbes de provence blend than just the original thyme and bay leaf mix.  My version had an overly thick sauce which would have benefitted from slightly more broth, but otherwise the flavor was so incredible that I almost phoned the last French bistro I ate in and asked for my money back.  Rest assured that I won't be ordering this out at a pricey restaurant any time soon - this probably cost me $30 out the door for two people, including meat from a top-end butcher and a bottle of wine, most of which ended up being drunk at dinner, as was the chef.


Braised Lamb Shanks with White Beans
Adapted from Williams-Sonoma Seasonal Celebration Series, Autumn, by Joanne Weir (Time-Life Books, 1997)


  • 3/4 cup dried small white, white kidney or cannellini beans (or 2 15 ounce cans if you’re lazy)
  • 2 Tbs. extra-virgin olive oil
  • 3 lamb shanks, each 1/2 to 3/4 lb.
  • 1 yellow onion, finely diced
  • 1 celery stalk, finely diced
  • 1 large carrots, peeled and finely diced
  • 3 garlic cloves, minced
  • 3/4 cup dry red wine such as Côtes-du-Rhône, Cabernet Sauvignon or Chianti
  • 1/2 cup chicken broth
  • 1 cup peeled, seeded and chopped tomatoes (fresh or canned)
  • 1.5 tbsp tomato paste
  • 1 tsp chopped fresh thyme
  • ¾ tsp chopped fresh rosemary, or ¼ tsp dried
  • 1-2 leaves chopped fresh sage, or ½ tsp dried
  • ½ tsp dried marjoram
  • ¼ tsp dried basil
  • ¼ tsp fennel seeds
  • ¼ tsp dried oregano
  • 1 bay leaf
  • Salt and freshly ground pepper, to taste
  • 1 tbsp chopped fresh flat-leaf parsley


If using dried, pick over the beans and discard any misshapen beans and stones. Rinse the beans, place in a bowl and add water to cover generously. Let stand for about 3 hours.  Drain the beans and place in a saucepan with water to cover by 2 inches. Place over medium-high heat and bring to a boil. Reduce the heat to low and simmer, uncovered, until nearly tender, 45 to 60 minutes. Drain well.  Or, if using canned beans, ignore that whole process and open 2 cans, rinse, and drain.

While beans are cooking (or being opened), prepare the herbes de provence by combining thyme, rosemary, sage, marjoram, basil, fennel, and oregano in a small bowl.


Meanwhile, in a deep, heavy stock pot over medium heat, warm the olive oil. Add the lamb shanks and brown on all sides, 10 to 12 minutes. Transfer the shanks to a plate. Add the onion, celery and carrots to the pan and sauté over medium heat, stirring occasionally, until the onion is soft, about 10 minutes. Add the garlic and cook, stirring, for 1 minute. Add the wine, broth, tomatoes, tomato paste, herbes de provence mix, bay leaf, and lamb shanks. Bring to a boil over high heat. Reduce the heat to low, cover and simmer until the shanks can be easily pierced with a skewer, 1 1/2 to 2 hours.


Add the beans, stir well, cover and simmer gently until the lamb begins to fall from the bone and the beans are tender, about 30 minutes more. Season with salt and pepper. Remove the bay leaf and discard.


Transfer the lamb shanks and beans to individual plates and garnish with chopped parsley.

Monday, September 2, 2013

Chicken Riggies

Update 12/24/2018: after making this dish again from my own recipe, I have realized that I am now a bit smarter about the process. So I updated to remove a couple of unnecessary ingredients and fix the method to be better all around.

Since the dawn of homo sapiens, when we first stood tall, emerged from our caves, and embarked on the great human experiment, we have begun to seek the answers to the great questions in life.  "Why are we here?  Do we have a purpose in life?  And what, really, is a riggie?"

Well, at long last one of these questions can be answered.  A riggie, coming from the Italian word "rigatoni", which in turn translates as "tube of extreme deliciousness" in a language I have not yet heard of, is a dish coming from the Utica / Rome area of upstate New York.  Only there would you take a tomato cream sauce, not unlike a vodka tomato sauce, but instead add both sweet and hot peppers, as if you were about to slather this stuff onto a cheesesteak or a hotdog, before going ahead and throwing in a few select proteins to toss with your pasta as originally planned.  The first time I encountered this dish was in Lansing, NY at Rogue's Harbor brewing company, who serves this under a section of NY state specialties.  I wish I could personally extend my thanks to the great man or woman who, on what must have been a very cold, somewhat alcohol-fueled night, decided to turn an otherwise classy, rich dish into a slightly less classy yet unbelievably satisfying assault on the senses.  Sweet, tart, velvety, warm, and hearty - a perfect meal for pulling the kids out of the snow, sloshing into wooden bowls, and mowing through by a roaring fire while you warm your bones.


I tried this dish from a recipe I dug up online few years ago with limited success - things just didn't come together, and the flavors weren't right.  The sauce broke, it wasn't the right mouthfeel, and it just lacked that well-rounded flavor that I was expecting.  But now, after a few more years of cooking and recognizing some flaws in the original recipe, I believe I have tweaked it into something altogether better, maybe suitable for entering into "Riggiefest", which I swear I am not making up.


Chicken Riggies
from various sources, fused together by me

  • 1 tbsp olive oil
  • 1 tbsp butter
  • 4 cloves garlic, minced
  • 8 tablespoons minced shallot (3 medium) or 1 small onion, minced
  • 1.5 pounds skinless, boneless chicken breast meat
  • salt and pepper to taste
  • 1 (4 ounce) jar sweet red peppers or cherry peppers, drained and julienned
  • 3-4 ounce jar hot banana peppers or cherry peppers, drained
  • 1/2 cup fresh tomato sauce
  • 2 tbsp dry sherry
  • 10 pepperoni
  • 4 ounces heavy cream
  • 8 ounces uncooked rigatoni pasta
  • Grated parmesan (optional), for plating
  • Minced parsley (optional), for plating
Prep your setup.  Get the shallots and garlic minced and together in a small bowl.  Go for shallots instead of onions - live the dream.  It does make a lot of difference.  Cube the chicken into bite-sized pieces, about 1" to a side.  Not so small that they won't hold up in what is essentially a stew, and not so large that you have huge hunks of flesh floating around in there.  Chop up your peppers, which should be equal parts sweet and hot (hence the bold to differentiate above).  You could use roasted red peppers, but I prefer sweet cherry peppers.  For the hot, what I originally had and still prefer most is hot banana pepper rings, although you could use hot cherry here and roasted red for the sweet.  Whatever suits your taste, but keep the ratios the same.

In a large cast iron saucepan, heat oil and melt butter over medium heat.  At same time, start boiling water for your rigatoni. Add the garlic and shallots to the pan and saute until soft, then add the chicken, season with salt and pepper to taste, and saute for 8 to 10 minutes, or until halfway cooked. Don't brown the meat, just keep stirring until it's no longer pink.


Add peppers and stir in tomato sauce, reduce heat to low and simmer about 10 minutes. Now start cooking your rigatoni.  Back in the main pan, add the sherry and simmer for another 10 minutes.


Add the pepperoni and the heavy cream, and cook for 5 minutes. Do not use anything lighter than 'light' whipping cream - no half-and-half, no whole milk mixed with cream, nothing like that.  If you try to add anything but actual cream, this sauce will break, forming little fat bubbles separated from a watery mess.  So don't think that you can come up with a low-fat substitute for this - I've already tried, plus I cut the fat down in the first step, which originally called for double the amount of oil and butter.


When the pasta is just barely al dente, if not slightly before, set aside about a cup of the cooking water, drain the pasta, and immediately toss it into the sauce. Toss this together to finish cooking the pasta for 1-2 minutes in the sauce, adding in a few tablespoons of the reserved rigatoni cooking water to thicken and help the sauce cling to the pasta. Feel free to add more of the water if the sauce is still too thick, but not so much that it will become loose again.


After adding the cornstarch, observe how thick this is.  This picture from an earlier attempt.

To serve, plate into bowls, possibly with shredded parmesan, and top with finely minced parsley.  I took mine plain.  Try to find something healthy as a side, like a salad or something green.


Tuesday, December 25, 2012

Kokkinisto (Greek Braised Red Lamb with Tomatoes)

This year, Christmas Eve was spent cooking, taking pictures, and frantically trying to scribble down a surprise recipe that I would be proud to call the best lamb recipe I have ever made.  I think I need to just start following my brother around and taking notes on everything he does.  When I showed up yesterday to help make dinner, he was making two boneless legs of lamb into a dish that didn't sound quite my style.  So I asked if I could set one aside to do something different.  And while I'm rummaging around in my recipe folder for a lamb recipe, he just busts this one out off the top of his head, rivaling the best Greek restaurant lamb dish I've ever tried.  After thinking about it for the duration of the cooking process, he finally goes, "it's called kokonisto or something".  So we looked it up, and sure enough, there's a dish called kokkinisto, and even without a recipe he basically nailed it.  It's a braised meat dish (kokkinisto means "reddened" in Greek, I believe) cooked in tomato, and often with red wine, and just a tiny hint of cinnamon to accentuate the spiced flavors.  Usually lamb is used, but I found recipes for beef and chicken on the web as well.

Kokkinisto - braised lamb in a tomato sauce.  OMG.

I present the recipe as I will make it moving forward, just adding some red wine and serving over orzo, a rice-shaped pasta that really helps hold the sauce and is a traditional accompaniment in Greek restaurants.  But this was excellent on its own, and I devoured every bite, excited to make this again at my house.  And you should make it in yours.


Sunday, August 19, 2012

Pork Carnitas

If you've been to Chipotle (or any actual Mexican restaurants), you may have come across a mean pork dish called 'carnitas', which really just means "little meats" in Spanish.  Made famous in the Michoacán region of Mexico, large hunks of seasoned pork are cooked for a very long time in either broth (braised) or fat (rendered in lard, essentially) before plating with tortillas, lime, and cilantro.  I didn't quite feel like cooking an already fatty pork shoulder in lard for many hours, so I went looking for a broth recipe, and merged a number of them to create what I thought was a very flavorful but simple finished product.  Rather than deep frying to get the right kind of crisp exterior and moist interior, I created a two-step method of braising followed by quick browning in the oven, with enough liquid to prevent it from getting dry.  I've made this dish a dozen times, and it's a consistently easy hit among company.

First of all, this dish is greatly facilitated by a pressure cooker.  If you don't have one, a slow cooker might do the trick.  If you don't have that, maybe just a heavy pot.  And if you don't have one of those, you probably shouldn't be on this site.  To make this, I use picnic shoulder, but I've also used Boston Butt.  Either one is great, as it will have the right amount of fat to add to the very lean cooking method.  Don't get all crazy on me and put in a pork loin, or you will miss out on the flavor imparted by the fat which, if you do this right, is mostly cooked out in the process of slow braising.  An explanation is in the directions.

Pork carnitas, served simply with corn tortillas and black beans


Shredded Pork (Carnitas)

  • 2 16 oz cans of chicken broth
  • 1 lime, juiced, zest shaved first with zester or removed in large strips with a vegetable peeler
  • 1 large scallion, cut into 3 pieces
  • 3 garlic cloves
  • 4 pounds of boneless pork shoulder
  • 1 tbsp chopped coriander (cilantro)
  • 2 bay leaves
  • 1 tbsp cumin
  • Corn Tortillas
  • Chili sauce, such as Pico de gallo, chipotle or whatever you like

The setup.  It's a very short list, not hard to gather

Cut the pork meat in chunks and discard big pieces of fat, but leave some fat as it adds to the flavor.  Set a large pot or pressure cooker over mid-high heat.  Add the pork, garlic, lime zest, bay leaves, cilantro, cumin, green onion, juice from the lime, and broth.  I like to zest the whole lime into the pot and then just cut it in half and squeeze the mangled fruit juice right in there, making for easy cleanup.  If you prefer more tartness, add more citrus to your braising liquid.  Bring to a boil, reduce heat to low and simmer for about 3-4 hours or until the meat is very soft and pulls apart easily, or 1 hour for the pressure cooker.

Before simmering.  This is a really easy dish to get started, just throw everything in there and close it up.  Takes 5 minutes or less.

After simmering.  This meat is now incredibly tender and falling apart, so remove carefully

20 minutes before the stovetop portion is done, preheat the oven to 450 degrees F.  Remove the meat carefully and place it in a roasting pan, discarding the green onion and broth.  If you did this right, especially in the pressure cooker, the meat will fall apart, so you may need a slotted spoon.  Try to let as much of the liquid drain out as possible, which should contain a lot of the rendered fat from the pork.

Shred the pork with two forks, removing large bits of fat to lean it out some.  Drizzle some cooking liquid over and throw in the oven to crisp up

Grab two forks and shred the meat into bite-sized pieces.  As you shred the pork, it will be obvious where there are large lumps of unrendered fat.  You can pull these out and discard, making for a much more lean finished dish.  After you've shredded thoroughly, ladle back on about 1 cup of the cooking liquid from the pot, which you are welcome to run through a fat separator to avoid consuming the rendered fat.

After a few minutes in a very hot oven, the pork will develop an excellent crispy exterior without getting too dried out.  Don't leave it in too long.

Bake for about 20 minutes until the meat is brown and crispy.  Heat the tortillas and enjoy, serving with your favorite chili sauce, queso fresco, chopped onions, and cilantro.  Garnish with cilantro-lime rice, radishes, black beans, fried plantains, or whatever you like.

I had vegetarian friends over, so I added some pan-roasted vegetables with sofrito and vegetarian black beans

This dish also happens to freeze well, and has a number of leftover uses.  Put it over nachos, make it into a breakfast burrito, throw it in tacos, etc.  Basically, in the words of Jim Gaffigan, all you need is "a tortilla filled with meat, cheese, or vegetables", and you can recreate essentially any form of Tex-Mex food.  But at least with this recipe you know your dish will be a winner.

Tuesday, June 26, 2012

Holy Mole Poblano!

Apparently there's a Mexican tradition to cook a really heavy stew called mole (pronounced mole-ay) and then bring it to picnics, where you feed it to your relatives on a hot day and then they pass out from all of the blood rushing to their stomachs trying to digest it.  I think this is a tradition many of us can get behind, so I present you with a recipe for mole.

Mole is like a Mexican version of chili, or curry.  It's got a whole bunch of varieties, and it's more of a type of dish than a particular recipe.  There are all kinds of interesting versions, many of which I was able to sample at Red Iguana in Salt Lake City, UT of all places - a strawberry mole, an almond-based mole, pumpkin seed-based, red, green, pink, cream-colored, whatever you can imagine.  However, if you ask most people who have had it, they'll tell you that even the most iconic mole - a mole poblano - contains some very interesting ingredients, such as nuts, chocolate, chile peppers, and then some kind of protein.  It does not, contrary to popular belief, contain any moles.

Mole poblano - enough to fell a bull elephant

WARNING: this is another labor of love dish.  Do not attempt this if you're just bored and curious.  You will need time, energy, a few strange ingredients, a big kitchen, and a food processor to do it right.  What?  You're still going to attempt?  Fine, but I tried to stop you.

I will mention before presenting the recipe that I scaled this up by a factor of 5, to feed 9 people.  We ate half of what I made, and still felt full.  I ended up using less than 5x the olive oil (maybe 6 tbsp total), and only about 6 cups of stock to make it the appropriate thickness.  So keep that in mind as you make...


Mole Poblano de Pollo (Chicken in a Poblano pepper Mole sauce)
from: I have no idea where, somewhere on the internet

  • 3 tbsp olive oil
  • 4 chicken pieces, about 6 oz each
  • 1 onion, chopped
  • 2 garlic cloves, finely chopped
  • 1 hot dried red chili such as chipotle, or 2 milder dried chiles such as ancho, reconstituted & finely chopped
  • 1 tbsp sesame seeds, toasted, plus extra for garnish
  • 1 tbsp chopped almonds
  • ¼ tsp ground cinnamon
  • ¼ tsp ground cumin
  • ¼ tsp ground cloves
  • 3 tomatoes, peeled & chopped
  • 2 tbsp raisins
  • 1½ cups chicken stock
  • 1 tbsp peanut butter
  • 1 oz/25 g semisweet chocolate with a high cocoa content, grated, plus extra for garnish

So you want to make mole, huh?  Well too bad, you have to spend an hour prepping first.  If you're crazy like me, you started with whole spices, fresh tomatoes and whole chickens, and toasted and ground / peeled / cut them up, respectively.  To see how to peel a tomato, check my other post on chili here.  While you're doing that, soak your chiles in boiling water, then take off the stem and scoop out the seeds, and chop coarsely.  This will ultimately go in the food processor, so feel free to slack on the precision a bit with your chopping.

All of the more interesting ingredients, ready to go.  Chocolate and peanut butter are among them - my cousin said the kitchen smelled like Reese's peanut butter cups

Blanching the tomatoes to remove the skin

Peeled tomatoes, ready for action.  This was surprisingly simple.

Now you're ready to start actually doing things.  Heat 2 tbsp oil in a large skillet.  Add the chicken and cook until browned on all sides.  Really brown it, don't just make it yellow.  And certainly not black, either.  Be sure to have enough fat in the pan, and don't overcrowd.  I did mine in two pans, over about 3 batches each, but I also had 27 pieces of chicken to deal with.  Remove chicken pieces with a slotted spoon and set aside.

Browning the chicken in multiple pans keeps things moving without you overcrowding.  Cast iron is far superior here.


Add the onion, garlic, and chilies and cook for 5 minutes, or until softened.  Add the sesame seeds, almonds, and spices and cook, stirring, for 2 minutes.  Add the tomatoes, raisins, stock, peanut butter, and chocolate and stir well.  Add only as much stock as you think will be necessary for stewing the meat you're using - you don't want soup, this should be more like a curry consistency after you blend.  I found that placing each round of ingredients into separate areas helped to idiot-proof my throwing things casually into the pan without double-checking the recipe.  And, if you are hasty and didn't think to chop them up before adding, chop up the tomatoes somewhat with a knife or spoon while they're in the pan.  Season to taste with salt and pepper and let simmer for 5 minutes.

After cooking the onions, garlic and peppers, add the spices and nuts

Then things get really crazy - add the chocolate and peanut butter

Tomatoes could have gone in chopped, but I didn't think this through

Be sure to fill your pan dangerously full, so that stirring is nearly impossible and you make a huge mess.  Or don't.


Transfer the mixture to a food processor or blender and process until smooth.  Try to put a towel over the top so you don't spray mole all over your kitchen - it is best taken internally, not through the skin and clothes.

Into the food processor for a quick spin


Return the mixture to the skillet, add the chicken, and bring to a boil.  Reduce the heat, cover, and let simmer for 1 hour, or until the chicken is very tender, adding more liquid if necessary.  If you're impatient, bust out the pressure cooker and cook for 20 minutes.

Serve garnished with sesame seeds and a little grated chocolate.  We served with homemade tostones and platanos (both plantain dishes), Mexican yellow rice, and tamales.  It was an excellent traditional feast, and well received by everyone.  Slightly sweet, nutty, rich, and just a little spicy.  I also had tons of sauce left over, which I froze to use next time I want to make this.  If that's the case, all you have to do is brown the chicken and then throw it into the ready-made sauce.  And don't forget to bring it to your next family gathering - especially if you are being taken against your will.

Monday, April 2, 2012

Chicken Tikka Masala

I'll be the first to admit that I have no idea what I'm doing when it comes to Indian food.  But I've made one dish so far that's consistently good, and also fairly forgiving if you screw it up.  Chicken tikka masala, one of the more common dishes on Indian restaurant menus, is surprisingly easy to make, if you look past a possibly intimidating list of new ingredients.  But go to your nearest ethnic food store and you should have no problem finding all of these things.  And to those Indian people who cringe by my saying 'garam masala' because it's a spice blend that varies heavily from region to region (even from shop to shop) in India, I will respond by saying that I am not enlightened enough to appreciate the differences, and bow to you all as the kings and queens of the spice world.  But I do know about at least a few of the spices: I used a sweet paprika with a mild level of heat (not smoked), and I recommend getting whole seeds of cumin and coriander, then lightly toasting and grinding them yourself.  This will bring out a lot more flavor.

If you've got some kind of vacuum marinator, you can cut the prep time down significantly.  Again, this is a fairly forgiving dish.  Don't have long to marinate?  Just thread the meat onto skewers and grill after 30 minutes in the chill chest.  Chicken came out tough?  Just simmer it a bit longer in the sauce.  Ran out of plain yogurt?  Use something mild, like lemon or peach (I used this once, and it was fine).  It's actually really hard to screw up.


Marinade
  • 1 cup plain yogurt
  • 2 tablespoons lemon juice
  • 2 teaspoons ground cumin
  • 2 teaspoons ground red pepper
  • 2 teaspoons fresh ground black pepper
  • 1 teaspoon cinnamon
  • 1 teaspoon salt
  • 1 piece gingerroot, minced (1/2-inch long)
  • 1.5 lbs boneless skinless chicken breasts, cut into 1 inch cubes

Sauce
  • 1 tablespoon unsalted butter
  • 2 cloves garlic, minced
  • 1 jalapeno chile, minced
  • 2 teaspoons ground coriander
  • 1 teaspoon ground cumin
  • 1 teaspoon paprika
  • 1 teaspoon garam masala
  • 1/2 teaspoon salt
  • 1 (8 ounce) can tomato sauce
  • 1 cup half and half

For marinade, combine yogurt, lemon juice, cumin, red pepper, black pepper, cinnamon, salt and ginger in a medium bowl or food-safe plastic bag; stir in chicken, marinate in refrigerator 2-4 hours.

Get the chicken into your marinade (not marinate, that's a verb) and let it party down for at least a few hours in the fridge

Toss the ingredients together to make sure you get even flavor distribution

Skewer the chicken after it's been marinating.  Give it as long as you can stand to let the flavors get in there.

For sauce, melt butter in a large, deep skillet over medium heat, add garlic and jalapeno; cook 1 minute.  Stir in coriander, cumin, paprika, garam masala and salt.  Stir in tomato sauce, simmer 3 minutes, stir in cream; simmer until sauce thickens, then keep on low while meat is cooking.

This dish has a surprising amount of heat, which you can temper by replacing jalapenos with something milder

Saute in butter to get that creamy flavor you won't find with olive oil.
The sauce, after everything is incorporated

Meanwhile, heat grill to medium-high (or heat broiler).  Remove chicken from refrigerator.  Thread chicken onto skewers; discard marinade.  Grill or broil chicken, turning occasionally, until cooked through, about 8 minutes.  Remove chicken from skewers; add to sauce.  Simmer 5 minutes.  Serve with basmati rice, naan, or pita bread.

You don't need to cook these all the way through, just get some char flavor on them.  They finish in the sauce.
Tikka masala, served with basmati rice and spinach (saag)

LinkWithin

Related Posts Plugin for WordPress, Blogger...