Showing posts with label pasta. Show all posts

Monday, November 14, 2016

Pasta Con Le Sarde (Sicilian Pasta with Sardines)

*Updated cooking method (again) 3/30/2020

Sicily, where my family is from, is a land of conquests. The Moors, the Romans, Berbers, Arabs, Persians, Byzantines - pretty much everybody has tromped through Sicily at some point in time, and has left some kind of mark on the people and the food. I believe that pasta con le sarde, a traditional Sicilian dish featuring sardines and pasta tossed with unheard-of flavor combinations, is one such example of what happens when you get such a diverse international palate influencing a cuisine. In this case, it's a Mediterranean cuisine, meaning you get to take fish and try to mix a bunch of flavors together. If you've ever experimented with cooking fish, you know that random flavors can often ruin a fish dish. I couldn't name any other dish that would combine raisins, saffron, fennel, and two kinds of salty preserved fish, but somehow this mix creates an incredible burst of salty and sweet, lightly perfumed, slightly floral, bizarrely colorful, and both crunchy and velvety from the mix of fried bread crumbs and silky pasta that's tossed quickly with its own cooking liquid. The closest thing I can think of to this dish would be a massaman curry, drawing again from influences of the Muslim / western world to work this into the existing (Thai) culture. But in many ways, this dish stands completely alone, and for that I have deep respect in a sea of pasta dishes that is Italian food.

Drawing from a rich supply of fresh fish, this recipe is probably spectacular with fresh sardines caught that day. But since most of us can't get that, I recommend that you invest in a couple of tins of very high quality sardines packed in olive oil. Tonight we used some from Portugal, and at $4-5 per box, it was totally worth it. Even if you don't splurge, at least be sure to get fish in pure olive oil, not a tomato sauce or water.

The dish traditionally calls for bucatini - a thin tube-like pasta - but we've done it both with this and with pappardelle. Both versions are shown in the photographs. I would strongly recommend a bronze die-cut bucatini as the pasta of choice, though, which will hold the sauce best.

Monday, February 15, 2016

Lasagna-stuffed spaghetti squash: a fun alternative

If you're looking for a way to take something totally unhealthy and turn it into something only mildly unhealthy, then look no further! This recipe converts the standard lasagna into one that uses spaghetti squash, a fun winter squash that pulls apart into threads (not unlike spaghetti) once sufficiently cooked. It may leave you wanting a bit, given the lower calorie count, but at least you won't hate yourself as much later that night. Plus, it's incredibly fun to eat.


Wednesday, September 10, 2014

Pasta alla Norma

Many years ago I traveled with my family to our homeland of Sicily to see where the family was from.  We toured around the island, tracking down birth certificates and marriage licenses.  It was an amazing trip, punctuated with unforgettable meals.

Sicilian food isn't the same heavy cuisine as the northern parts of the country; instead, the food of the island represents a melting pot of influences and a culture that has thrived on meager existences.  This classical dish, pasta alla norma, took us by surprise at how much flavor was packed into such few ingredients, cooked just barely enough to bring out the essence of each one.  I think that this dish could represent the humble beginnings of tomato use in Italy, coming over from the Americas and passed by the Spaniards to the Italian islanders.  In the beginning, tomatoes were often barely cooked rather than being pureed into sauces, and were often tossed with some form of grain and maybe a couple of other vegetables.  So this dish is essentially a trip backwards in time through the history of the Italy's "golden apple".


I present a very classical recipe, not unlike ones I found by Mark Bittman and Mario Batali.  You can plate this however you like, but I relish the crudeness of the ingredients and prefer to serve this as large bites of everything, an homage to the basic vegetables that would go on to form the much more eloquent language of an entire cuisine over the centuries.

Saturday, July 5, 2014

Chickpea, Sausage, and Kale Pasta

I was skeptical of this dish at first - it seemed like it might be chalky or dry given the chickpeas mixed with pasta.  But using dried chickpeas instead of canned gives this a wealth of surprisingly fresh flavor, and the mixture of cheese and a snap of lemon juice really gives this dish a lot of energy to complement the inherent deliciousness that is spicy Italian sausage.  I felt like I had done something productive with my night after eating this, and didn't slip into the usual food coma.

Digging around online, I found a very similar recipe to this one from Martha Stewart by Mark Bittman, who instead of Italian sausage uses chorizo, and instead of pasta uses bread crumbs.  He cooks the chickpeas for a more significant amount of time, more like 10 minutes instead of 3.  I might try this variant next time, plus this dish would probably be equally delicious just substituting chorizo for Italian sausage.

Let me implore you to use dried chickpeas in this dish.  Canned chickpeas taste like a whole lot of nothing now that we've tried both fresh and dried, which are staggeringly close to each other in flavor after the dried peas have been soaked overnight.  They're cheaper than canned, they're easy to find almost anywhere (check the latin or Indian section of your store), they have less salt, and they're generally superior.  At the very least, buy a test bag and soak a few overnight, then eat them raw.  If you don't switch over after eating one, I will be amazed.


Saturday, February 8, 2014

Italian Braised Pork Ribs with Tomatoes

Tired of your average BBQ ribs?  Looking for something new?  Search no further, I have the answer for you!  Trust in the Italians, those masters of piquancy and lovers of all things tomato (even though European explorers discovered tomatoes here in the Americas in the 1500s and introduced them to Italian cuisine only 600 years ago, but that's not the point).  There is a Roman dish called Italian Country Style Ribs, which I pull from the book Roma: Authentic Recipes from In and Around the Eternal City.  Don't worry, I looked at the reviews and you're not missing anything by not running out to purchase this book.  Let me rework this recipe that was reposted anyway, and you'll reap the rewards without trying to chase down the book.  I have modified it to avoid the use of the oven, and instead rely on my favorite of cooking methods - the pressure cooker.  If you are scared of the pressure cooker, first, shame on you, and second, you can bake at 350 F and wait around for dinner, and think about what you could be doing with those extra 2 hours of your life if only you were more courageous (I'm looking at you, Mom).


Italian Country Style Ribs with Tomatoes
From Roma: Authentic Recipes from In and Around the Eternal City


  • 1/4 cup olive oil
  • 3 pounds country style ribs
  • salt and freshly ground black pepper
  • 1 28-ounce can Italian plum tomatoes with purée or juices
  • 1 medium yellow onion, chopped
  • 1 medium carrot, diced
  • 1 rib of celery (with leaves), diced
  • 2 cloves garlic, minced
  • 1 teaspoon dried rosemary (or 1 tablespoon fresh)
  • 1 teaspoon sweet paprika
  • 1 bay leaf
  • 1/2 cup dry red wine
  • parsley, for garnish


Pat ribs dry with paper towel and season on both sides with salt and pepper. Heat olive oil over medium-high flame in a heavy cast iron skillet. Brown the ribs well on both sides, turning them a couple/few times, about 10 minutes total. Avoid crowding them in the pot. Meanwhile, pour tomatoes into a bowl roughly chop them.


Transfer ribs to a plate and reduce heat to medium. Add onion, carrot and celery to pot and cook for 5 to 6 minutes, stirring frequently to avoid burning. Stir in garlic, rosemary and paprika and cook until fragrant, about 45 seconds. Add wine, scraping up any brown bits, and cook until it’s almost evaporated, about 3 minutes. Dump all of this into your pressure cooker along with the ribs and any accumulated juices, arranging them in a single layer as much as possible. Pour chopped tomatoes and their juices over the ribs, working them in around the meat with a wooden spoon. Tuck the bay leaf into the tomatoes. Seal the pressure cooker, or, if you're baking, cover the pot you're baking in and transfer to the oven.


Braise ribs until very tender, 40-50 minutes for pressure cooker or 2 to 2-1/2 hours in the oven, carefully turning them about halfway through the cooking process if you're baking. Transfer ribs to serving platter as best you can - they may fall apart, as mine did. Serve with the sauce, over pasta such as penne, rotinin, or farfalle. Garnish with parsley, and have at it.


Sunday, January 19, 2014

Jambalaya Pasta

What do you do when you have a single andouille sausage, some cooked pasta, a big bag of okra, and a few leftover ingredients from making gumbo?  Probably nothing, maybe a sausage sandwich.  But I figured I'd throw everything in the fridge together to make a 'jambalaya pasta', which borrows the spirit of jambalaya but combines some other European flavors.  It's really a flamed tomato cream sauce pasta with a few other key ingredients added for good measure, but this turned out much better than I had hoped.


Jambalaya Pasta
by me
  • 1 tbsp canola or light olive oil
  • 1 shallot, sliced thinly
  • 1/2 red bell pepper, diced
  • 1 clove garlic, minced
  • 1 andouille sausage, casing removed
  • 1/4 cup heavy cream
  • 1 cup diced tomatoes
  • 2 cups cooked pasta (I used campanelle)
  • 1 cup okra, sliced
  • 1 tbsp brandy
  • salt and pepper, to taste,
  • file powder, tableside
  • 1 tsp chopped parsley, for garnish
Some (not all) of the ingredients.  Sorry, it was an evolving recipe.  But everything is in the list above.

In a heavy saute pan, heat oil over medium heat and crumble in sausage, breaking up into bite-sized chunks and stirring with a wooden spoon until nicely browned.  Remove to a plate, and reduce heat to medium-low.  Saute shallot and bell pepper for 2 minutes until shallot is translucent, and then add garlic and saute for 30 seconds longer.  Add tomatoes and okra and stir to combine.  Pour in brandy and allow to incorporate into the mixture for a few minutes - this will bring out aromatic compounds in the tomatoes that you can't get any other way.

Add cream, bring to a simmer, and reduce to low and cook for a few minutes longer.  When sauce looks to be at the correct thickness, season to taste, and add in the cooked pasta.  Toss to incorporate.

The only picture that emerged during the cooking process.

To serve, plate immediately and sprinkle parsley on top.  Pass a small bowl of file powder at the table.

Plated pasta, pre-file garnish.  Don't skip that, it's got great flavor

Monday, September 2, 2013

Chicken Riggies

Update 12/24/2018: after making this dish again from my own recipe, I have realized that I am now a bit smarter about the process. So I updated to remove a couple of unnecessary ingredients and fix the method to be better all around.

Since the dawn of homo sapiens, when we first stood tall, emerged from our caves, and embarked on the great human experiment, we have begun to seek the answers to the great questions in life.  "Why are we here?  Do we have a purpose in life?  And what, really, is a riggie?"

Well, at long last one of these questions can be answered.  A riggie, coming from the Italian word "rigatoni", which in turn translates as "tube of extreme deliciousness" in a language I have not yet heard of, is a dish coming from the Utica / Rome area of upstate New York.  Only there would you take a tomato cream sauce, not unlike a vodka tomato sauce, but instead add both sweet and hot peppers, as if you were about to slather this stuff onto a cheesesteak or a hotdog, before going ahead and throwing in a few select proteins to toss with your pasta as originally planned.  The first time I encountered this dish was in Lansing, NY at Rogue's Harbor brewing company, who serves this under a section of NY state specialties.  I wish I could personally extend my thanks to the great man or woman who, on what must have been a very cold, somewhat alcohol-fueled night, decided to turn an otherwise classy, rich dish into a slightly less classy yet unbelievably satisfying assault on the senses.  Sweet, tart, velvety, warm, and hearty - a perfect meal for pulling the kids out of the snow, sloshing into wooden bowls, and mowing through by a roaring fire while you warm your bones.


I tried this dish from a recipe I dug up online few years ago with limited success - things just didn't come together, and the flavors weren't right.  The sauce broke, it wasn't the right mouthfeel, and it just lacked that well-rounded flavor that I was expecting.  But now, after a few more years of cooking and recognizing some flaws in the original recipe, I believe I have tweaked it into something altogether better, maybe suitable for entering into "Riggiefest", which I swear I am not making up.


Chicken Riggies
from various sources, fused together by me

  • 1 tbsp olive oil
  • 1 tbsp butter
  • 4 cloves garlic, minced
  • 8 tablespoons minced shallot (3 medium) or 1 small onion, minced
  • 1.5 pounds skinless, boneless chicken breast meat
  • salt and pepper to taste
  • 1 (4 ounce) jar sweet red peppers or cherry peppers, drained and julienned
  • 3-4 ounce jar hot banana peppers or cherry peppers, drained
  • 1/2 cup fresh tomato sauce
  • 2 tbsp dry sherry
  • 10 pepperoni
  • 4 ounces heavy cream
  • 8 ounces uncooked rigatoni pasta
  • Grated parmesan (optional), for plating
  • Minced parsley (optional), for plating
Prep your setup.  Get the shallots and garlic minced and together in a small bowl.  Go for shallots instead of onions - live the dream.  It does make a lot of difference.  Cube the chicken into bite-sized pieces, about 1" to a side.  Not so small that they won't hold up in what is essentially a stew, and not so large that you have huge hunks of flesh floating around in there.  Chop up your peppers, which should be equal parts sweet and hot (hence the bold to differentiate above).  You could use roasted red peppers, but I prefer sweet cherry peppers.  For the hot, what I originally had and still prefer most is hot banana pepper rings, although you could use hot cherry here and roasted red for the sweet.  Whatever suits your taste, but keep the ratios the same.

In a large cast iron saucepan, heat oil and melt butter over medium heat.  At same time, start boiling water for your rigatoni. Add the garlic and shallots to the pan and saute until soft, then add the chicken, season with salt and pepper to taste, and saute for 8 to 10 minutes, or until halfway cooked. Don't brown the meat, just keep stirring until it's no longer pink.


Add peppers and stir in tomato sauce, reduce heat to low and simmer about 10 minutes. Now start cooking your rigatoni.  Back in the main pan, add the sherry and simmer for another 10 minutes.


Add the pepperoni and the heavy cream, and cook for 5 minutes. Do not use anything lighter than 'light' whipping cream - no half-and-half, no whole milk mixed with cream, nothing like that.  If you try to add anything but actual cream, this sauce will break, forming little fat bubbles separated from a watery mess.  So don't think that you can come up with a low-fat substitute for this - I've already tried, plus I cut the fat down in the first step, which originally called for double the amount of oil and butter.


When the pasta is just barely al dente, if not slightly before, set aside about a cup of the cooking water, drain the pasta, and immediately toss it into the sauce. Toss this together to finish cooking the pasta for 1-2 minutes in the sauce, adding in a few tablespoons of the reserved rigatoni cooking water to thicken and help the sauce cling to the pasta. Feel free to add more of the water if the sauce is still too thick, but not so much that it will become loose again.


After adding the cornstarch, observe how thick this is.  This picture from an earlier attempt.

To serve, plate into bowls, possibly with shredded parmesan, and top with finely minced parsley.  I took mine plain.  Try to find something healthy as a side, like a salad or something green.


Thursday, May 23, 2013

Fettuccine with Black Garlic and Blue Cheese


I'm calling it right now, like I did about chipotles roughly ten years ago, but now I have a blog to use as my own personal stenographer:

Black Garlic.

This stuff is going to be everywhere soon.  Haven't heard of it?  Good, that means I beat you to it.  But you're about to find out about it, so steady yourself.

Many foods have been fermented over the years.  Pepperoni.  Cabbage.  Beer.  Some other things that tend to smell funny when fermented, like shark and peanuts (not kidding, look them up).  And now, garlic.  Apparently in 2004 some Korean dude figured out that if you expose garlic to high, humid temperatures, you can get it to ferment into something unbelievably delicious - kind of like a cross between the best roasted garlic you've ever had, balsamic vinegar, and fermented black beans, if you've ever tried those in lobster sauce.  It has something to do with the sugars in the garlic, and amino acids, and all kinds of chemistry that only a few people seem to have figured out, due to the "carefully controlled process" that this Korean guy worked out when he set up BlackGarlic.com and took his product commercial (see black garlic: how it's made).  So this isn't some naturally occurring thing - it's a new discovery, and you've got to get it from this guy, or one of his competitors.  But trust me, it's worth it.

Black garlic.  What?

I was given a small tub of this by my excellent mother about a year ago, and tried to figure out what to do with it.  And it took so long, about a year later I thought "maybe this needs to be thrown out".  But then I realized it's basically gone as bad as it's going to get, and gave it a shot.  So glad I didn't toss it - this was more delicious than any garlic I've ever eaten, and if it's stale at this point, then I can't even begin to imagine what the fresh stuff tastes like.  Picture if everything savory in the world just jumped into your mouth at once, dripping with garlic and tamarind-like flavors, in a small black morsel the size of a Hershey kiss and the consistency of a roasted beet.  That's black garlic.

Because it was so delicious, I wanted a recipe that would do it justice, not overpower, and allow the flavor to come through distinctly.  So I went with a simple pasta that also uses the pungency of blue cheese, but very little else, to showcase the garlic.  Amazing use of the stuff, and I can't wait to make it again.


Fettuccine with Black Garlic and Blue Cheese
modified slightly from suddenlunch.com


  • A slice of great bread, coarsely crumbled (about 4 tbsp, I used rosemary olive oil bread)
  • 1 tbsp of olive oil, or black garlic-infused oil
  • 9 ounce package of refrigerated fettuccine, or tagliatelle
  • 6 oz blue cheese, crumbled
  • 1 more tbsp of olive oil
  • 5-6 cloves black garlic, coarsely chopped
  • Freshly ground black pepper

The setup is really easy

Toss the breadcrumbs with 1 tbsp oil in a small bowl.  Over medium heat, cook the breadcrumbs until crispy, shaking often.  You could also bake these if you like.

Dry-frying the breadcrumbs gets them delicious and crispy

Chop or crumble the cheese and mix together most of it with the chopped garlic and the second tbsp of oil.

Cook the pasta according to instructions on the package.  Set aside about 2 ounces of the cooking water, then drain the pasta.  Now toss together the pasta and the blue cheese mixture in a pan, adding the reserved cooking water as necessary until you have a light sauce.


Taste and season with ample amounts of freshly ground black pepper, then stir in some of the crisp crumbs and top the pasta with the rest, as well as the rest of the blue cheese crumbles.  Serve immediately.


Variations: add sliced, pan-seared chicken breast, add chopped chives as additional garnish

Monday, March 25, 2013

Orecchiette with Rapini and Goat Cheese

I finally got around to making this pasta dish with broccoli rabe and goat cheese, showcasing the unique shape of orecchiette pasta.  You may not have heard of orecchiette before, but it's heard of you.  That's a joke, because orecchiette translates as 'little ears' based on their crazy shape.  Only Italians might get that joke, and they're usually not very impressed with it.  Let's move on.

This is orecchiette, pronounced "ORE-EH-KIET-EY":

Dried orecchiette, or 'little ears'

And this is broccoli rabe:

Broccoli rabe, known also as rapini

Broccoli rabe, aka rapini, aka broccoletti, is another less common ingredient, incredibly bitter when raw, but delicious when cooked properly.  From the brassica family, it is similar to broccoli in that it has tightly bunched clusters of green buds, but it is not at all the same plant.  It is much more closely related to a turnip oddly enough, but also related to one of my favorite plants, rapeseed.  You may know rapeseed by another name given by the food industry to stop scaring off potential consumers: canola (actually, it's an acronym for a modified rapeseed breed - CANada Oil, Low Acid).  Anyway, in Italian cuisine, broccoli rabe is often slowly sauteed with garlic over low heat, though in this recipe we're going to do the more universally accepted blanch and quick saute method.  Read on to figure all of that out.

I have concluded that this recipe is inspired by the Puglia region of Italy, as based on the overlap in ingredients presented in this dish being used there.  If anyone knows otherwise, please correct me.  I found the dish to be simple to prepare, bursting with the almost nutty flavor of the browned garlic and a mild sweetness from the blanched and quickly sauteed rapini.  The tang of the lemon zest and the earthy creaminess of the goat cheese really rounded out the dish nicely, and I thought it did a great job of smacking all of my taste buds around.

It's worth noting that finding orecchiette was somewhat of a challenge, and required going to a couple of specialty stores.  This actually held me up for multiple months, as I kept checking the pasta section of my standard megalomart hoping to find them with zero success.  It was a similar story for rapini - it's hard to find out of season, which I guess would be late summer in most parts.  Check Italian stores for dried orecchiette, and Asian markets for rapini.


Orecchiette with Rapini and Goat Cheese 
Modified from Saveur

  • Kosher salt, to taste
  • 1 bunch rapini (about 1 lb.), roughly chopped
  • 3 tbsp. extra-virgin olive oil
  • 6 cloves garlic, crushed
  • ¾ tsp. crushed red chile flakes
  • 12 oz. orecchiette 
  • 2 tbsp. lemon zest (from 2 lemons)
  • 4 oz. goat cheese, softened

The setup - a short list, but all very interesting ingredients

Bring an 8-qt. pot of salted water to a boil.  Add rapini and boil until crisp-tender, about 2 minutes.  Why not just saute and call it a day?  Because if you don't break down the bitter compounds in there first and leach them out into the cooking water, you'll end up with something that's thoroughly inedible.  Blanching (quickly boiling to partially cook the vegetables) first will mellow out the flavors quite a lot.  Using a slotted spoon, transfer rapini to a large bowl of ice water to shock (immediately stop cooking process and preserve bright green color).  Reserve boiling water for cooking pasta.  Drain rapini, pat dry, and set aside.

You have to shock the rapini after boiling, or they will keep cooking and turn grey, as well as become lifeless.

Once that step is done, heat the olive oil in a 12" skillet over medium heat.  Add the garlic and cook, stirring occasionally, until golden, about 3 minutes.  I cooked my garlic a bit more than usual, adding a bit of a nuttiness and subtle bitterness that I thought played off of the now mellowed rapini quite well.  Add the chile flakes and cook, stirring frequently, for 30 seconds.  Add the rapini, toss, and remove all contents from the pan to a plate.

Saute the garlic until starting to brown
Toss the rapini in your chile infused garlic-oil mixture

Meanwhile, add the pasta to the boiling water used for the rapini and cook until al dente, about 10 minutes.  Drain pasta, reserving about a cup of the boiling water for the next step.

Reheat the skillet to medium-high heat, and transfer in the rapini mixture, pasta, and lemon zest.  Toss quickly to combine, and season with salt.  If the pasta is too dry for your taste, add a tiny amount of the boiling water to the dish and quickly stir, to give body to the dish.  I didn't do this, and loved it more on the sauceless side.

Quickly zest the lemon over the pasta

Divide pasta between bowls and add a dollop of goat cheese to each.  Serves 4 as a main dish.  Add shredded roasted chicken if you absolutely have to, but I don't think this dish requires any meat to be stellar.


Monday, December 3, 2012

Fettuccine with Pesto and Summer Squash

Okay all, here's a quick and easy recipe I think I came up with a while back, trying to find a use for some zucchini.  If you're like me, every summer you end up with too much of the stuff, and you're desperately trying to find a way to use it.  And you can only grill so much of it before you want to gag, so you start looking for new and creative ways to give it different flavors.  This one uses a pesto and ricotta cheese to give it both a sweet creamy texture as well as that pungent herb taste, and it comes together incredibly fast.  If you got really crazy you could make your own pasta or pesto, but for this one I'm using store bought ingredients (although they were both fresh, not dried or canned).  This dish is arguably similar to this one which I posted last year, but with a lot more flavor going on, and a few more ingredients.  It is also distinctly non-vegan, for those of you who live by that code, whereas the other one might have been.


Always on the lookout for good uses of squash - this one hit the mark

Fettuccine with Pesto and Summer Squash

  • 1 pint (2 cups) fresh zucchini or other summer squash
  • 2 tomatoes
  • 1 small onion, diced
  • 2 cloves garlic, minced
  • 2 tbsp olive oil
  • 1/4 pound fettuccine, dried, one 1/2 pound container of fresh fettuccine from the refrigerated section, or equivalent volume homemade pasta
  • 4 ounces pesto
  • 1/4 cup ricotta cheese
  • salt and pepper to taste

Peel your tomatoes by blanching in a large pot of hot water (check here for detailed instructions).  Reserve the hot water for boiling your pasta - you can use that water again, making this more time efficient.  After shocking in ice water, coarsely chop tomatoes and set aside.  Chop the zucchini into bite-sized pieces, no larger than 3/4" to a side.  If using dried pasta, begin to boil now and follow package instructions to cook until just shy of al dente - maybe 30 seconds short of done.  If using fresh, read on.

Prep your ingredients - I used local mini squash, which have less bitter seeds

Heat olive oil in a large skillet over medium heat.  Add the zucchini and cook until starting to brown, then shake / flip and cook other side.  When you flip the zucchini, add the onion, and stir around to saute lightly.  Saute the garlic for just a few seconds.  If using fresh pasta, add to pot of boiling water now, and cook for the 60-90 seconds recommended by the package, or whatever you feel comfortable with for homemade.  

Back in the skillet, lower heat to medium low, add the tomatoes with any juice that may have accumulated, and cook for 30 seconds.  Add the pesto and stir to combine, and keep warm.  Drain cooked pasta, reserving up to 1/4 cup of the cooking water, and add pasta to the sauce.  Stir to combine, adding water a little at a time as needed to reach the consistency you like.  The starchy water will help partially thicken the dish while creating more of a sauce, as well as help finish the pasta (which you cooked to NOT QUITE al dente, right?) by cooking it in this sauce.

Toss the sauteed vegetables with the pesto and partially cooked tomatoes.  Don't keep the heat on too high at this point or you'll lose some of the subtlety

To serve, plate pasta into 2-3 servings, and garnish each with 2 tbsp of ricotta cheese.  If you want to get crazy, add a chiffonade of basil threads (see Wikipedia for a nice picture of this).  Eat it, love it, feel good about yourself for eating healthy.


Sunday, March 11, 2012

Beef Stroganov

I had some friends in town and decided to make this recipe, which I'd been saving for a while.  It was a lot of fun to make, because it involved some of my favorite things - fire, large hunks of meat, steam, and cast iron.  Taken out of context, this might mean I'm either ready to wage war or check myself into a ward, but at least in the kitchen this makes sense.

I did a bit (translated: 4 seconds on Wikipedia) of research on this dish, and discovered first that it should probably be called Stroganov, and not Stroganoff, because it's most likely named after the Russian family of that name, and therefore giving it the French spelling with the 'ff' is pretty much a slap in the face to this family, and might kick off another Cold War.  The dish is typically a meat stew, either beef or chicken, served commonly in a creamy, dairy-based sauce, and either over rice or pasta.  Somehow the recipe has been embraced by Iran, England, Japan, China, Sweden, Portugal, and a few others, though of course it's different in each country.

Though the dish in America typically calls for sour cream, it turns out that the Russians use their own, more epic soured cream called smetana, which is apparently richer and won't curdle, which can't be said for my light sour cream.  But alas, I was not able to find this in the grocery store, nor did I actually look for it.  The flavor and mouthfeel came out just fine, in my ignorant taste buds' opinion.

If you look up the original recipe I stole (which you shouldn't, it's more boring), it doesn't call for actually lighting the onions on fire.  But my version ended up receiving much fanfare, and produced amazing smells from sauteed onions that I had to resist eating right out of the pan.  So if you are bold, I recommend a bit of flambe when you make this.

Nothing says cooking like the imminent threat of destroying your home.

Beef Stroganov
mostly liberated from Tyler Florence, with adjustments
  • 5 tablespoons olive oil
  • 4 (5 to 6-ounce) London broil, cut into 2-inch cubes
  • 1 1/2 cups finely chopped onion
  • Salt and freshly ground black pepper
  • 3 sprigs thyme
  • 3 tbsp cognac or brandy
  • 1 cup dry red wine
  • 1 1/2 cups beef broth
  • 3 tablespoons unsalted butter
  • 3 cloves garlic, chopped
  • 1/2 pound fresh shiitakes, stems discarded and caps thinly sliced (about 2 cups)
  • 1/2 pound white mushrooms, trimmed and thinly sliced (about 2 cups)
  • ¼ cup sour cream, plus more for garnish
  • 1 tablespoon Dijon mustard
  • 2 tablespoons chopped fresh parsley leaves, plus more for garnish
  • 1 package egg noodles

Pat the beef dry and season it with salt and pepper.  Heat 3 tablespoons oil in a large heavy bottomed skillet over high heat.  Fry the meat in batches so that it is browned on all sides, placing on a plate if using a regular pot, or transferring to the pressure cooker if you are using it.  Lower the heat to medium and, if not using a pressure cooker, return all the meat to the pot.  Add the onions and cook until they are soft, about 5 minutes.

We've been through the discussion about not crowding the pan before, but again, this is all you want in there at at one time, to encourage browning rather than 'steaming' your meat.  This cut was labeled "London Broil", which in fact is not a cut but a style, and which was in fact a very lean cut of top round requiring extended braising to coax out any tenderness and impart the flavors we wanted.

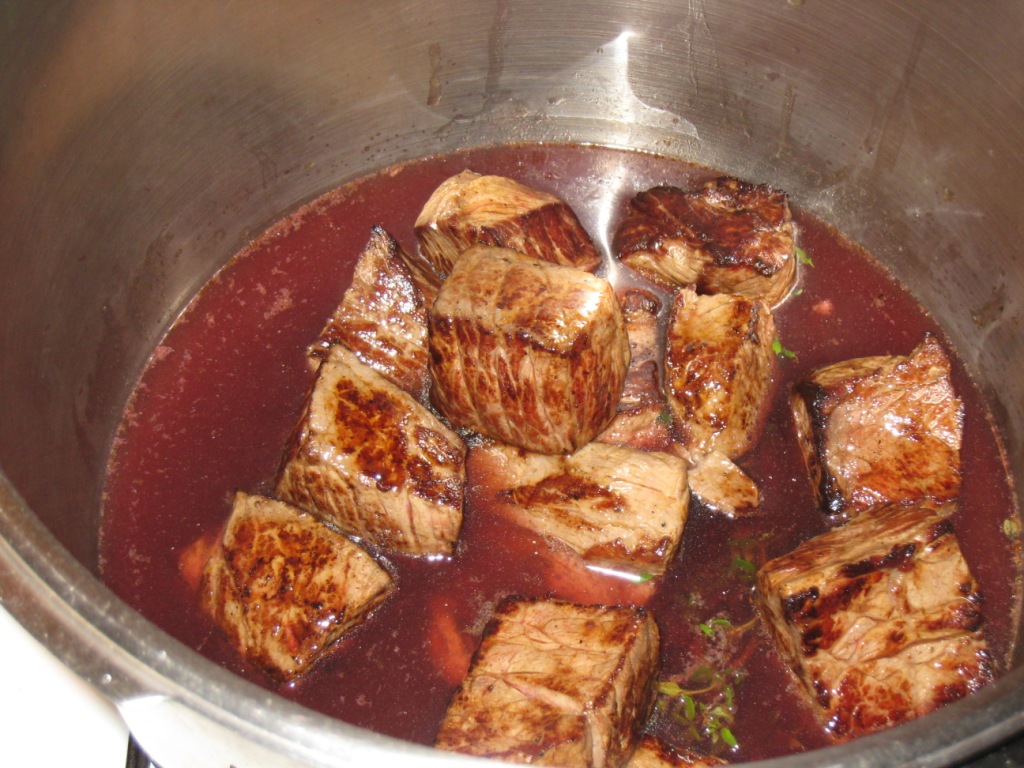
Look - nicely browned due to the Maillard reaction, good flavor bits on that meat, and not totally cooked through until you put it in the pressure cooker.  Without this step, the meat will taste much more bland.

Now carefully, pour in the cognac and flame until alcohol cooks off.  You may consider turning off the stovetop before you do this, at the risk of screwing up and losing your arm hair, although if you are a woman maybe this isn't such a bad thing (though you didn't hear it from me).  You can either tilt the pan to expose the vapors to the stovetop flame, or better yet, use a long fireplace starter to ignite remotely.  Cook, shaking if you wish, until the flames die out.  If the flames reach your ceiling, please contact the distributor of your alcohol for a full refund on the price of your home.  A good safety guideline is to have a tight-fitting lid for the pan at the ready, to smother the fire if it gets out of control.

Adding the brandy, seconds before the action shot above.  Disregard my complete unpreparedness - no lid, no fire extinguisher, just a spectator with a camera and a beer in his other hand.  I think I hear the Allstate guy.

Once the onions are properly flamed, add the beef stock and red wine, or transfer to the pressure cooker and add everything to that.  Cook, partially covered, over a very low flame for 1.5 - 2 hours, or in a pressure cooker for 45 minutes.  Towards the end, start boiling a large pot of water for the noodles.

Fully browned meat, hanging out in a trench of red wine before its timely demise in the grip of my pressure cooker


In a large skillet over medium heat, melt 3 tablespoons butter in the remaining 2 tablespoons olive oil.  Add the mushrooms, garlic, and remaining 3 thyme sprigs and cook until the mushrooms are browned and cooked through.  Remove from heat and set aside.

For a bit of variety and some more interesting flavor, don't skip on the shiitake mushrooms.

As you cook these, they will soak up the fat in the pan and then eventually let it go if you cook them long enough.  Keep stirring over medium-high heat, and they will eventually brown and become delicious.  They shouldn't 'squeak' when you're done.


Boil egg noodles according to package directions.  Drain and have ready to plate.

When the meat is done, remove it from the heat and fold in the mushrooms, sour cream, mustard, and parsley.  Taste and adjust the seasoning with salt and pepper.  Serve stroganov with buttered noodles and a green vegetable of your choice.

The final setup

Add the mushrooms, sour cream, parsley, and mustard off the heat

The finished dish, served with asparagus over egg noodles.  High marks from all.

Thursday, January 12, 2012

Mushroom Bolognese

This dish is an interesting twist on a standard bolognese, which is usually made with beef.  Don't be fooled - this isn't even a vegetarian recipe.  It's got ground pork, rendering it unsafe for both vegetarians and people keeping kosher.  I consider it a gateway dish to a carnivorous lifestyle - take the meaty flavor of mushrooms, and introduce some pork in there.  Kind of like using electronic cigarettes to get started on smoking.  Anyway, it's another recipe poached from Cooking Light, so at least it's fairly healthy.  Having a food processor will save you a few minutes; using a meat grinder instead of just buying ground pork will add them back.  And of course, since I refuse to learn my lesson, making your own pasta will tack on another hour or two.

Mushroom (and pork) bolognese


Mushroom Bolognese
from Cooking Light, October 2010

  • 1/2 ounce dried porcini mushrooms (I used a mix of wild mushrooms)
  • 1 cup boiling water
  • 1 tablespoon olive oil
  • 2 1/2 cups chopped onion
  • 3/4 teaspoon kosher salt, divided
  • 1/2 teaspoon freshly ground black pepper, divided
  • 1/2 pound ground pork
  • 8 cups finely chopped cremini mushrooms (about 1 1/2 pounds)
  • 2 tablespoons minced garlic
  • 2 tablespoons tomato paste
  • 1/2 cup white wine (I use dry vermouth)
  • 1 (14-ounce) can whole peeled tomatoes, undrained
  • 1/4 cup whole milk
  • 10 ounces uncooked whole-wheat spaghetti
  • 1 tablespoon kosher salt
  • 1 1/2 ounces Parmigiano-Reggiano cheese, grated
  • 1/4 cup chopped fresh parsley

Combine porcini and boiling water in a bowl; cover and let stand 20 minutes or until soft. Drain porcini in a colander lined with a paper towel over a bowl, reserving liquid. Rinse and chop porcini. Chop your button mushrooms and onions separately, and have everything ready.

Still looking for opportunities to use the food processor.  I got an uneven cut on these, but it worked out okay

This is the bulk of what you need to make this dish, plus some tomatoes, wine, and milk

Heat olive oil in a Dutch oven over medium-high heat. Add onion, 1/2 teaspoon salt, 1/4 teaspoon pepper, and pork; cook 10 minutes or until pork is browned, stirring to crumble pork. Add cremini mushrooms, garlic, remaining 1/4 teaspoon salt, and remaining 1/4 teaspoon pepper; cook 15 minutes or until liquid almost evaporates, stirring occasionally. Add porcini; cook 1 minute. Add tomato paste; cook 2 minutes, stirring constantly. Add reserved porcini liquid and wine; cook 1 minute, scraping pan to loosen browned bits. Add tomatoes; bring to a boil. Reduce heat; simmer 30 minutes, stirring occasionally and breaking up tomatoes as necessary. Stir in milk; cook 2 minutes.

Brown the meat.  I might use cast iron next time

After cooking the button mushrooms, add the chopped rehydrated porcini.  I used a mix of wild mushrooms

The mixture, after simmering for 30 minutes but before adding the milk

Cook pasta according to package directions, adding 1 tablespoon salt to cooking water. Drain. Toss pasta with sauce; top with cheese and parsley.


LinkWithin

Related Posts Plugin for WordPress, Blogger...