Showing posts with label Thai. Show all posts

Sunday, March 6, 2016

Jungle Curry (Kaeng Pa) // The virtues of obscure ingredients

When we went to Thailand, our travels through the northern part of the country landed us at a great cooking school in Chiang Mai. Here, we learned about the difference between northern Thai food, influenced heavily by other cultures and their significant distance from the coast, and southern Thai food, flavored heavily with coconut, fiery chiles, and plenty of fish. In the north, pork reigns supreme, and an interesting curry dish has emerged - jungle curry, known most notably for its absence of coconut milk from the sauce. Drawing on the other flavors of the countryside - fermented fish sauce, lime leaves, palm sugar, and a pungent red curry paste - mixed with chicken broth, it is a very enticing, filling, and yet surprisingly healthy alternative to the usual cholesterol-laden curry dishes from Bangkok and parts south. We cooked a decent version that day, which we carried home with us.

Fate being the cruel mistress that it is, we tried to replicate this dish following that recipe multiple times, to no avail. I tried making my own curry paste, finding different vegetable mixes to add, making Thai-infused chicken stock, buying a can of green peppercorns, and even growing my own kaffir lime tree to get things right. Nothing worked. Disgusted, embarrassed from one too many hosted dinner party failures, and on the verge of a breakdown, we tried one last time last night, with a careful eye on the exact ingredients called for.

The results were astounding. Somehow this dish rocketed from the bottom of our Thai repertoire to near the top, for a few reasons - it's healthy, it's easy, it's delicious, and it's exotic. This is the only dish I now make that has two very specific ingredients, which we had to learn (painfully) not to substitute for others. We didn't even have to make our own curry paste for this, just used the cans and it came out great. Still in shock, we may make it again tonight just to confirm that we have this one in the bag.

This is what the dish should look like

A prior attempt included making curry paste from scratch

I have no idea what I was thinking

Prep for the older version - too many substitutions, way too much effort, and an unbelievably disappointing meal. We will refer to this image shortly

So read on to learn about why this last photo is completely wrong, and how you can do this right.

Sunday, February 14, 2016

Matsaman Curry // Fresh coconut milk beats homemade curry paste any day


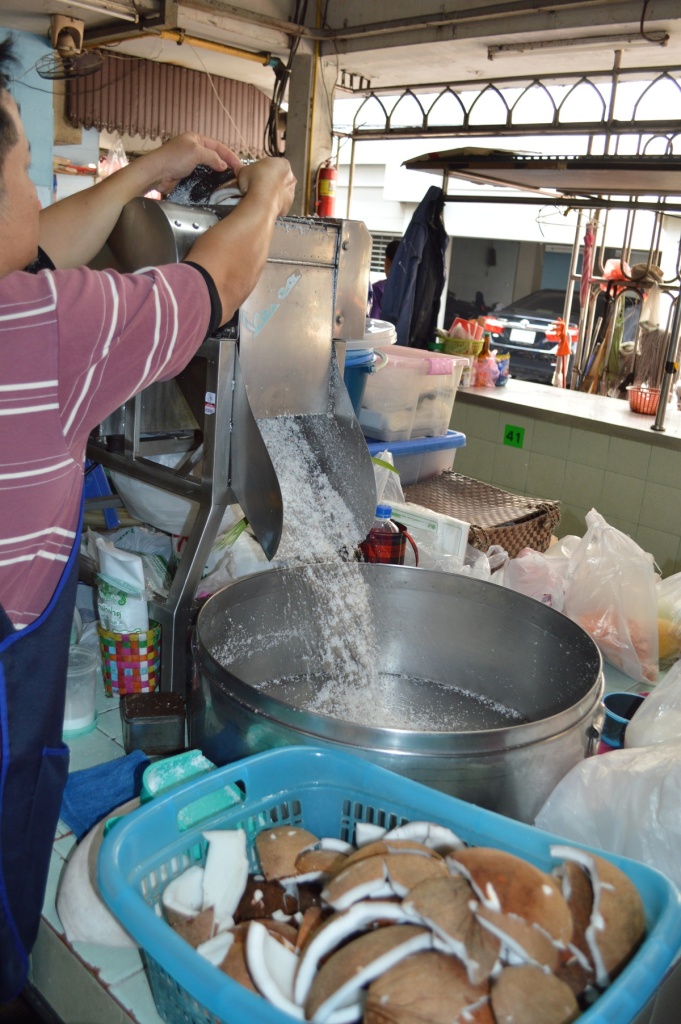
On our trip to Thailand a few years ago, I was captivated by the freshness of the ingredients. The Thai markets are filled with fresh produce and all manner of slaughtered animal parts, which is impressive enough, but then there are the prepared foods - the curry pastes, the sausages, the shrimp chips, and of course, the coconut milk. I had no idea that this was made on a small scale, but after seeing the operation, it made sense - coconut flesh could be shredded quickly, and then a small hydraulic press can crank out a few quarts of fragrant coconut milk every few minutes. We had multiple occasions to taste this fresh coconut milk (and coconut cream, will explain later), and it was starkly different from the thick, somewhat savory canned coconut milk we commonly get in the U.S. Most notably, when you smell homemade coconut milk, it smells like... coconuts! There's no plastic, fatty smell from the preservation of the liquid necessary to get it into cans and across the ocean. The freshly made milk makes no mistake in letting you know what it is, and, as I would soon learn, offers exactly the same unapologetic, coconutty brashness when made back at home with a questionably old coconut. So I watched this process, enthralled by the heavy machinery nestled within the small farmer's market, bound and determined to try replicating this at home with hand tools.


The story wasn't actually that simple. I started out thinking that the magic was all in the paste, with no appreciation for the coconut milk. Coming home armed with curry paste recipes, and having sat on the floor smashing herbs in a mortar and pestle for a few hours, I assumed I was an expert in paste making. But more than a few failed attempts back home led me to realize that those little old Thai ladies sitting around smashing up garlic all day really know what they're doing. Homemade curry paste is truly an art, and I do not have the magic just yet. Maybe it's the freshness of the ingredients, I don't know. All I know is that my pastes are too coarse and lack the depth of the ones made fresh in Thailand, or even the ones from a can here. So after one too many mediocre curries, I broke down conceded defeat, requiring much more practice to this day. Instead, I dug into the process of making homemade coconut milk. Thankfully, the gear required isn't too extensive, but it is somewhat challenging to actually do this, if you use the method I used.

We decided to use the coconut milk as part of a matsaman curry, which we really liked when we made it in Chiang Mai. Matsaman, also written massaman, means "muslim", and isn't actually a Thai word at all - it's a Thai interpretation of the Persian dish, referred to in the 19th century as "mussulman" curry, which is a dated term for Muslim. The analog of this dish is American tex-mex food: it's the native culture's interpretation of what an international dish tastes like, adapted somewhat to the local methods. In this case, the dish borrowed the spices brought to Asia by the Muslim spice traders, including cinnamon, cardamom, cloves, bay leaves, cumin, and star anise, but mixed into a paste and then fried with coconut milk, like so many other Thai dishes. It's said to be favored by westerners because of its more familiar spice palette, but honesty I don't like it any more than a good red (kaeng phet) or green (kaeng khiao wan) curry.


This recipe explores a big hack in the process - how much does homemade curry paste matter? And which is more important, high quality coconut milk, or high quality curry paste. The short answer is both, but the longer answer is that you can get a good curry paste from a pouch, but there is no substitute for homemade coconut milk. Using a commercial paste I brought back with me, the finished dish was so spectacular that I have to question if a mediocre homemade paste is in any way a substitute for a reputable packaged paste. What's more, the fresh coconut milk elevates the dish to a floral, magical level, with the subtle fruity perfume that really takes your mind to the tropics. This doesn't happen with a great curry paste and mediocre coconut milk, by converse. Given this and the other curious additions that make up matsaman curry, I'm going to advocate for skipping the paste pounding step in lieu of making your own coconut milk from now on, so long as you agree to use a decent quality paste. Agreed? Okay, let's move on.

Sunday, January 18, 2015

Thai Bamboo Rice Salad

Strolling through a Whole Foods last year, I found a curious jar of green rice that I had never seen before.  Smelling faintly of jasmine rice but more earthy and perfumed, this curious infusion was known as bamboo rice.  This rice is apparently infused with the juice from young bamboo plants, giving it the vegetal notes as well as the green color.  We would have strolled on had we not found this recipe accompanying the rice, as we fortunately picked some up to try this out.

I highly recommend this rice salad, which was amazing as a side but could almost stand on its own if you were really avoiding protein for some reason.  Interestingly, I couldn't find this recipe on the Whole Foods website - it's some kind of mystery recipe that never appeared after I found the small card, so I'd like to post it here for all to see.


Thai Bamboo Rice Salad
Whole Foods


  • 1 cup bamboo rice
  • 1.5 cups coconut water
  • Sea salt, to taste
  • ¼ cup toasted unsweetened coconut
  • 2 tbsp lime juice
  • 2 tbsp seasoned rice vinegar
  • ¼ cup peanut oil
  • 4 green onions, sliced
  • ¼ cup freshly torn mint
  • ¼ cup freshly torn basil
  • 1-2 tsp serrano chile, small dice
  • Freshly ground black pepper
  • ¼ cup chopped roasted peanuts
  • 1 large cucumber, sliced into thin rounds


Combine rice with coconut water and a pinch of salt in a heavy-bottomed saucepan.  Bring to a boil over high heat, cover, reduce to a simmer and cook for 11-12 minutes.  Remove from heat and let stand, covered, for 5 minutes.  Fluff with a fork.  Transfer to a bowl and refrigerate to cool.

Preheat oven to 350 F.  Spread coconut on a baking sheet and bake for 4-5 minutes, stirring after 2 minutes, making sure it doesn’t burn.  Combine lime juice and vinegar in a bowl.  Whish in peanut oil.  When rice has cooled, combine with green onions, mint, basil and chile pepper.  Top with coconut and peanuts.  Serve on cucumber rounds, with a piece of fish if desired.


Thursday, July 10, 2014

Thai Pumpkin in Red Curry (Kaeng Phet Fak Thong)

This is a great dish to make in the fall, which is actually when I made this, despite taking forever to post it.  I had always wanted to try making a pumpkin curry after I tried one at the very excellent Thai X-ing, an off the beaten path restaurant literally in someone's living room in Washington, D.C.  The pumpkin curry dish surprised me with how much flavor it packed in - the standard pungency of a curry sauce, but with the smoothness and slightly sweet and nutty overtones from the stewed pumpkin (in that case, acorn squash).  So the first fall that came around, when fresh squash reared their heads, I made it a point to try this out.

I highly recommend kabocha squash to make this dish instead of other squash or pumpkins.  It holds up well, is fairly easy to work with, and seems to be the traditional gourd preferred by many Thais, in addition to being one of the mystery orange vegetables in an order of Japanese tempura.

Don't be misled by the name, this dish is non-vegetarian given the addition of some boneless pork to round out the protein content of the dish.  After all, squash and pork chops seem to go together, so why not pork with squash curry?


Saturday, June 28, 2014

Pad Khing Gai (Thai Ginger Chicken Stir-Fry)

This recipe is a definite staple in Thai restaurants, and very easy to make.  Sometimes called ginger chicken, or chicken with baby ginger, this Chinese-influenced recipe is very mild (if you omit the chile peppers, which recommend) and gives you tons of sweetness and rich flavor with just a whisper of Thai flavors.  This dish is not too different from cashew chicken in terms of the end result, but it's a heck of a lot easier to get there.  If you can find it, look for jars of preserved sliced baby ginger in brine, which has a much more subtle ginger flavor that won't take your breath away quite as much.


So now, to help you understand how to order this in a restaurant if you find yourself in one of the few parts of Thailand where someone nearby doesn't speak English, let's revisit:

Culturally Insensitive Language Training

In my post for pad prik khing gai, I gave a few Thai translations of interest, which are still valid.  Here they are again.
"Pad" - stir-fried.  Not an especially helpful word.
"Gai" - chicken.  Pretty straightforward.
"Khing" - ginger.  Wait, galangal.  Actually, I believe it means "rhizome", which covers both.  But in this context, unlike in pad prik khing, it means ginger.
So, this dish has a name eerily similar to pad prik khing, with the distinction being the inclusion of the word "chile".  And man, what a huge difference you get in the dish when you add that one little word.

Friday, March 14, 2014

Thai Rice Porridge with Pork (Jok Moo)

Two months ago, we went to Thailand.  On our second day, we were introduced to jok (pronounced like "joke"), which is basically the Thai version of congee, which is the Chinese version of rice that has been cooked into oblivion.  Jok may have been one of our favorite hidden gems of Thai cooking - a hearty, savory, salty, warming bowl of deliciousness with a variety of ingredients that were all delicious when paired together.  In Chiang Mai we found a vendor selling huge bowls of this for about a dollar, with a freshly poached egg and some fried noodles in it.

A cheerful jok vendor in Chiang Mai

I start here with a fairly basic recipe - rice porridge with pork meatballs.  I adapted a number of recipes to get what we thought was the right blend of flavors, and really like this process, which I think I will stick with as my basic method and adapt some of the ratios and times in the future.  It is probably the fastest way to get this done from start to finish, and adds layers of flavor at the right times.  Hopefully you will enjoy this Thai treat, and spread it further around the globe.  Make sure you get the two or three crucial ingredients for this - broken rice, white pepper, and Maggi seasoning.


Thai Rice Congee with Pork (Jok Moo)
Modified heavily from Thaifoodstyle by my recollections of Thailand

Serves 4

  • 1 cup broken jasmine rice
  • 2 cubes chicken bouillon, or 1 quart pork stock
  • 2 quarts water, or 1 quart if using pork stock
  • 2 cilantro roots, or 10-15 stems
  • ½ lb ground pork
  • 1 tbsp cilantro leaves, chopped finely
  • 1 tsp cornstarch
  • 3 tbsp fish sauce, divided
  • 2.5 tbsp soy sauce, divided
  • 1 tsp ground white pepper
  • 2 tbsp Thai cilantro, finely sliced (optional)
  • 2 spring onions, green part only, finely julienned
  • 1/2 cup ginger, julienned, or baby ginger strips in brine
  • 1 medium shallot
  • 1/2 cup canola oil
  • 4 eggs (optional)
  • White pepper, for plating
  • Maggi sauce or Bragg's Liquid Amino, for plating


Start by bringing 1 quart of water to boil with 1 chicken bouillon cube, or 1 quart pork stock, with 1 cup of broken rice.  Reduce heat to a simmer and allow to cook for 30 minutes, stirring periodically.


Once the rice is boiling, make the meatball mixture: season ground pork with chopped cilantro leaf, 1 tbsp fish sauce, ½ tbsp. soy sauce, cornstarch, and ground white pepper and mix well.  Allow to marinate for at least a few minutes, then form into small meatballs appx 0.75 - 1” in diameter.


To cook the meatballs, boil 1 quart water on medium-high heat and add coriander root.  When the water is boiling, add 1 cube chicken bouillon, allow to fully dissolve, and boil meatballs until they float, appx 2 minutes.  Remove with a slotted spoon to a plate, and add remaining 2 tbsp soy sauce and 2 tbsp fish sauce.  Let boil for 5 minutes, then keep on a bare simmer.


At this point, the rice in the other pot should have absorbed most of the liquid.  Add 2-3 cups of the boiled pork cooking liquid and stir to incorporate.  Allow rice to cook to a soupy consistency, appx 60-75 minutes.  If rice mixture isn’t thin enough, add more of remaining meatball cooking liquid. If including, fry the shallots in hot canola oil until crispy, 1-2 minutes, and allow to drain on a paper towel.


If including eggs, crack them into the boiling rice mixture towards the end and let them sit, undisturbed, for up to 8 minutes.  A runny egg will only take 4 minutes. Alternatively, use my new favorite trick of soft cooking the eggs in a sous vide setup. I'm still dialing in the numbers, but so far it's landing on 145 deg F for 45-60 minutes.

To serve, ladle into bowls sprinkled with spring onion (finely sliced), shredded ginger, and ground white pepper.  Plate with Maggi sauce or Bragg's Liquid Amino tableside.


If you want to get more exotic with this, go ahead and add the some fried shallots, crispy fried noodles, and cilantro leaves (regular or Thai variety).  These are all nice additions.  And for some reason, they like to eat this with fried bread alongside, so consider either some Navajo fry bread or just some plain donuts.  There, don't you feel multicultural now?

The current build as of June, 2016 - sous vide poached egg, fried shallots hiding behind the cilantro somewhere.

Thursday, November 28, 2013

Pad Prik Khing Gai (Thai Stir-Fry with Roasted Chile Paste)

Okay everyone, time for a crash course in ordering from Thai menus.  You may think you understand it, but I have concluded that none of us westerners really know.  Well allow me to clear at least a couple of things up, in a section I like to call:

Culturally Insensitive Language Training

In Thai, there are a number of words which are used strangely, and a small number which you can always hang your hat on.  I think I've finally got a small piece of this figured out.  So let me lay some words on you, and you can try to remember them so you don't make the same restaurant ordering mistakes that I did:

"Pad" - stir-fried.  Not an especially helpful word.
"Gai" - chicken.  Pretty straightforward.
"Prik" / "Phrik" - chile peppers.  Got it.
"Khing" - ginger.  Wait, galangal.  Wait, all of the above.  Ah, here's the problem - people who try to translate this don't know what they're talking about!  What they mean to say is that "khing" most likely means rhizome, which in turn encompasses both ginger and galangal.  In this context, it means galangal.

So, when you see the phrase "prik khing", you may think you're getting chile and ginger sauce, when in fact you are not.  This is even more confusing when you consider that there is a dish called "pad khing", which IS a dish of stir-fried ginger and other vegetables (recipe coming soon).  But no, prik khing refers to a paste made of roasted chiles and assorted aromatics, to include galangal and lemongrass.  If you just pick up a can of the stuff, you will see an almost identical list of ingredients compared to red curry paste, but this paste is prepared in a completely different way, which I know nothing about, but which I gather involves roasting the chiles first, much like you would do to create chipotles from jalapenos or anchos from poblanos.

Moving on.  This is a very common Thai dish, and strongly resembles a curry but without the use of coconut milk.  And since the name gives away very little, it is almost always a stir-fry of green beans (or long beans), often with meat, and usually with some kind of fresh pepper in there.  I absolutely love this dish, and until recently had been making it with red curry paste.  It was probably about 80% as good as if you use prik khing curry paste, but if you can find it I say go for the real thing because it has a certain complexity that red curry paste doesn't have.  And definitely don't hold back on the use of the paste, either.  I used a whole can, and didn't feel like it was overpowering at all.

This dish comes together really quickly, and despite having a relatively short list of ingredients it packs a wealth of complex flavors.  I guess that's because the work was already done preparing the curry paste; be thankful I'm not asking you to make your own... yet.


Pad Prik Khing Gai
By numerous sources

  • 1 4 ounce can prik khing curry paste (Maesri brand is fairly common)
  • 1/2 cup chicken, sliced thinly
  • 2 cups green beans (or Chinese long beans), cut into 1-2" pieces
  • 1/2 cup water
  • 3-4 kaffir lime leaves, sliced thinly
  • 1/2 red bell pepper, sliced
  • 1 tbsp fish sauce
  • 1/2 tbsp white or palm sugar
  • 2 Thai chiles, sliced thinly (optional)
  • 1 tbsp canola oil


Gather up the fairly short list of ingredients.  Feel free to switch out the meat or the peppers for others, but definitely include green beans or long beans

Heat oil over medium high heat.  Add the prik king chili paste and fry for 1-2 minutes.  Now add the chicken (or whatever protein), coat with the chili paste, and let them cook until they are done.  If the pan gets too dry while the meat is cooking, add some water, a few tablespoons at a time.

Stir-fry the curry paste to bring out the flavors, and attempt to gas your friends out of the house.

Add the meat and stir-fry in the paste

Add the green beans, Thai chiles, and bell pepper slices and some more water, again a little at a time, until they are almost cooked.  Add the kaffir lime leaves, sugar, and fish sauce.  Taste and adjust the seasonings as needed.  Once the beans are fully cooked, serve over jasmine rice.

Stir-fry the remaining ingredients for a few minutes, adding water as necessary, then add the sauce components and serve immediately

Yum Woon Sen (Chile Lime Glass Noodles)

My first encounter with chile lime noodles was at a vegan food market, where it was framed as a gluten-free, animal byproduct-free meal.  As I ate it, I thought "this would be much better with some animal byproducts in it."  But all of the recipes I found were somewhat bland, Americanized versions of this dish.

Enter the real deal - yum woon sen, which is a Thai salad using mung bean noodles.  You've probably seen these before - they start off pale white, and when you cook them they turn translucent, earning them the name "glass noodles".  They're fairly easy to find, and not to be mixed up with rice vermicelli, which will cook up white, and though they are the same diameter, that's about all they have in common.  Glass noodles are chewy and have a much more neutral flavor, making them perfect for this dish.  And the Thais don't mess around with the whole animal byproduct thing - they thrown in fried, dried shrimp, and often ground pork (which I didn't add here, to try just the standard dried shrimp version).

In addition to getting to buy two new ingredients I had never purchased before, which is always fun, this dish surprised me by how easily it came together.  You don't really cook anything, in the traditional sense.  You basically just soak the noodles in boiling water, then crisp up the dried shrimp and peanuts, and toss everything together.  I was waiting for the stir-fry step the first time I made it, but it never came.  The end result was very healthy and fresh as a result, so now I see why this dish became popular.


Yum Woon Sen (aka Chile Lime Glass Noodles)
From ThaiTable.com


  • 5-6 sprigs cilantro
  • 1 2 ounce (dry) bundle mung bean noodles (aka glass noodles, clear noodles)
  • 1/4 cup dried shrimp
  • 1 tablespoon fish sauce
  • 1 tablespoon fried garlic
  • 1-2 limes
  • 1/2 sliced onion
  • 1/2 cup peanuts
  • 1/2 teaspoon sugar
  • 3 Thai chili pepper
  • 1 cup cut Chinese Celery, or regular celery if you can't find Chinese


If you can't find the Chinese celery above, just use regular celery.  But do at least keep the tops

This single bundle is all you need for the recipe posted here.  Don't get carried away, it will throw off the balance of ingredients

Rinse your vegetables well, and chop them to the right sizes.  They won't end up being cooked, so it has to be bite-sized and ready to go.

Take one of the 2 oz bundles from the noodle pack, and place in a large bowl with boiling hot water for 6 minutes. Strain the noodles and drain, then pour the noodles into a large mixing bowl and cut them with scissors randomly to make the strands easier to serve and eat.  Cut the Chinese celery into 1 ½ inch pieces. Slice onion, top to bottom to get crescent pieces. Chop cilantro and chili peppers.  If making your own, make the fried garlic by placing 6 cloves of garlic in a microwave-safe bowl and cover with 1-2 tbsp neutral oil, then microwave on high for up to 2 minutes, 30 seconds in 30 second increments until nicely browned and fragrant.

If using raw peanuts, fry peanuts in 1 teaspoon of oil over low to medium low heat until light brown and cooked, about 5-7 minutes. Remove peanuts and set aside. Fry the dried shrimp over medium heat until crispy and brown, about a minute, depending on the size of your shrimp. When the shrimp turns whitish, remove from heat and set aside.

Dry-fry the dried shrimp - this was a new one for me.  I found these in the refrigerated section of the Asian grocery store

Make the sauce / dressing - 1 tablespoon of fish sauce, 5 tablespoons of lime juice, and 1/2 tsp (or less) of sugar.  It should be more sour than salty; you should also take into account how salty the shrimp are. The role of sugar here is to round the flavors.

Add a tablespoon of fried garlic to the noodles and mix them. Fried garlic gives the noodles flavor. Add 5 tablespoons of the dressing to the noodles and mix well, reserving the last tablespoon to add only as necessary. Add the peanuts, dried shrimp, onion, Chinese celery, chili peppers and cilantro to the noodles. Toss well and taste. You may need more dressing, depending on water content of the noodles and the concentrations of your seasonings.

Toss all ingredients to combine, and you're done!  Minimal cooking necessary

Friday, February 15, 2013

Pad See Ew (Soy Sauce Noodles) and Homemade Sriracha

Pad See Ew is one of those ubiquitous Thai dishes you always see hidden on a Thai restaurant menu.  You've got your red and green curries, your Pad Thai, maybe some Pad Prik King or Gai Himmaparn, and this.  It's easy to translate - "pad" means stir-fried, and "see ew" means soy sauce.  Not much left to the imagination.  And the ingredient list essentially doesn't disappoint - noodles, meat, a few other things, and soy sauce.  Ah, but not just any soy sauce, as we will get to shortly.  It's been influenced by the Chinese, which explains why they're using the phrase "see ew", a Southern Chinese term for soy sauce, and also why Chinese broccoli is used here but in basically no other Thai staple dish I've yet come across.  I tried making this a number of times a few years ago with mixed success, then I went off into a cave and thought about what I did wrong, then looked up a ton of different recipes, and finally I took a nap.  When I woke up I assembled this new one.


Restaurant-quality.  Not something I throw out lightly.  And it's not often that people tell me to quit my day job and open a restaurant after dinner.  But that happened when I made these soy sauce noodles, after my adjustments to the recipe, my ingredients, and my process in order to best capture the flavors and textures of this dish.  Every bit of this is a spot-on copy of the best soy sauce noodles I have ever eaten which, if you haven't done so, I highly recommend you try.  I will make it a point to comment on where I have made tweaks, and what is a critical detail in making this dish.  Don't cut corners, look for the right ingredients, and you'll pull through.


Pad See Ew (Soy Sauce Noodles)
Adapted heavily from RealThaiRecipes.com
  • 2 tablespoons vegetable oil
  • 1 tablespoon chopped garlic
  • 1 tablespoon thinly sliced shallot
  • 1/2 cup pork (or chicken), thinly sliced and cut into bite-sized pieces
  • 1 cup wide rice noodles, FRESH (dried is just not going to cut it if you want the real deal)
  • 1 generous cup chinese broccoli
  • 1 large egg
  • 1 tbsp black soy sauce
  • 2 tbsp white soy sauce
  • 1 tbsp white sugar
  • 1/2 teaspoon white pepper powder
First, gather your ingredients.  This may take some time - you need to find shallots, Chinese broccoli, and things called 'white' and 'black' soy sauce.  I know what you're thinking: you've got some 'black' soy sauce already, so what the heck is white soy sauce?  Well, you are wrong.  If you have soy sauce, you have 'white' soy sauce.  Or 'light' soy sauce, which has nothing to do with 'low sodium' soy sauce.  'Black' aka 'dark' aka 'sweet' soy sauce is made by adding sugar or molasses to the soy beans before fermentation, and lends a strong sweetness and a thick consistency to the finished product.  It is aged longer than the light soy sauce, and is less salty.  It is the primary ingredient in Pad See Ew, so if you can't find it locally, order it before you make this dish.  I recommend Healthy Boy brand if you can find it.  Let's take a look at these products:

Various soy sauces.  From left to right: a) low/less sodium, sometimes called "lite", not to be confused with b) "light" or "white" soy sauce (basically just regular soy sauce), c) Thai "black" soy sauce (siew dam in Thai) aka "sweet" soy sauce, which is essentially the same as d) Chinese "dark" soy sauce

Since you're using fresh noodles, which you can purchase at the Asian grocery store, separate them from each other, and place them on a plate.  Now, if yours were like mine, you got them refrigerated, and they're a big stuck together wad that doesn't look like people food - it looks like a bunch of squid.  I tried warming in the microwave and ended up getting as far as separating the rolls from each other, then giving up and cutting them into what would later become small rice pillows.  But next time I will soak them in cold water (cold to prevent further cooking), then coax them apart gently and dry them separately from each other.

They may look like squids, but they are in fact rice noodles, all bunched together.  Soak in cold water to unravel them.

If you absolutely can't find these and end up using dried, boil them for 6 minutes, drain in cold water, and rinse 2-3 times until fully chilled.  RIGHT BEFORE cooking, remove them to colander to drain for about 1 minute.  Don’t let them sit out to dry.

Cut the Chinese Broccoli stems at an angle so they cook easier, into about 2″ (5cm) long pieces towards the top, and smaller at the stems.  Cut on a bias for nice looking pieces. Make sure to clean well.

Heat a large nonstick saute pan on the highest heat you've got.  When sufficiently hot, add the oil and swirl to coat.  Add the garlic and shallots, and fry until lightly browned and fragrant, about 15-20 seconds.

Add the pork (or chicken) and fry until cooked through. Keep stirring so the garlic doesn’t burn.

Now add the noodles.  Don't worry about the other ingredients, we'll get there.  Keep stirring so they don’t stick.  Add the soy sauces, sugar and white pepper. Mix well.  Your goal here is to infuse the soy sauce flavor into the noodle but not into the veggies or egg.  So stir this around, let it absorb into the noodles, and continue.


Let the soy sauce get into those noodles
Crack the egg into the pan on top of the oil. Scramble in the pan and let sit until solid.  Break up with a spatula.


Add the Chinese Broccoli, and mix well. You may need to add a little bit of water so everything cooks and doesn’t stick.  Don’t add so much that the noodles get clumpy though - maybe around 1 teaspoon at a time.  As soon as broccoli is cooked, turn off heat and plate immediately.


Dish out and serve with soy sauce, sugar, vinegar, chili powder and white pepper so you can flavor to your taste preference at the table.


Note: If cooking more than one serving, cook them one at a time. If you cook too many noodles in the pan, you'll get a big sticky glob.


Homemade Chili-Garlic Sauce (Sriracha)

If you have a blender and 2 minutes, you can make this.  Put 8 red jalapenos, 2 cloves of garlic, and 1 tsp salt into the blender.  You may want to do obvious things like take the stems off your peppers and maybe peel the skin from the garlic, but only if you want this to be, you know, edible.  Once blended, pour this mix into a jar and top with 1/2 cup rice wine vinegar - enough to cover the pepper mix.  Let sit for a few minutes, and you're good to go!  Should keep basically indefinitely.


Tuesday, February 5, 2013

Grilled Lemongrass and Turmeric Chicken Wings


If you're following along, you know I'm searching for new and more amazing chicken wing recipes.  This means thinking outside of the box - more than just your average Buffalo wing flavors.  This one is no exception, and worth checking out.  It's more of a Thai curry, plus it has a great color from the fresh turmeric.  And once again, it meant that I got to purchase a new ingredient, not having bought turmeric in any form other than dried.


Fresh turmeric can be found in Asian grocery stores, and looks similar to ginger but with no branches and more ribbing.  It's a rhizome related to ginger, often used in Indian curries, but also used as a food coloring (specifically in mustards).  Inside, the root is a bright orange, and smells like a combination of carrots and ginger.  Careful - it stains skin and clothing quickly and effectively, making my nails look like those of an old woman.  But good news, turmeric isn't light fast, so that stain will fade over time.

Fresh turmeric looks a bit like a slug
Peeled turmeric stains pretty much everything.  That's why I'm taking the picture, and someone else is peeling it.

Grilled Turmeric and Lemongrass Chicken Wings
from Bon Appetit, July 2012


  • 1 cup canned unsweetened coconut milk
  • 3 shallots, chopped
  • 3 garlic cloves
  • 2 lemongrass stalks (bottom third only, tough outer layers removed), finely chopped
  • 2 jalapeños, stemmed
  • 1 1" piece ginger, peeled, chopped
  • 2 tablespoons fresh lime juice
  • 2 tablespoons tamarind juice concentrate (not paste or pulp) or 1 tbsp fresh lime juice
  • 1 tablespoon fish sauce
  • 2 teaspoons kosher salt
  • 1 teaspoon fresh turmeric (not powdered)
  • 3 pounds whole chicken wings
  • Vegetable oil (for grill)
  • Lime wedges

The ingredient list is strange, and is some mix of Thai and Indian flavors.  If anything, I'd say it's closest to Cambodian cuisine
Combine coconut milk, shallots, garlic, lemongrass, jalapeños, ginger, lime juice, tamarind juice, fish sauce, kosher salt, and turmeric in a blender.  Purée mixture until a smooth marinade forms.

Lemongrass has a strong citrus scent and looks really cool.  It's also really pulpy and needs to be blended well.

Add everything to the blender and puree thoroughly

Place chicken wings in a large baking dish.  Pour marinade over; turn wings to coat evenly.  Cover chicken and chill overnight.

Add the chicken, and marinate overnight.  The turmeric should dissolve more into the marinade and turn more yellow overnight.  I looked into this - apparently the color change is related to the acidity of the solution it is in.  If I had added a bunch of lye instead of lime juice, it might have turned red!


Remove chicken from marinade, shaking any excess marinade back into dish.  Transfer chicken to a large platter.  Let stand at room temperature for 15 minutes.  Transfer marinade to a large saucepan and bring to a boil over medium heat.  Reduce heat to medium-low and simmer, stirring occasionally, until marinade thickens, 10-15 minutes.  Pour half of marinade into a small bowl; set aside for basting chicken while it grills.  Keep remaining marinade in saucepan; cover and keep warm until ready to serve the chicken.

Build a medium fire in a charcoal grill, or heat a gas grill to medium-high.  Oil grill grates to prevent sticking.  Grill chicken wings, turning every 5 minutes and basting occasionally with marinade in small bowl, until fat is rendered and skin is nicely charred in spots, 30-35 minutes. (The key here is to turn the wings often so the skin doesn't burn.)  Continue cooking chicken without basting (so it will get crisp) until wings are cooked through, about 10 minutes longer.

Turn regularly and baste with the reduced marinade


Transfer chicken to a large platter and let it rest for 5 minutes. Squeeze lime wedges over wings. Transfer marinade in saucepan to a small bowl. Serve warm marinade alongside chicken as a dipping sauce.

Garnish with more sauce and a lime wedge

LinkWithin

Related Posts Plugin for WordPress, Blogger...