Showing posts with label sausage. Show all posts

Wednesday, October 15, 2025

Texas Hot Links

When I think of BBQ, I picture ribs, brisket, pulled pork, maybe the oddball turkey breast. If you asked me "what defines Texas BBQ", I would probably have said beef ribs. But apparently there's a kind of smoked sausage there that I have been missing out on for my whole life, called a Texas Hot Link. It's a beef sausage, cured and smoked, a bit like a NY style "half smoke" but I think a bit more spicy and probably quite a bit more heavy on the smoke. Twice as smoked, if you go by just the name. I had the good fortune to try this recently while enjoying a combo plate we know as a "hog bucket" at our local BBQ restaurant, and was instantly a fan. So of course I had to try making this at home, because all rational people decide to make forcemeat dishes when they find ones that taste good, right?

Searching for a recipe pulled up more colorful names for this - hot links, hot guts, and also just "guts". Not the best name, hopefully that's not how you would have to order a sausage platter in, say, Austin, though that probably wouldn't be the strangest part of your day even if that's what it came to. But the general premise seemed easy enough - grind up fatty beef with spices and a curing salt, stuff, rest overnight, smoke, feast, food coma. Done. Sounds easy, right?

Well, not so much. This turned out to be an exercise in not having the right equipment at the right location. I was looking forward to using my sausage stuffer, but discovered that the tubes weren't in the box, and after tearing the house apart concluded that they were donated along with an old meat grinder. So getting the meat into the casings required two people wrangling equipment, shoving with full force down the throat of a KitchenAid meat grinder, which was woefully inadequate and kept getting gummed up. I also had no good way to hang the sausages in the smoker, and the makeshift rack caused the links to slip down and knock into each other, slowing things down and causing uneven smoke coverage. Finally, the probes to my thermometer weren't the thin kind that I could leave in one of the sausages, so I kept opening the smoker every hour or so to poke at them as I became increasingly starving, annoyed, and frankly, hostile towards the unsuspecting links. They didn't cause this.

In the end, the two day experiment put dinner on the table at a reasonable 10:30 at night. But all of the frustration melted away into greasy, spicy, smoky bliss after trying just one bite. I would say this was a huge success, and plan to make a much larger batch for a party, since this should scale pretty well in the right smoker. And the smells in the house even the day after carried happy memories of sausages past, which was a nice bonus to wake up to. I will say that for adults, the flavor is great, but for kids, I'd knock down the amount of cayenne, which was pretty intense.

Last time we bought these from the restaurant, any survivors from the initial dinner ended up in a sausage, kale, and potato soup, which we will make soon and post with stragglers from the current batch.

Here's the list of crazy tools I used (or should have) to make this work:

  • Stand mixer
  • Meat grinder
  • 5- to 10-pound sausage stuffer
  • Vertical smoker with offset smoke chamber
  • Needle tip probe thermometer
  • Very precise kitchen scale
  • Spice grinder
The other thing I highly recommend is a pack of Instacure #1, also known as Prague Powder #1. This is the curing salt that is used in making hotdogs and other cured meats, and it's incredibly unsafe if handled wrong, possibly fatal if consumed plain, maybe toxic, and makes for totally delicious sausages. Follow the directions for its use exactly! 5 lbs of meat translates to just under 1 tsp of this curing salt. I happened to have some from back in my sausage-making days after taking a butchering class in college (land grand schools rock!), but if this product is new to you, don't be scared of it, but do be careful.

The recipe was lifted almost verbatim from the Thermoworks website minus the use of ground mace, which we were out of.

After 4 hours in a 200 F smoker

The finished product. I think the color is about right, but I'm no expert

5-pound vertical sausage stuffer. Not helpful when you LOSE THE STUFFER TUBES!!! Ugh.


The setup - heavy on the spices and equipment on this one

Be careful with the curing salt (the pink-colored salt at about 11 o'clock in this photo)!

Mixing the meat and spices with water will unravel the proteins and make a good paste for stuffing. Not the best for getting through the grinder chute, but good once it's in the casing. If only I had a sausage stuffer....

Thread the casings onto the stuffer tubes, tie a knot, and go wild. Oh, and good luck finding casings this century - had to go to many grocery stores before I found them. Check with a butcher if you have one nearby, or order online if you don't.

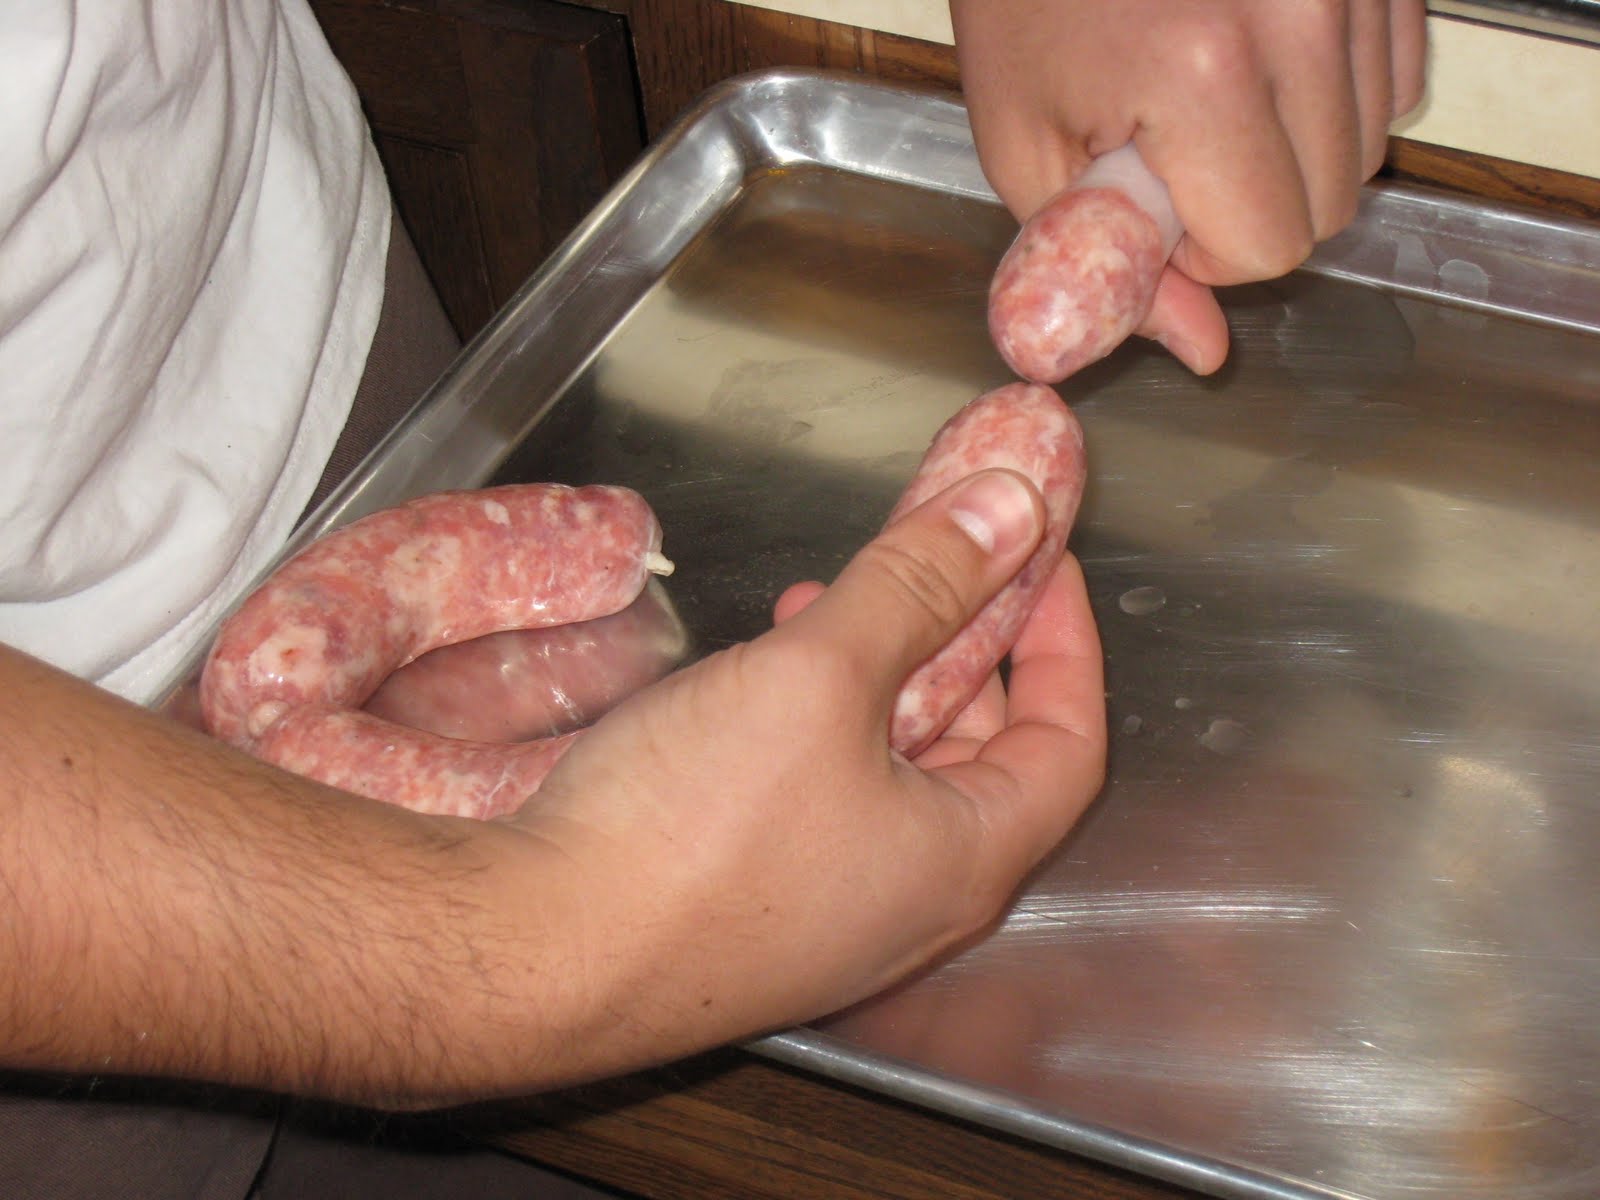
I twisted these as they came off the tube, but you could do one long rope and then twist. Spin in alternate directions or they will unravel. Keep pressure on the casings still on the tube to control the fill speed, and poke holes in the filled sausages with a toothpick to pop air bubbles, as needed.

Ready to be rested overnight in the fridge to cure

24 hours after stuffing, into a 200 F smoker for 2-4 hours

Towards the end of smoking. The color doesn't reflect the finished product in the first photo.


Texas Hot Links
Modified slightly from Thermoworks.com blog post

  • 3 lb lean beef eye of round is perfect. Or use 80/20 ground beef.
  • 1 lb beef fat not rendered, such as brisket trimmings. I used very fatty pork belly, since I don't have a good butcher at the moment
  • 6 g paprika (NOT smoked!!)
  • 8 g cayenne pepper (maybe less if you want a more family-friendly flavor)
  • 5 g mustard powder (ground fresh in the spice grinder)
  • 7 g garlic powder
  • 5 g onion powder
  • 25 g ground black pepper (ground fresh in the spice grinder, though I've read to maybe do some fine and some coarse)
  • 90 g dry milk powder, used as a binder
  • 40 g salt
  • 5 g Prague powder #1 AKA Instacure #1 curing salt. My packet's instructions quote this as just under 1 teaspoon, which is what I use for a 5 pound batch of meat.
  • 1 ½ cup cold water
  • Hog casings
Cube and chill the beef and beef/pork fat, then chill them in the freezer for about 30 minutes, alongside your grinder. Grind with a medium disc into a bowl set into a larger bowl of ice.

Mix the seasonings, milk powder, and cure together in a small bowl. Put the meat into the bowl of a stand mixer, and sprinkle on the cure/seasoning mix. Make sure the meat is still below 40 °F.

Mix the meat with the paddle attachment, adding the water as you go, until it forms a sticky, fibrous mass that clings to the walls of the mixer and the paddle.

Stuff the meat into casings (not too tight or they will burst!) and twist it into links. Pop any bubbles in the casings with a toothpick as needed.

Allow the links to sit, uncovered, in the refrigerator overnight to cure and dry out just a little.

The next day, preheat your smoker to 200°F. Put the sausages in the smoker, insert a needle probe into one of them if you have one, and close the lid. Cook to 155 - 160 °F. It should take a few hours.

If saving the sausages for later, plunge them into an ice bath to chill and stop cooking. Otherwise, slice and eat fresh off the smoker.

Saturday, July 5, 2014

Chickpea, Sausage, and Kale Pasta

I was skeptical of this dish at first - it seemed like it might be chalky or dry given the chickpeas mixed with pasta.  But using dried chickpeas instead of canned gives this a wealth of surprisingly fresh flavor, and the mixture of cheese and a snap of lemon juice really gives this dish a lot of energy to complement the inherent deliciousness that is spicy Italian sausage.  I felt like I had done something productive with my night after eating this, and didn't slip into the usual food coma.

Digging around online, I found a very similar recipe to this one from Martha Stewart by Mark Bittman, who instead of Italian sausage uses chorizo, and instead of pasta uses bread crumbs.  He cooks the chickpeas for a more significant amount of time, more like 10 minutes instead of 3.  I might try this variant next time, plus this dish would probably be equally delicious just substituting chorizo for Italian sausage.

Let me implore you to use dried chickpeas in this dish.  Canned chickpeas taste like a whole lot of nothing now that we've tried both fresh and dried, which are staggeringly close to each other in flavor after the dried peas have been soaked overnight.  They're cheaper than canned, they're easy to find almost anywhere (check the latin or Indian section of your store), they have less salt, and they're generally superior.  At the very least, buy a test bag and soak a few overnight, then eat them raw.  If you don't switch over after eating one, I will be amazed.


Sunday, August 25, 2013

Sausage and Rice Stuffed Peppers

It's been 100 recipes, and I'm still alive.  And hopefully, you are too, and maybe even better off for checking in here from time to time.  So for this one, I'm not going to present anything too extreme, just something delicious, healthy, and fairly easy to make.  And for a change of pace, I didn't even use a recipe for this one - just threw some things together from memory in a way that I thought would work out well, and it turned out that it did.

Today we contemplate the stuffed pepper.  Who would ever think to take a large, cavernous vegetable, hollow it out, cram it full of goodness, and then roast it and treat it like an edible bowl?  Well, I don't know, but let's hope that he was given a thousand virgins and quite a few goats for his discovery.  You could do this with tomatoes, peppers, or eggplant or squash if you really knew what you were doing.  But as an easy start, let's focus on the most forgiving of all of these from a cooking and structural integrity standpoint - the pepper.  If you don't like bell peppers, then I have nothing for you.  But consider that you may only dislike green bell peppers, which are slightly less sweet, and consider giving this a try.


Bell Peppers Stuffed with Sausage and Rice
by me

  • 2 large red bell peppers
  • 1/2 lb Italian sweet or hot sausage, removed from casings if present
  • 1 small zucchini, diced
  • 2 cloves garlic, minced
  • 1 small onion, diced
  • 1 rib celery, diced
  • 1 green onion, sliced thinly
  • 1/2 c coarse breadcrumbs
  • 2 oz firm aged cheese, such as Parmesan or Asiago, grated
  • 1.5 c cooked brown (or white) rice
  • 2 tbsp olive oil
  • Salt and pepper
  • tomato sauce or aged balsamic vinegar, for plating
  • 1 tbsp parsley, minced, for plating
The peppers loaf about lazily on the countertop, unaware of their fate.

Preheat your oven to 400 deg F.

Begin by halving the peppers lengthwise, removing the core and seeds, and cutting away as much of the white membrance as you can (this is bitter, and also takes up space).  Now, in a large saute pan over high heat, brown the sausage in 1 tbsp olive oil, breaking up with your spoon into small pieces.  When browned, remove from pan and drain on a paper towel, and saute zucchini, garlic, onion, celery, and green onion in the next 1 tbsp of olive oil.  Remove to a large bowl.

In the meantime, take a small frying pan and heat the last 1 tbsp of olive oil.  Toast the breadcrumbs if they're not already toasty, and set aside.

Now, the rest is fairly straightforward.  Take everything you've got except the peppers themselves and the breadcrumbs, and stir them together in a big bowl.  Taste, and season as needed with salt and pepper.  Try not to just stop here and eat the whole thing, because you will probably want to.  But we must forge ahead - now stuff this into the pepper halves, packing in the filling somewhat densely and mounding up slightly.  Don't get so crazy that it's spilling out, because next you have to sprinkle on the toasted breadcrumbs.

The filling, resting before an epic journey in a hollowed out pepper through the fires of Mt. Ofen.

The peppers, packed and ready to go.

In a reasonably sized glass baking dish, brush a few drops of olive oil onto the bottom and situate the pepper halves.  Toss in the oven for about 30 minutes, until peppers are soft and starting to brown at the edges, and bread crumbs are brown on top.

To serve, either place on a bed of homemade marinara sauce, or drizzle with balsamic vinegar, as I have done.  I tried this both ways and preferred the tomato sauce version, but both are going to impress people.  Sprinkle with minced parsley, and serve.

Exhausted from their journey, the peppers lie unsuspectingly before hungry predators.

At last, the stuffed pepper has come to its final resting place

Saturday, August 17, 2013

Tomato Sausage Risotto in Portobello Caps

Coming off of my last successful risotto experience, I wanted to try another flavorful risotto recipe.  While I love the consistency, I have the same problem with risotto that I do with pizza - too much starch, not enough diversity of flavor.  So rather than making one of the essential risottos - mushroom, or cheese, or lemon - I went with a slightly different take - a tomato-based risotto, promising a somewhat unconventional experience.

Your average risotto is made by slowly cooking the rice in hot broth as it is stirred, unfolding the starchy web on the outer layer of the rice so that it can dissolve into the cooking liquid.  Chicken broth is very commonly used for this.  But I was intrigued by the idea of using canned tomatoes instead of broth, just for the variety.  It turns out that this is an amazing twist on your average risotto, transforming a meaty, savoury dish into a lighter, more aromatic dish.  The meat still finds its way in by way of some Italian sausage, but it's a different backbone that was eye-opening and delicious.


Tomato and Sausage Risotto
Modified from Martha Stewart Everyday Food


  • 1 can (28 ounces) diced tomatoes in juice
  • 1 tablespoon olive oil
  • 3/4 pound sweet or hot Italian sausage, casings removed
  • 1 small onion, finely chopped
  • Coarse salt and ground pepper
  • 1 cup Arborio or Carnaroli rice
  • 1/2 cup dry white wine, or dry Vermouth
  • 10 leaves basil, chiffonaded
  • 1/2 cup grated Parmesan cheese, plus more for serving (optional)
  • 2 tablespoons butter


In a small saucepan, combine tomatoes (with their juice) and 3 cups water. Bring just to a simmer; keep warm over low heat.

In a medium saucepan, heat oil over medium. Add sausage and onion; season with salt and pepper. Cook, breaking up sausage with a spoon, until sausage is opaque and onion has softened, 3 to 5 minutes.


Add rice; cook, stirring until well coated, 1 to 2 minutes. Add wine; cook, stirring until absorbed, about 1 minute.

Add about 2 cups hot tomato mixture to rice; simmer over medium-low heat, stirring occasionally, until absorbed, 4 to 5 minutes. Continue adding tomato mixture, 1 cup at a time, waiting for one cup to be absorbed before adding the next, stirring occasionally, until rice is creamy and just tender, about 25 minutes total (you may not have to use all the liquid).

Here's the process of risotto, armed with a fancy risotto spoon.  Observe how the rice swells and the liquid becomes thicker in these time history photos, taken at the 3 minute mark, the 20 minute mark, and the 26 minute mark.


Remove pan from heat. Stir in basil, Parmesan, and butter; season with salt and pepper. Why the butter?  Because you're "mounting" your sauce.  You heard me.  It's from the French monter au beurre, meaning "build with butter" and pronounced "mount" by the less classy Americans who heard the phrase.  It's the process of adding a cold fat to a hot liquid and getting it to emulsify at temperatures above where it usually breaks down into milk solids, fat, and water.  Restaurants tend to do this to develop a more velvety, bodied sauce, which you have probably simply called "delicious", "rich", or "OMG".  Also, they tend to put in way too much - websites I scanned just called for 1 tbsp butter per 1/2 cup of sauce, so don't get crazy mopping that stuff up with your bread.

These are the finishing ingredients - they only go in at the very end

Now, stand over your dish... and mount it!

Serve immediately, and sprinkle with additional Parmesan, if desired.  For a classy presentation, grill portobello caps and use them as small serving bowls on your plate, as shown above.  A recipe follows.


Grilled Portobello Caps
by me


  • 2 medium portobello caps
  • 1 tsp coarse dijon mustard
  • 1/2 tbsp red wine vinegar
  • salt and pepper
  • 2 tbsp olive oil
Stir together last four ingredients, and brush onto both sides of mushroom caps.  Cook on a hot grill for 5-6 minutes per side.

Saturday, January 19, 2013

Low Country Shrimp Boil - Welcome to America

Coming from the Midwest, I had no idea what somebody meant the first time they said they were having a "low boil".  What does that mean?  So let me help my fellow northerners here - a low boil, or  is some kind of shellfish boiled in a heavily seasoned, creole-infused broth with potatoes, corn, and usually sausage.  Usually crab, crawfish, or shrimp are used, and this ends up being a meal and half when you sit down and roll up your sleeves to this feast.


I have decided that this dish, like chili and barbecue, is the epitome of American cooking - shellfish from the Gulf of Mexico, corn and potatoes indigenous to North America, sausages with Polish or French origins, and a spice blend created by a German Nazi refugee.  Apparently the shellfish boil is most common in the low country of Georgia and South Carolina, whose cuisines I absolutely love, but it has spread to New England and the Chesapeake area as well, where people refuse to call it a boil, and instead use the word "feast".  I could get behind this convention, but really don't care what it is, so long as you leave me alone and let me at those tasty shrimp already.  Let's dig in.


Low Country Shrimp Boil

  • 1 large onion, sliced, skin on
  • half head of garlic, smashed
  • 1 tbsp salt
  • 2 lemons, quartered
  • 1/4 cup Old Bay seasoning
  • 4 pounds shrimp, shell on, deveined
  • 2 pounds andouille or kielbasa sausage, cut into 1-2" sections
  • 3 pounds red potatoes, whole
  • 6 ears corn, halved
This recipe is really, stupidly, incredibly easy.  All you need to do is cook things in the proper order, realizing that shrimp cook quickly.  First, gather your ingredients, and make sure they're all cut into serving sized pieces:


Bring to a boil about 1 gallon of water in a large pot with salt.  When boiling, add lemon, onion, and garlic.  Now add the Old Bay seasoning - you can use more or less, or split it up and add directly with the shrimp.

Get your boiling liquid ready to go, and follow the sequence for everything to be properly cooked and not overcooked
Add potatoes, and cook for about 10 minutes.  Add sausage, cook for 10 more minutes.  Add corn, and cook for 5 minutes.  Add the shrimp, stir to submerge, and cook for 3 minutes.  If you want, add the extra Old Bay when you pour in the shrimp.  Serve immediately with more Old Bay, hot sauce, and whatever dipping sauces you like.  Not that this needs any.

Add the shrimp with some more Old Bay if you like

Stir, cook until shrimp are pink and curled, and then serve immediately!
There's a restaurant near me that serves this tossed in a delicious garlic butter sauce, or a cajun sauce if you prefer, both of which are an excellent (though potentially blasphemous) addition.  I intend to figure both of those out, and add to this post in the future.  So stay tuned!

Tuesday, November 20, 2012

30 Minute Cassoulet

I love a good cassoulet - sit me down with that on the menu, and I almost don't care what else the place serves, I'm going to order it.  And what's not to love - a gigantic plate of meat, garlic, some herbs, and white beans, cooked until they're just starting to crisp in a hefty cast iron skillet.  I would love to make this at home, but the problem is that I don't want to sit around making the four or five different cuts of meat that chefs usually nestle into the beans, which is often some infuriating combination of rabbit, duck, Merguez sausage, and other difficult to procure animals or animal bits.

So while nosing through a family cookbook called Fast Food My Way, by Jacques Pepin based on his PBS TV series, I stopped cold when I saw a recipe called "30 Minute Cassoulet".  I almost didn't care what meats were in it, though I was pleasantly surprised.  A recipe that promised all of the flavors of a French bistro dish in less time than it takes to get service from a snotty French waiter?  Check, please.

The last time I saw this much meat in one place... [insert joke here]

30 Minute Cassoulet
from Fast Food My Way, by Jacques Pepin

  • 1 tbsp olive oil
  • 1 pound daisy ham, tough outer skin removed (stand by for description)
  • 3/4 pound mild Italian sausages, cut into 3" pieces
  • 4 bratwurst sausages, cut into thirds
  • 1 cup diced whole button mushrooms (3 oz)
  • 3/4 cup diced (1/2") onion
  • 2 tbsp crushed garlic (4 cloves)
  • 1/2 tsp dried thyme
  • 1 bay leaf
  • 2 15.5 oz cans cannellini beans, drained and rinsed
  • 3/4 cup diced (1") tomato (1 large tomato's worth)
  • 1/2 cup water
  • 1/4 tsp ground black pepper
  • 3 tbsp chopped parsley

Okay, the ingredients.  First and foremost, what the heck is daisy ham?  I asked the same thing.  For a first recipe from this book, I wasn't pleased that he called for some obscure meat product that no red-blooded American has ever heard of.  But not to worry, I looked it up and it turns out that this is just a smoked, boneless ham, typically Boston Butt, and individually sealed up.  I found it with no difficulty in the meat section, over by the cooked ham.  Go America.  Next, the other meats.  I went with mild rather than hot Italian sausage, which I think was the right choice.  And I stayed with the bratwurst called for in the original recipe.

A daisy ham.  This one even had 'daisy' in the brand name.  I cut off the outer skin and then it was just delicious smoked ham.
All kinds of sausage going on here.  Recipe calls for cutting up the Italian and keeping the bratwurst whole

Heat the olive oil in a large skillet and add the ham and Italian sausage.  Do NOT add the bratwurst, that gets steamed / poached in the next step.  Cover and cook over high heat for 7-8 minutes, turning occasionally.  This gets good browning but helps cook everything through, and slows the drippings from burning to the pan.

Brown the ham and Italian sausage with a lid on - not what I would have expected, but it worked

Add the bratwurst, mushrooms, onion, garlic, thyme, and bay leaf.  Mix well and cook for 5-6 minutes.

The next round of additions is the mushrooms, aromatics, and the bratwurst

Getting a bit crowded in the pan, I wondered if maybe I should switch pans.  But I like a challenge.

Add the beans, tomato, water, and pepper, bring back to a boil, reduce heat to low, cover, and boil gently for 5-10 minutes.

Add the chopped tomato and rinsed white beans

This is when I knew the pan was too small.  Oh well.

Give everything a stir to incorporate, cover, and cook on low for just a few minutes!
 
10 minutes of this, and you're good to go.  And if you end up doing other things and letting this cook longer, it's only going to make it better.  At serving time, discard the bay leaf, cut the ham into slices and slice sausage pieces in half, and arrange meat on platter with beans.  Sprinkle with parsley, and serve with Tabasco and Dijon mustard.

Cassoulet, served in 30 minutes or more.

Sunday, July 3, 2011

Sausage-fest

A few years ago, I took a meats class at school.  They have a working slaughterhouse on the premises, and I wanted to know if I had the nerve to process my own animals (turns out I did).  In addition to the butchering process, we learned all kinds of great techniques and recipes, including recipes for jerky, bacon, prosciutto, bologna, and sausages.  I liked making this stuff so much that I tried a few times at home, and then got wise and actually bought some equipment.

That's right, ladies and gentlemen - I own a sausage stuffer.  What, don't you?  Come on, everyone needs one of these!  What's more fun than cramming raw meat into hog intestines?  Nothing, that's what.

A Grizzly brand 5 pound vertical sausage stuffer - best bang for the buck

Allow me to paint a picture for you to convince you that you want to do this.  You're out at a German restaurant, and you get the bavarian sausage assortment.  You think to yourself, these are delicious!  I have to pick some of these up and cook them at home!  But then you go to your Safeway, or your Kroger, or your whatever, and there is no knockwurst to be found.  No bockwurst, no linguisa, no boudin blanc, no andouille.  Maybe there's some chorizo or bratwurst, but these are made by Emeril or Johnsonville, and you know they're shells of their original glory.  But then someone at the store tells you, "hey, you can make any kind of sausage you want.  Just get into the back of my van and I will show you."  And hopefully, you do NOT take him up on this offer, and instead stumble onto my blog and read on about how to do this.

Making sausage is actually surprisingly easy, and I think it's pretty fun.  If you buy ground meat, all you really have to do is toss in seasonings and get it into the casings, which can take as little as 20 minutes if you're good.  Of course, this can also be a very frustrating activity if you never had any instruction in this, so maybe you should read this guide before you run out and try to throw a bratwurst party for 30 hungry Germans.

I have tinkered with equipment in a few different combinations, and here is what I have decided you will need, at the absolute minimum, in order to make sausage:

  1. Sausage stuffer.  This assumes, of course, that you want to stuff the sausage into casings, and not just make patties with the sausage.  5 pounds holding capacity is a good starting point.  These things cost from $30 up to a few hundred, depending on what you get.  I recommend the one from Grizzly tools - it's the same exact one as on Amazon and other places, but isn't marked up as much.  Whatever you do, do NOT use the sausage stuffer tubes that attach to the food grinder of the KitchenAid.  These don't work at all.
  2. A large baking sheet, for collecting the sausages
  3. Toothpicks (all will be made clear later)
  4. A good, sharp knife, preferably a boning knife (for tearing down large hunks of bone-in pork)
  5. A food grinder of some kind, preferably something like the KitchenAid food grinder


There are plenty of good recipe sources online, but what is often frustrating when searching for sausage recipes is that most of them are for recipes USING sausage, not recipes for MAKING sausage.  If you're really serious, I recommend Home Sausage Making, by Susan Peery.  If you're only kind of serious, just read on.

My friends heard that I had this sausage stuffer, and basically demanded that I teach them how to do this.  Perhaps it's a guy thing, I'm not sure.  But there is definitely something satisfying about grinding, linking, and grilling meat without having a butcher do anything for you.  With that, how about we jump into the recipe, and I walk you through the process.


Homemade Italian Sausages
Adapted from Home Sausage Making, by Susan Peery

I have modified this recipe to omit some of the added fat, because I don't think your average Italian sausage really requires the extra, plus if you trim it up right, a pork shoulder has roughly the right proportions.  But if you really want to go the distance, use the original recipe, which calls for 4.5 pounds of lean pork butt, plus 0.5 pounds of pork fat.

  • 5 feet medium hog casings
  • 5 pounds pork shoulder
  • 2 tbsp kosher or coarse salt
  • 1 tbsp fennel seed
  • 1 tbsp freshly ground black pepper (medium grind)
  • 2 tsp crushed red pepper flakes to taste

Let's start at the top here, since this will probably cause the most confusion.  Hog casings?  What the heck does that mean?  Well, essentially it's a euphemism for 'cleaned out hog intestines'.  Yes folks, that's what you've been eating.  My sincerest apologies if you did not know, but it's been working for hundreds of years, and I don't think now is a good time to stop.  Sure, there are artificial cellulose casings for the squeamish, but what's the point?  These things work, and they have great 'grill snap' - that bite you get when subjecting the collagen in the intestinal walls to a dry, high heat.  They're also incredibly elastic and durable, and while slimy and gross to work with, they get the job done.

Where do you get hog casings?  Now THAT is a tough question to answer.  I have found them at local butchers' shops, as well as some grocery stores.  You may want to look by the chicken livers, as well as by the refrigerated pickles.  Look for either a bag, or a 1 pint tub with the casings packed in salt.  They will keep for months preserved in there.

Now, here's how you work with these things.  First, separate out a few feet of the casings from the big ball that will be packed into the tub / bag.  If packed in salt, you will want to rinse them off thoroughly.  I take a big pot, yank out the casings I need, and fill the pot with water, cycling it twice to get all the salt out.  Once I have a strand free, I run water through the casing like a water balloon, to clean it out, check for tears, and make sure there's nothing hiding inside.

Cleaning and separating the hog casings

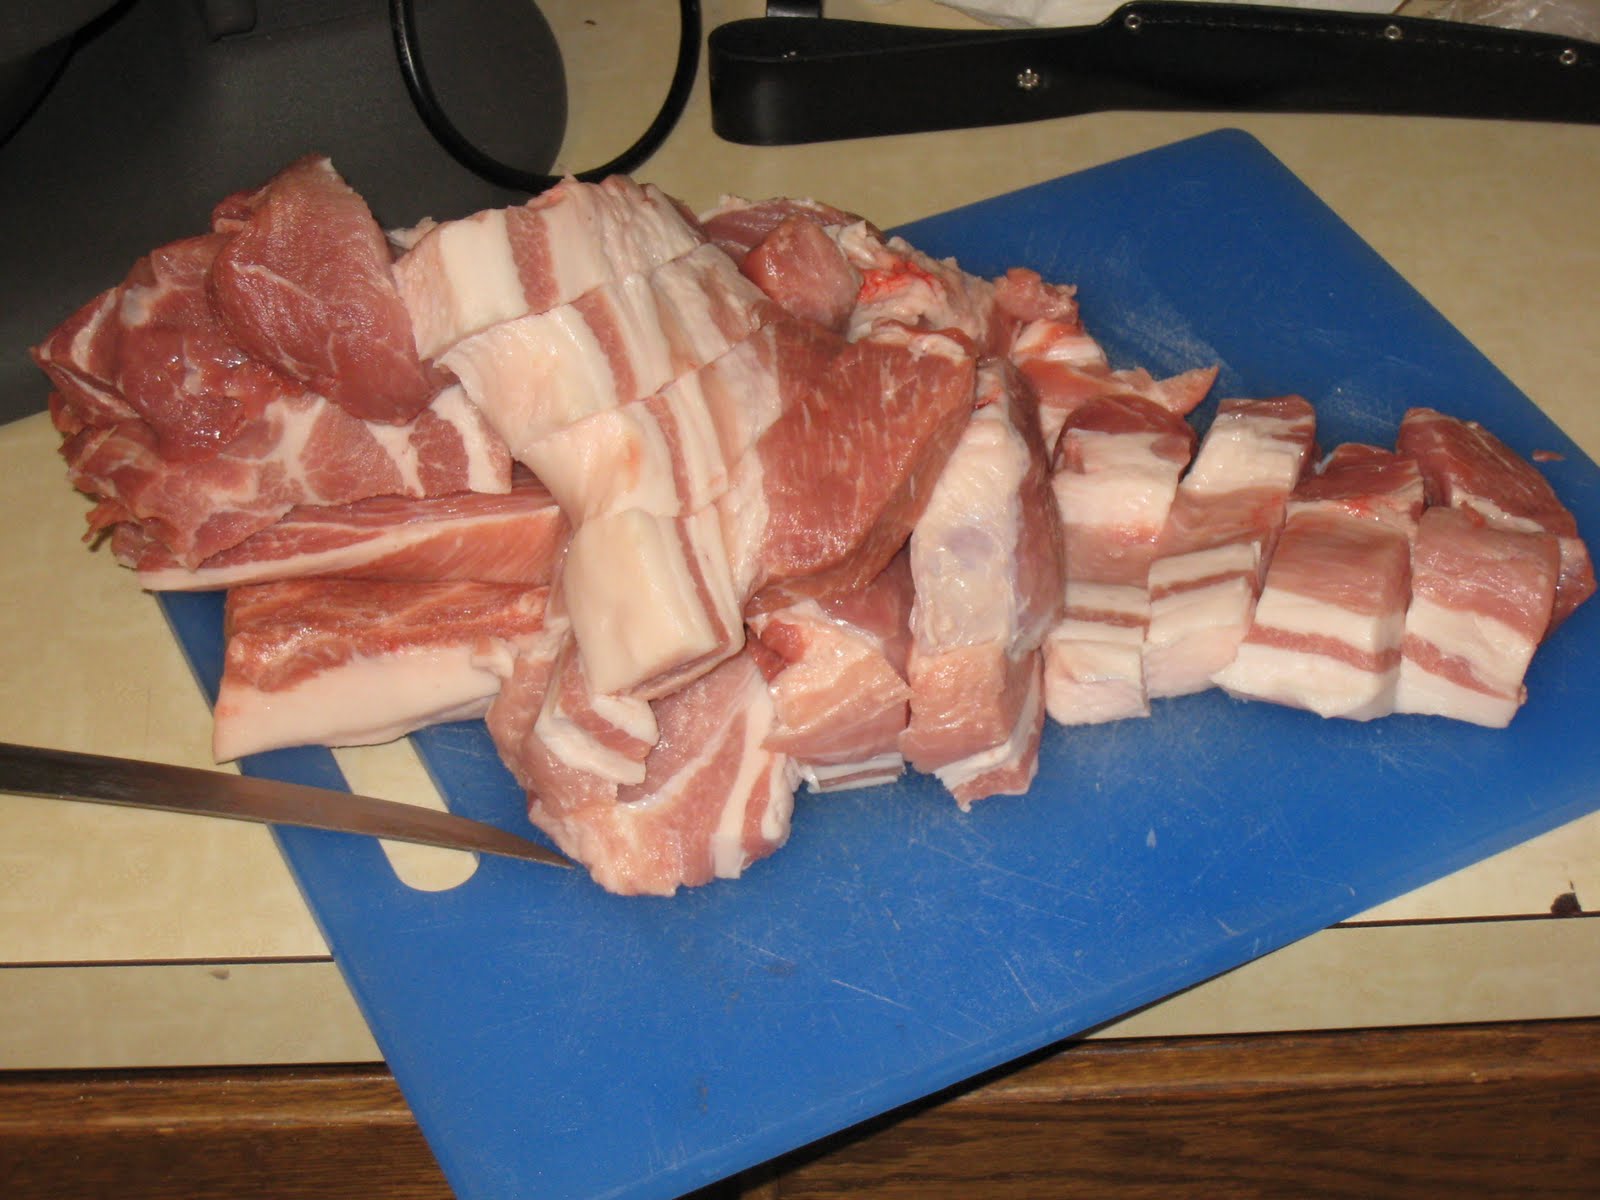
At this point, you've got a big pot of casings ready to go.  The next step is to prepare the pork.  If it's ground pork, you're already done.  But if you're a purist and want to know exactly what cut of meat you're working with (and I suggest you do, since it's more fresh and you can say with certainty what cut of pork you used), I suggest buying a pork shoulder (picnic or butt) and trimming it up for grinding.  Follow the instructions for the grinder, which probably says to cut it into narrow strips, like this:

Trimmed pork shoulder for grinding

Note the amount of fat I left on there - this makes for much more delicious sausage in the end (hey, I never said this would be healthy).  I won't go through the whole process of grinding, but just try to keep everything as cold as possible to make life easier.  In the end, you will have about 5 pounds of ground pork to work with.

Grinding the pork strips

The finished ground pork

From here, you will add your spices.  At this point, you  could make any of a number of sausage recipes, but my friends demanded Italian sausage, so that's what we went with.  Fennel and hot pepper flakes are the main ingredients in hot Italian sausage, so that's what's going on here.  Stir everything up with your hands, and allow to rest and for flavors to combine.

Adding the spices to the pork.  Cook it from here, and you've got Italian sausage patties

Now comes the fun part - stuffing the sausages.  First, install a medium stuffer tube onto the hopper of the sausage stuffer.  Put on a few drops of vegetable oil so the casings don't stick.  Then slide the casings onto the tube, bunching up so they all fit on there.  Tie a knot at the end when you're done, so you've got a big casing 'sock' on this tube.

Loading the casings onto the stuffer tube

A close-up

Fill up the hopper with the meat mixture.  This is why a 5 pound recipe works well - it's the exact amount this thing was designed for.  Put the hopper in the base, and start cranking down until meat starts coming through the tube and is about to start pushing the sock off the tube.  Now stop.  Contemplate your life.  Why am I doing this?  Am I ready for what is about to happen here?  Is anyone around that can witness this?  Actually, I strongly encourage you to have help for this.  Turning the crank and linking the sausages is definitely a two person job.

The stuffer hopper, with 5 pounds of sausage mix loaded and ready for action

Start turning the crank, SLOWLY.  As meat fills up the casings, they will start to fill up and expand.  For the first casing, you will probably get a large air pocket in the casing first.  This is where the toothpicks come in handy.  Just poke a small hole in the casing and let the air out.  Don't get crazy with the holes, or else the casings will rupture and you'll have a mess on your hands.  But use them to keep the links free of air pockets.

You want to use both hands in this process.  One hand should keep some pressure on the tube to dispense the casings only as fast as needed, and the other should wrangle the links coming off into the right shape, and twist them off as they come through.  Note what my friend is doing here - keeping everything under control:

Feeding the sausage into the casings

If you're going to make links, fill up about 4-6" of casing, then twist 2-3 times around.  Repeat with the next link, but twist the OPPOSITE direction.  Otherwise, the links will just unravel themselves, and you'll have a mess at the end.  If you're just doing sausage rope, you don't have to twist anything.  Either way, keep going until you're out of meat in the hopper, and then tie off the last link and head out to the grill.  If you burst a lot of links and have a bunch of meat you want to still try to get cased, open up the hopper, reload, and continue until you are satisfied.
Twisting the links

A little later on...

And, we're done!  Only one blown out casing - not too bad.

That's it!  You have now made your own sausage.  They probably don't look perfect, but mine don't look perfect either.  At least you can say that you made them yourself.  Plus, you can start experimenting with all kinds of different ingredients.  Chicken and apple sausage?  Alligator sausage?  Thanksgiving sausage?  Bacon and bourbon sausage?  Basically, you can make anything into a sausage - you just have to dream it.

Sausage on the grill.  I don't need to give directions here.


The finished product.  Italian sausages, made entirely by you


If you have any amazing successes, I'd like to know about what kind of crazy ingredients you combined.  Maybe I'll post the best recipes, and we can get some kind of underground sausage cult following started.  Or maybe not - just go make sausage!

LinkWithin

Related Posts Plugin for WordPress, Blogger...