Saturday, January 14, 2012

Roast Pork Loin with Shiitake and Leek Compote

I found a recipe allowing me to repurpose a single roasted pork loin dish into five other good sounding recipes, but the basic pork dish didn't sound like a winner.  So I went digging around until I found a good starting point that I would want to actually try.  This dish consists of a pork loin seared and roasted over a bed of leeks and mushrooms, fairly simple to prepare and loaded with flavor.  Plus, the pork is mildly flavored on its own, so you can use it for other dishes afterwards as you see fit.

The roast before boiling down the compote


Roast Pork Loin with Shiitake and Leek Compote
Gourmet, January 1995
  • 1 large leek (white and pale green parts only)
  • 1-pound center-cut boneless pork loin (mine was about 2 pounds, but I used it for other things afterwards)
  • 1 tablespoon plus 1 teaspoon chopped fresh parsley leaves
  • 1 teaspoon unsalted butter or olive oil
  • 1/2 pound fresh shiitake mushrooms, stems discarded, caps cut into 1/2-inch slices
  • 1/2 teaspoon salt
  • 1/2 cup dry red wine
  • 1/2 cup beef broth
  • Garnish: fresh parsley sprigs

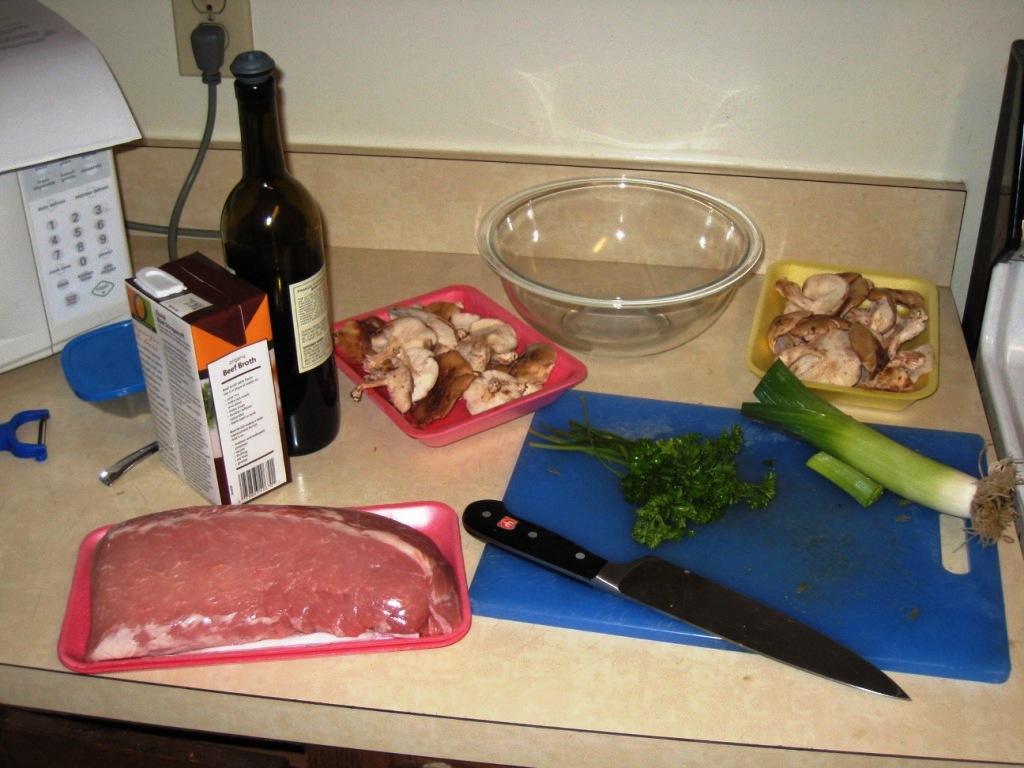
The setup.  I found shiitakes at an asian grocery store for much cheaper than the megamart

Cut leek crosswise into 1/2-inch slices and in a bowl soak in water to cover, agitating occasionally to dislodge any sand, 5 minutes. Lift leek out of water and drain in a colander.

Leeks are notoriously dirty.  Don't skip the step of soaking them, and then lift them out instead of dumping them out (the dirt will have sunk to the bottom of the bowl)

Trim any fat from pork. Season pork with salt and pepper and pat with 1 tablespoon chopped parsley. In a 10-inch oven-proof non-stick or cast-iron skillet heat butter or oil over moderately high heat until hot but not smoking and brown pork loin, turning it. Transfer pork to a plate.

Brown the pork loin.  Cast iron helps hold the heat for this.

Preheat oven to 425°F.

In fat remaining in skillet cook mushrooms and leek with salt over moderately high heat, stirring occasionally, until liquid mushrooms give off is evaporated, about 5 minutes. Add wine and broth and bring to a boil. Put pork on vegetables in skillet and roast in middle of oven 40 minutes, or until a thermometer inserted in center of pork registers 160°F.

Mushrooms and leeks before cooking

Mushrooms and leeks, after cooking.  Again, I highly recommend cast iron on this, or else they might stick/burn or require a ton of oil

Transfer pork to a cutting board and let stand 10 minutes. If vegetable compote is too thin, cook over high heat, stirring occasionally, until almost all liquid is evaporated. Stir remaining teaspoon chopped parsley into compote.

Pork and leek compote, served here with roasted vegetables

Slice pork thin and serve, garnished with parsley, with compote.

Thursday, January 12, 2012

Mushroom Bolognese

This dish is an interesting twist on a standard bolognese, which is usually made with beef.  Don't be fooled - this isn't even a vegetarian recipe.  It's got ground pork, rendering it unsafe for both vegetarians and people keeping kosher.  I consider it a gateway dish to a carnivorous lifestyle - take the meaty flavor of mushrooms, and introduce some pork in there.  Kind of like using electronic cigarettes to get started on smoking.  Anyway, it's another recipe poached from Cooking Light, so at least it's fairly healthy.  Having a food processor will save you a few minutes; using a meat grinder instead of just buying ground pork will add them back.  And of course, since I refuse to learn my lesson, making your own pasta will tack on another hour or two.

Mushroom (and pork) bolognese


Mushroom Bolognese
from Cooking Light, October 2010

  • 1/2 ounce dried porcini mushrooms (I used a mix of wild mushrooms)
  • 1 cup boiling water
  • 1 tablespoon olive oil
  • 2 1/2 cups chopped onion
  • 3/4 teaspoon kosher salt, divided
  • 1/2 teaspoon freshly ground black pepper, divided
  • 1/2 pound ground pork
  • 8 cups finely chopped cremini mushrooms (about 1 1/2 pounds)
  • 2 tablespoons minced garlic
  • 2 tablespoons tomato paste
  • 1/2 cup white wine (I use dry vermouth)
  • 1 (14-ounce) can whole peeled tomatoes, undrained
  • 1/4 cup whole milk
  • 10 ounces uncooked whole-wheat spaghetti
  • 1 tablespoon kosher salt
  • 1 1/2 ounces Parmigiano-Reggiano cheese, grated
  • 1/4 cup chopped fresh parsley

Combine porcini and boiling water in a bowl; cover and let stand 20 minutes or until soft. Drain porcini in a colander lined with a paper towel over a bowl, reserving liquid. Rinse and chop porcini. Chop your button mushrooms and onions separately, and have everything ready.

Still looking for opportunities to use the food processor.  I got an uneven cut on these, but it worked out okay

This is the bulk of what you need to make this dish, plus some tomatoes, wine, and milk

Heat olive oil in a Dutch oven over medium-high heat. Add onion, 1/2 teaspoon salt, 1/4 teaspoon pepper, and pork; cook 10 minutes or until pork is browned, stirring to crumble pork. Add cremini mushrooms, garlic, remaining 1/4 teaspoon salt, and remaining 1/4 teaspoon pepper; cook 15 minutes or until liquid almost evaporates, stirring occasionally. Add porcini; cook 1 minute. Add tomato paste; cook 2 minutes, stirring constantly. Add reserved porcini liquid and wine; cook 1 minute, scraping pan to loosen browned bits. Add tomatoes; bring to a boil. Reduce heat; simmer 30 minutes, stirring occasionally and breaking up tomatoes as necessary. Stir in milk; cook 2 minutes.

Brown the meat.  I might use cast iron next time

After cooking the button mushrooms, add the chopped rehydrated porcini.  I used a mix of wild mushrooms

The mixture, after simmering for 30 minutes but before adding the milk

Cook pasta according to package directions, adding 1 tablespoon salt to cooking water. Drain. Toss pasta with sauce; top with cheese and parsley.


Sunday, January 8, 2012

P. F. Chang's Chicken Lettuce Wraps

I'm pretty sure that the lettuce wraps at P.F. Chang's put them on the map.  Not only are they awesome, but they're an interesting way to convince people that iceberg lettuce has any value in this world (yeah, I went there).  So naturally, rather than having to put on pants to enjoy lettuce wraps, I've been attempting to live the dream at home over multiple attempts at a copycat recipe.  Well folks, I think I've got it.  Close your eyes, imagine you're sitting at an exotic Chinese restaurant near a giant brass horse and staffed by surly white teenagers, and you won't know that you're not at Chang's.

Lettuce wraps, the way they were meant to be experienced


P. F. Chang's Chicken Lettuce Wraps (copycat recipe)
from Food.com, modified slightly by me

  • 1.5 tablespoons oil (canola and a little sesame)
  • 1 boneless skinless chicken breast, diced or ground
  • 1/2 cup water chestnuts
  • 1/3 cup mushrooms (I used button mushrooms)
  • 1/4 yellow onion, minced
  • 1 teaspoon minced garlic
  • 4-5 leaves iceberg lettuce (I used Boston bibb lettuce)

'Special' Sauce
  • 2 tbsp sugar
  • 1/4 cup water
  • 1.5 tbsp soy sauce
  • 1 tbsp rice wine vinegar
  • 1 tbsp ketchup
  • 1/2 tbsp lemon juice
  • 1/8 teaspoon sesame oil
  • 1 teaspoon sriracha
  • 1/2 tablespoon hot mustard powder
  • 1 teaspoon hot water

Stir Fry Sauce
  • 1 tablespoon soy sauce
  • 1 tablespoon brown sugar
  • 1/4 teaspoon rice wine vinegar

Make the special sauce by dissolving the sugar in water in a small bowl.  Add soy sauce, rice wine vinegar, ketchup, lemon juice and sesame oil.  Mix well and refrigerate this sauce until you're ready to serve.  Combine the hot water with the hot mustard and set this aside as well.  Eventually add your desired measurement of mustard and garlic chili sauce to the special sauce mixture to pour over the wraps.

Dice the onions, water chestnuts, and mushrooms.  Or, if you have one, pulse the onions and garlic until the onions are at a medium chop, then add the mushrooms and water chestnuts and pulse a few more times to get everything to the right size.  Dice the chicken, or use ground chicken if you can find it.  I spun mine through the food processor, but only because I just got it and have been desperately trying to use it for anything that will fit in there, such as overripe fruit, old Christmas ornaments, or expired credit cards.

Take that chicken for a spin in the food processor to save time

Bring oil to high heat in a wok or large frying pan.  Stir-fry the chicken for 4 to 5 minutes or until cooked through.  Remove chicken from the pan and allow oil to heat again.  Keep oil hot in the pan, adding another drop if necessary.  Once the pan is hot again, add the chicken back in along with the garlic, onions, water chestnuts and mushrooms.  Add the stir fry sauce and sauté the mixture for a couple minutes.

You don't even need a wok for this recipe - just sauté the chicken, then add in the vegetables and sauce.  It's pretty easy.

Just make sure to reheat the pan between the two steps, so you're not boiling the vegetables.

Immediately transfer to a serving plate along with the lettuce "cups".  If you want to get really fancy, you can fry some maifun rice stick noodles in hot oil as the bed for the noodles, but I tried this once and didn't have much luck.  Top with the "Special Sauce", and enjoy!


These were long gone before the steam was done coming off that plate

Saturday, January 7, 2012

Artichoke Ravioli with Roasted Tomatoes

Since my recent food processor acquisition, I've been itching for excuses to try it out, and a ravioli filling seemed like a good idea at the time.  That's right, ravioli - the wonton of the Italian world.  For some reason I had been avoiding making ravioli for years, figuring it would take too long.  But I found a good sounding recipe, bought all my ingredients, and many hours later I had produced something moderately resembling ravioli.  Granted, it looked absolutely nothing like the pictures I saw online, but with a second pass I believe it can be tweaked significantly to improve the presentation.

The recipe was stolen and adapted from Gourmet magazine, but I have changed it per reviewer guidance after having made it, to include more filling, different flour, and adjustments to the cooking process.  If you want, you can use my earlier recipe for semi-semolina pasta, or you can just use this slightly different recipe, which worked just fine and had the right ratio of dough to filling.  See the end of the recipe for an interesting substitution.

Hey!  I make you the Ravioli!


Artichoke Ravioli with Roasted Tomatoes
Adapted heavily from Gourmet magazine

For the pasta:
  • 1 1/2 cups semolina flour
  • 2 large eggs
  • 1/2 teaspoon salt
  • 2 tablespoons water
  • All-purpose flour, for dusting

For the filling:
  • 2 tablespoons unsalted butter, cut into pieces
  • 1 small onion, chopped (3/4 cup)
  • 14 oz frozen artichoke hearts, thawed and patted dry
  • 3 cloves garlic, chopped fine
  • 1.5 ounce finely grated Parmigiano-Reggiano (3/4 cup)
  • 1/2 cup chopped fresh flat-leaf parsley
  • 1 extra large egg yolk, or 2 medium
  • 3/4 teaspoon fresh lemon juice
  • ½ tsp red pepper flakes
  • 1 teaspoon salt
  • 1/3 teaspoon black pepper
  • 3/4 teaspoon freshly grated nutmeg
  • 1 large egg white, lightly beaten with 2 teaspoons water (for egg wash)

For the assembly:
  • 1 tablespoon unsalted butter, cut into pieces
  • 4 medium plum tomatoes, trimmed and cut into 1/4-inch dice (1 cup)
  • 1/3 cup heavy cream
  • 1 ounce finely grated Parmigiano-Reggiano (1/2 cup)
  • 1/4 teaspoon salt
  • 1/4 teaspoon black pepper


Tools for the job:
  • Pasta roller (essential)
  • Basting/pastry brush (essential)
  • Food processor (recommended for dough, essential for filling)
  • Ravioli crimper (optional)

Blend flour, eggs, salt, and water in a food processor until mixture just begins to form a ball, adding more water, drop by drop, if dough is too dry (dough should be firm and not sticky).  Process the dough for 15 seconds more to knead it.  Transfer to a floured surface and let stand, covered with an inverted bowl, 30 minutes to 1 hour to let the gluten relax and make rolling easier.

Getting the dough ready.  Of course I forgot to take a picture of the final dough, but I assure you it's quite boring to look at.

Heat butter in a 12-inch heavy skillet over moderately high heat until foam subsides, then sauté onion, stirring occasionally, until golden, about 6 minutes.  Add artichoke hearts and sauté, stirring occasionally, until tender, 6 to 8 minutes.  Add garlic cloves and saute with mixture for final 2 minutes.  Remove from heat and cool slightly.

Saute the artichokes with the onion and garlic, to go into the filling

Transfer all but 3/4 cup artichoke mixture to cleaned bowl of processor (reserve remaining artichoke mixture in skillet), then add cheese, parsley, red pepper flakes, yolk, lemon juice, salt, pepper, and nutmeg and pulse until mixture is coarsely chopped.

Cut pasta dough into 4 pieces, then flatten each piece into a rough rectangle and cover rectangles with an inverted large bowl.  Make sheets for ravioli following pasta roller instructions (setting #5 on Kitchenaid rollers).  What?  You don't have a pasta roller?  Well, why are you making this?!  When done, the dough will be a smooth sheet, approximately 24-30 inches long (that's 60-75 cm, for you crazy metric people).

The ravioli sheets, ready for my further pleasure

Put a sheet of dough on a floured work surface and drop 1 1/2-teaspoon (I'm done converting) mounds of filling 1 1/2 inches apart in a row down center of one half of sheet.  I'm not going to tell you how to make your ravioli - you can make them into circles, or squares, and make them small or large.  I made 8 per sheet, 4 by 2, cutting each sheet in half first so I could drape it over afterwards.  What I should have done was trim the edges down a little, because they were still so huge that each one took up most of my plate, with not enough filling out at the edges.  So I guess I might try circles next time, as the original recipe suggested.


Lay out the filling in a way that seems appropriate.  I went for 8 ravioli per sheet - you could do 6 circles, there's no magic here.


Brush egg wash around each mound, then fold other half of sheet over filling.  Press down firmly around each mound, forcing out air (air pockets increase the chance that ravioli will break during cooking.)  Cut pasta (between mounds) with cutter into 3-inch rounds, or squares, or whatever you want to do.  Line a large shallow baking pan with a clean kitchen towel (not terry cloth) and dust towel with flour, then arrange ravioli in 1 layer in it.  I'll tell you what you shouldn't do - don't use a WET paper towel and let the ravioli sit too long.  Make more ravioli with remaining pasta dough, 1 sheet at a time, and remaining filling, transferring ravioli to lined pan.

Apply the egg white wash around the filling.  This will act as a glue for the layers

Drape the other half of each sheet over the top, press out the air, and crimp with a ravioli crimper (or a fork).

And now, some prep work: put an oven rack in middle position of the oven and preheat to 400 °F.  Lightly butter a large baking dish.  Bring a 6- to 8-quart pot of salted water to a boil. 
Roast the tomatoes on a sheet pan until softened, about 10 minutes.  Reduce temperature to 350 °F.

While tomatoes are roasting, add ravioli to boiling water.  Stir carefully to separate, and, adjusting heat to keep water at a gentle boil, cook until pasta is just tender, about 6 minutes.  Transfer with a slotted spoon to a colander.  Amazingly, while this dough will cook as fettuccine in about 2 minutes, it takes much longer when assembled in ravioli form, even when rolled just as thin.  So don't skimp on the cooking time, but don't overdo it either.

Boil your ravioli for 6 minutes.  Note the presence of wine to help this process along.  It IS Italian cooking, after all.

Transfer half of the ravioli to large baking dish and top with half of artichoke mixture, half of tomatoes, half of cream, and half of cheese.  Repeat with remaining ravioli, artichoke mixture, cream, and cheese.  Sprinkle with salt, and black pepper.

Layer your ravioli with the toppings and bake for 15 minutes.  You'll have to deconstruct this before plating - I might do single layers next time, and will update the recipe accordingly.
Bake, uncovered, until ravioli is heated through and cream is bubbling, about 15 minutes.  Serve by separating ravioli from each other and plating with artichoke and tomato mixture.  Garnish with black pepper and more fresh Parmesan cheese.

Tip: if you want to make your life REALLY easy, give up on making dough and just buy some wonton wrappers from an Asian grocery store.  They're almost exactly the same, and will buy you back an hour of your life.  Will anyone know the difference?  Probably not, unless they're fresh off the boat Italian, and they're not going to let you cook for them anyway.  Just take them to the Olive Garden where, if I understand the ad industry correctly, all Italian immigrants love to be taken.

Wednesday, December 14, 2011

Hong Kong-Style Beef with Udon Noodles

I tend to stir-fry over any other form of cooking, because I like those flavors and the dishes come together quickly.  I'm always on the lookout for new variations on my dishes, as well as simple recipes that make my stir-frying lifestyle a bit easier.   So when I randomly stumbled on this recipe from Wegmans, I hung onto it to make one day.  And a mere 6 years later, I finally checked it out.  I'm not sure why I waited so long - it's great, not terribly difficult, and makes a mountain of food.  Plus, I had never cooked with mushroom flavored soy sauce before, and any time I get to use a new ingredient is a good day.

You'll end up with about 4 servings, though I pass no judgment on how many people this will end up feeding :)

This dish tastes similar to what you would get from any of the mongolian BBQ restaurants scattered around the country, but it's probably more healthy since you know what went into it, and probably also about a third of the cost.  We went all out - NY strip instead of beef sirloin - but you could use the proposed cut of beef with great results.  Also, my friends suggested adding some mushrooms next time, which I would probably add (in small quantities to avoid screwing up the cooking process) along with the meat.

For this recipe, I only modified the sequencing of the cooking process, and also removed store-branded products from the list to replace them with actual names.  If you buy these ingredients from your average asian grocery store (and they are all commonly found there), you'll probably pay 25-50% of what you would pay at a standard American megamarket.  And that assumes they would even have some of this stuff, such as mushroom-flavored soy and frozen udon.  Don't bother being clever and substituting things like spaghetti or regular soy - it won't be the same experience.

Hong Kong-Style Beef with Udon Noodles
from Wegmans magazine
  • 1 lb beef sirloin, sliced thinly across the grain
  • 3 tbsp water
  • 1 1/2 tbsp cornstarch
  • 2 pkgs (6.98 oz each) frozen udon noodles, thawed
  • 2 tbsp oyster sauce
  • 1 tbsp mushroom flavored soy sauce
  • 1 tbsp sugar
  • 8 oz bean sprouts
  • 1 bunch green onions, trimmed, cut in thin strips 2-2 1/2 inches long (about 1 cup)
  • 2 tbsp vegetable oil
  • 2 tbsp fresh ginger root, peeled, sliced thin
  • 1/2 large onion, peeled, 1/4-inch slices (about 1 cup)


Place beef in small bowl.  Add water, 1 tbsp at a time, working it in with your hands until the water is absorbed into beef.  Sprinkle cornstarch over the beef and work in with your hands to coat all the pieces.  You're doing this so that you get a nice crispy coating to the meat; it is not 100% necessary, but an interesting variant I've seen before, notably in many of P.F. Chang's beef dishes (their mongolian beef in particular - I have a recipe if anyone wants it).


Loosen the noodles by hand and set them aside.


Mix oyster sauce, soy sauce, and sugar in a small bowl, and set aside.


Here's all of the prepped ingredients.  In retrospect, this recipe was slightly more involved than I expected


Blanch the sprouts and green onion in large pot of boiling salted water 5 seconds; drain and set aside.  Why?  Because you're going to put them in at the very end of the cooking, and you want to take the bite out of the green onions without overcooking them.  Is it a senseless waste of energy?  Maybe, but you always follow the recipe the first time.

The blanched sprouts and green onions, after shocking in ice water.


Heat your pan until it's as hot as it's going to get.  Once the pan is heated, drizzle the oil around the sides of stir-fry pan, then immediately add the beef, ginger, and onion slices.  Don't wait too long or you'll burn the oil - it's a temperature game (you want the pan rocket hot, the oil below 375 F so it won't oxidize and become toxic [and here's another, more scientific link from J. American Science], and the meat as hot as you can get it without burning the oil).  Now stir-fry for 3-4 min.  I did this in two batches, and you should too - don't crowd the pan!

Add the beef, but leave plenty of room so that you have enough heat to cook everything quickly.  Better to do 2 batches correctly than screw everything up at once

This is about as much as you should have in your pan.  Any more and you won't be stir-frying, you'll be steaming / boiling while the meat gets dried out.

This is half the batch.  Notice the brown color on there, from the Maillard reaction.


Add noodles; stir fry about 1 min.  Add sauce; stir fry 30 seconds, until heated through.  Try to fold rather than stirring, so you don't break up the noodles too much.  Add sprouts and green onions to pan.  Stir fry briefly to heat through and blend. Serve.


Toss the noodles together with the sauce and meat, and then add the sprouts and greens

The finished udon noodles, served with chinese broccoli


LinkWithin

Related Posts Plugin for WordPress, Blogger...