Saturday, January 21, 2012

Pumpkin Soup with Cran-Apple Relish (Vegetarian)

I realize it's no longer the fall, but I really wanted some pumpkin soup this week.  And this is one of my favorites, in addition to the new pumpkin shrimp bisque I discovered last year.  It's very simple, and the garnish is awesome.  I'm pretty sure it would go well on other things too, but haven't figured out what just yet.  For a touch of class, drizzle some honey over the top - people will think you went to culinary school, even when you just took a bunch of things out of cans and stirred them together (I'm pretty sure this is what some pros do anyway).

Pumpkin soup!


Pumpkin Soup with Cran-Apple Relish
based on a Rachael Ray recipe

  • 1 tablespoon extra-virgin olive oil
  • 2 tablespoons butter
  • 1 fresh bay leaf, or 2 dried
  • 2 ribs celery with greens, finely chopped
  • 1 medium yellow onion, finely chopped
  • Salt and pepper
  • 3 tablespoons all-purpose flour
  • 1 teaspoon fresh thyme, or 2 teaspoons dried thyme
  • 2 teaspoons hot sauce (I used Frank's, or you could use Tabasco), or to taste
  • 6 cups vegetable stock
  • 1 (28-ounce) can cooked pumpkin puree
  • 2 cups heavy cream (I use 1 cup heavy cream and 1 cup half-and-half)
  • 1/2 teaspoon freshly grated nutmeg
Relish:
  • 1 crisp apple, such as McIntosh or Granny Smith, finely chopped
  • 1/4 red onion, finely chopped
  • 2 tablespoons lemon juice
  • 1/2 cup dried sweetened cranberries, chopped
  • 1 teaspoon chili (or chile) powder
  • 2 teaspoons honey
  • 1/2 teaspoon ground cinnamon
Most of the ingredients, after starting the onion and celery.  This all comes together quickly.

Heat a medium soup pot over medium to medium high heat. Add the oil and melt the butter. Add bay, celery, and onion. Season the vegetables with salt and pepper. Cook 6 or 7 minutes, until tender. Add flour, thyme and hot sauce, to taste, then cook flour a minute. Whisk in stock and bring liquid to a bubble. Whisk in pumpkin in large spoonfuls to incorporate it into the broth. Simmer soup 10 minutes to thicken a bit then add in cream and nutmeg. Reduce heat to low.

Stir in the flour after cooking the vegetables, and you end up with something like a roux - this will thicken the soup

While soup cooks, assemble the relish: combine apple, onion, lemon juice, cranberries, chili powder, honey and cinnamon.  I used the same chile powder that I use in my beef chili - a mix of dried peppers without the other ingredients found in chili powder.  Didn't seem to make a huge difference, so use whatever you've got.  I used a low quality chili powder from a can once and it actually did ruin this, so be sure to use something decent, and don't go overboard.

This garnish is arguably the best part of the soup

Remove bay leaves from soup and pulse with a stick blender to puree the sauteed vegetables.  Adjust seasonings in soup and relish and serve soup in shallow bowls with a few spoonfuls of relish and a drizzle of honey.

Sunday, January 15, 2012

Slow Cooker Beef Chili

If you've been following the posts, you might have noticed that I'm an avid fan of the pressure cooker.  Well, I recently inherited an old Crock Pot, and thought I would try out the slow cooker method for a change.  They're both very convenient tools - one lets you cook very quickly, and one lets you cook quite lazily.  However, even with the slow cooker's appeal of turning it on and leaving for the day, I had to do a lot of prep work to get the final product to come out to my liking.  You can't just throw everything in there raw and have it come out perfectly, after all.

So I made my standard chili recipe, which is an amalgam of different recipes loosely inspired by that of Dinosaur BBQ up in Syracuse, NY.  They have a cookbook I highly recommend, with tons of other good stuff.  I browned the meat, put everything in the slow cooker, and headed off to work.  And sure enough, when I came back at the end of the day, it was chili, and the house smelled fantastic.

Let me head a few of you off at the pass here - I recognize that putting beans in my chili makes it not officially 'competition ready' chili.  I further recognize that ingredients such as cinnamon and brown sugar may seem strange in a classical chili recipe.  But I also recognize that up where I am, this far away from Texas, I can call practically anything with beef, tomatoes, and chile peppers a bowl of chili, and nobody's going to hogtie and brand me.

It's chili!  Be excited.


Slow Cooker Beef Chili
From a variety of sources, assembled by me

  • 2 tablespoons olive oil -- (up to 3 tbsp)
  • 2 pounds boneless chuck or round -- cut in 1" cubes
  • 2 tbsp garlic, minced
  • 3 cups coarsely chopped onion
  • 1 green bell pepper, diced
  • 1 dash crushed red pepper flakes
  • Fresh chile peppers to taste (I used 2 serranos)
  • 1 28 oz can tomatoes with juice, coarsely chopped, or 28 ounces plum tomatoes, peeled
  • 1 tsp whole cumin seeds, ground
  • 1 teaspoon dried oregano
  • 1 3 inch stick cinnamon, halved
  • 2 bay leaves
  • 1 1/2 tbsp chile powder*
  • 1½ tbsp brown sugar
  • 1 teaspoon salt, or to taste
  • 1 cup beef broth
  • 1-2 cups cooked red kidney beans (optional)
  • 2 tablespoons finely ground yellow cornmeal or tomato paste (optional)
  • 1 cup tightly packed, minced fresh cilantro
  • grated cheddar cheese, as a garnish (optional)
  • sour cream, as a garnish (optional)
  • finely chopped onions, as a garnish (optional)
*What is chile powder?  How is it different from chili powder?  Well, "chile" is Spanish for pepper (capsicum, not what you grind up and pass with salt) - think bell peppers and habaneros and such.  "Chile powder", therefore, refers to ground up chiles, nothing more.  "Chili powder", on the other hand, is a pre-mixed spice blend typically containing, among other things, cayenne, salt, pepper, cumin, and, strangely enough, chile powder.  To make chile powder, gather up your favorite dried chiles and put them in a coffee grinder.  I recommend pasilla, guajillo, and ancho peppers, all of which can be found at Latin markets.
Trim meat of excess fat.  If you're using fresh tomatoes like me, slice a small 'x' in the top of each one and plunge into boiling water for 60 seconds, then immediately into ice water.  Then just peel the skins off!

To peel a tomato, slice an 'x' into the bottom of a tomato and boil for 1 minute...

...then immediately plunge into ice water.  See how the skins fall off?

Heat 2 tablespoons oil in a heavy skillet (preferably cast iron).  Over medium-high heat, brown the meat in 2-3 batches.  Remove to a platter and set aside.  Do NOT attempt to brown all of the meat at once; I have re-enacted this mistake for your benefit, and include a photo showing you exactly why you shouldn't.

This would be an appropriate amount of meat to brown at once

This is too much meat.  Do you see all of that liquid boiling under the meat?  Guess what - you're now steaming your meat, not searing it.  Not to mention that all of that delicious meaty goodness is escaping from the meat rather than being 'sealed in', a misnomer but still the easiest way to explain what you want.

Adding more oil if necessary, saute the garlic, onions, green pepper, and hot pepper (if desired) for 3 minutes, scraping up any browned bits from the bottom of the pan.  Add the browned meat and aromatics to the slow cooker and add the tomatoes and beef broth, pouring some of the liquid first in the sauté skillet to deglaze and get all the juicy bits off the bottom if separate pan was used in first step.  Stir in the spices and salt.  Put the chili on low, and cook for 6-8 hours.

Serrano peppers before mincing.  I use a spoon to remove the seeds and membrane, which is where the heat is concentrated.  Did you know you can take the membrane out of a habanero and it's mild enough to eat with ice cream?

Chile powder.  It's just chiles - no other spices.  You're thinking of chili powder.  Don't mix those up.

Vegetables being sauteed before adding to the slow cooker.  This is mostly to lift the browned meat bits off of the pan.

Once everything's already been mostly cooked, go ahead and finish it in the slow cooker for another 6-8 hours.  This old guy behaved like a champion - perfectly tender in 6 hours on low.

Test the beef for doneness.  If it is not sufficiently tender, crank the heat to high and cook for another 30-45 minutes.  When done, remove the bay leaves and cinnamon sticks.  Stir in the kidney beans (if desired) and cilantro.  If the chili is too thin, gradually whisk in the cornmeal or tomato paste until thickened.

You can garnish this however you like, but I like cheddar cheese, cilantro, sour cream, and raw onions.

Slow-cooked chili, garnished simply with cheese and onions

Spicy Black Bean Soup, or Beans: Nature's Digestive Nightmare

I'm not sure what it is about black bean soup, but my dad and I both seem to really enjoy it.  Maybe because we're Italian and it's a latin thing, or maybe because it's rich, fairly healthy, and not overly pungent.  A good black bean soup, to me, has a nice backbone of garlic and spices, but isn't overwhelming in any way.  It's served warm but not hot, and it's not pushy what you do with it - you can eat it as a dish or as a side.  It just exists to make you happy, which this recipe did for me.

I found a recipe for a basic black bean soup, but it called for canned beans.  And I wanted to start from scratch, using staples common to latin america that I knew I could keep for a while and pull out of storage at a moment's notice down the road.  So I made my version from dried beans, which requires some advance planning.  It also calls for cooking the beans with kombu, a form of kelp seen most commonly in recipes for dashi, which is the base for miso soup.  Kelp is one of the main culinary sources of glutamic acid (related to MSG, the condiment we all love to hate), and plays a strong part in the history of the word "umami", which many food lovers have been hearing a lot recently.  Cooking beans with the kombu will leach out some of the glutamines from the seaweed, and will give your vegetarian soup additional savoury notes without having to add chicken broth.

Now, as some of you may know, beans often pack a hidden surprise with them, in the form of awkward moments for you and your company a few hours after dining.  This is because beans contain a large amount of oligosaccharides, which are chains of roughly 2 to 10 simple sugars (such as glucose and fructose).  The human digestive track doesn't typically contain many (if any) anti-oligosaccharide enzymes, but the intestines do.  So guess what?  When those complex sugars find their way to the intestine, it's like Cinco De Mayo down there for your intestinal bacteria, and they just go to town.  And if you've ever made beer or bread before, you know that multiplying, festive bacteria create gas, and hopefully you can figure out what happens next.

Why We Should Keep Eating Beans
Fortunately for us, mankind recognized five things about beans a long time ago:

  1. Beans are really healthy for you, containing high amounts of fiber, protein, complex carbohydrates, folate, and iron.  Along with lentils, they should be a staple in every vegetarian's diet, providing many of the necessary amino acid constituents that are otherwise hard to find in most vegetables.
  2. If you eat a lot of beans, you can actually condition your body to break down their complex sugars.  It's a tough love campaign, but it will happen.
  3. There are ways to cook beans that can remove a number of these complex sugars.  More on this shortly.
  4. There are natural and man-made products to help with your crippling, post-bean gas.  These include products like Beano, and herbs that fall under the category of "carminatives", meaning prevent formation or they facilitate expulsion of gas.  This includes epazote, cumin, coriander, anise, and even pepper.  Side note - the current Mayor of London, Boris Johnson, has decreed that "carminative" is his favorite word.  I'm not making this up.
  5. Maybe it's worth it to just eat the beans and deal with the hand you are dealt afterwards.  Because, like my mom always said, "when life gives you lemons, just shut up and eat your damn lemons."


So How Should I Cook Beans so My Dog Will Stop Trying to Crawl Under the House After Dinner?
You may have heard a number of methods - soak them, soak them in distilled water, boil them for an hour, soak them AND pre-boil them, spin them in a bag over your head while throwing chicken bones on the floor and chanting, and so forth.  So I figured the best way to lay this one to bed was with actual, no-kidding data collected by Turkish researchers and published in the Pakistan Journal of Nutrition (where apparently this kind of thing is relevant).

In "The Effect of Soaking and Cooking on the Oligosaccharide Content of Sekera Dry Bean Variety (P. vulgaris, L) Grown in Turkey", by I. G. Sat and F. Keles, Pak. J. Nutrit. 1 (5): 206-208, 2002, many of the methods above are compared in terms of initial and final oligosaccharide content.  This included raw and soaking over a variety of lengths of time, cooking for different lengths, and cooking with or without a pressure cooker.  And here's the final breakdown, ranked from the most gas to the least:

Bean Gassiness Levels, Highest to Lowest
  • Raw
  • Cooked in boiling water (60 min)
  • Pressurized cooking (121 C, 15psi) for 30 min
  • Soaked in distilled water 12 hr and cooked in boiling water (60 min)
  • Soaked in distilled water 18 hr and cooked in boiling water (60 min)
  • Soaked in 0.5% NaHCO3 (baking soda) solution 12 hr and cooked in boiling water (60 min)
  • Soaked in 0.5% NaHCO3 solution 18 hr and cooked in boiling water (60 min)
  • Soaked in distilled water 12 hr and pressurized cooking (121 C, 15psi) for 30 min
  • Soaked in distilled water 18 hr and pressurized cooking (121 C, 15psi) for 30 min
  • Soaked in 0.5% NaHCO3 solution 12 hr and pressurized cooking (121 C, 15psi) for 30 min
  • Soaked in 0.5% NaHCO3 solution 18 hr and pressurized cooking (121 C, 15psi) for 30 min

So clearly, the best solution to reduce the gas-causing sugar content is to do EVERYTHING, which I'm not prepared to do.  They go on to say that soaking in the alkali solution may destroy B vitamins, and propose using tap water as a good compromise.  So I'm prepared to use my pressure cooker after having soaked the beans for 12 hours, which I consider to be a fair compromise.  By the way, if any budding scientists read this and thought "how the heck can I boil something at 121 C?" since water boils at exactly 100 C, well, that's the magic of cooking under pressure!

That was a lot of science.  Let's go through a recipe and make it worth your while.


Spicy Black Bean Soup
This one's all me, baby - a Frankenstein recipe from many places
  • 2 tablespoons olive oil
  • 1 1/2 cups chopped red onion
  • 1 4-ounce can diced mild green chilies
  • 2 garlic cloves, chopped
  • 1 tablespoon chopped jalapeño chili with seeds
  • 1 tablespoon ground cumin
  • 1 1-pound bag black beans, soaked overnight in cold water
  • 1 4"x8" piece of kombu kelp (found at asian grocery stores)
  • 2 cups canned low-salt vegetable broth
  • ½ cup red wine
  • 1 tomato, diced
  • 1 lime
  • 8 tablespoons chopped fresh cilantro
  • Sour cream
  • Tortilla strips / chips, or corn tortillas and enough oil to fry them

If you're soaking your beans, put them in a large bowl of cold tap water.  Soak for 12-18 hours as directed by the Turkish folks above.  Then DRAIN this water - don't use it, or you're just going to end up with the same result as if you hadn't soaked them.

The soaked beans in the pressure cooker, along with the kombu for some extra flavor enhancement

Now place your beans and the kombu in a pressure cooker, bring to temperature, and cook for approximately 30 minutes.  The first few times you do this, err on the side of overcooked, but you can gradually reduce this if your beans start falling apart because they're overcooked.  You want them to have some bite, but not dissolve completely (unless you're into that sort of thing).

The beans after they've cooked for 30 minutes.  Check them to make sure they're cooked through; if not, boil for a few minutes

While beans are cooking, heat olive oil in heavy large pot over medium-high heat. Add onion, green chilies, garlic, jalapeño, and cumin. Sauté until onion is tender, about 5 minutes. Have this mixture at the ready. 

How could these ingredients possibly do you wrong?

Once beans are cooked through, remove the kombu, and add the mixture from the pan to the bean pot along with the broth, tomato, and wine. Bring soup to boil. Reduce heat to medium-low; cover and simmer (not under pressure) until the flavors blend, about 15 minutes. Puree 3 cups soup in batches in blender. Return puree to same pot. 

If you want to get really fancy, take some corn tortillas and cut them in strips, then fry them in a little canola oil for 30 seconds and drain on paper towels.  Use these as a garnish - they make a world of difference and add some class to your soup.

Fried corn tortillas, as a garnish

Add 6 tablespoons chopped cilantro to the soup, season to taste with salt and pepper, and squeeze in lime juice.  Ladle soup into bowls. Top with dollop of sour cream, tortilla strips, and remaining 2 tablespoons cilantro.

Black bean soup, sans gas-causing sugars, garnished as I saw fit

Saturday, January 14, 2012

Caramelized Onion and Horseradish Pork Sandwiches

As I mentioned in another post, I had a stack of recipes calling for leftover roasted pork loin, and this one sounded like the most savoury of the lot. So after doubling up on the meat to have enough to get me through my leftover experiment, I went ahead and attempted this sandwich recipe.  This calls for caramelizing onions, which is not always an easy task.  The trick is to cook over low heat for a long time, so you don't end up with fajita-style onions that are charred.  You want to get the sugars in the onion to caramelize without burning.  Believe me when I tell you that this requires patience, but that it is worth the effort.

Do yourself a favor on this one - go find good bread.  There's no point in caramelizing onions for an hour if you're going to use Wonder bread.  Though I suppose they're going bankrupt anyway, so maybe when you find this recipe you won't even know what I'm talking about.  Anyway, a good crusty French boule or Italian loaf will do the trick.

Serve with something fried, like these mushrooms, and send your taste buds on vacation


Caramelized Onion and Horseradish Pork Sandwiches
from Cooking Light, September 2004

  • 1 tablespoon olive oil
  • 4 cups vertically sliced onion (about 1 1/4 pounds)
  • 1 1/2 tablespoons sugar
  • 1 tablespoon red wine vinegar
  • 1 tablespoon low-sodium soy sauce
  • 1 teaspoon chopped fresh thyme
  • 1/8 teaspoon ground red pepper
  • 2 garlic cloves, minced
  • 2 tablespoons reduced-fat sour cream
  • 2 tablespoons low-fat mayonnaise
  • 1 tablespoon prepared horseradish
  • 1 (8-ounce) loaf French bread, halved lengthwise
  • 1 cup torn red leaf lettuce leaves
  • 1 1/2 cups thinly sliced roasted pork loin (about 8 ounces)

This gives you a feel for how thinly I sliced the onions - about 1/4"

A pork loin, going out with dignity - by way of the electric knife

Heat oil in a large nonstick skillet over medium heat. Not high, probably not low either but it's too late now. Add onion and next 6 ingredients (through garlic) to pan; cook 30 minutes or until onions are golden, stirring occasionally. This took me an hour of careful monitoring, but if you're really good I bet you can do it in 30. See my time lapse photos below to get a feel for what's going on.  Remove from heat; let cool.

Let's take a journey through caramelizing these bad boys.  This is about 2 minutes in.

14 minutes in.  Keep stirring!

27 minutes in.  Things should start sticking a bit more by now, so you need to keep monitoring.

52 minutes in.  Probably could have stopped by now, but I was still cooking so I let them go a bit more.

59 minutes after starting.  No black bits in the onions = win.

Toast the sliced bread. Warm sliced pork loin if you prefer a hot sandwich. Combine sour cream, mayonnaise, and horseradish; spread evenly over cut side of bottom half of bread. Arrange lettuce (I omitted this - too healthy) over the now mayonnaise-laden bread half (the mayo will prevent the bread from getting soggy). Arrange onions and roasted pork over lettuce. Top with other half of bread. Cut stuffed loaf into 4 pieces and serve.  If you want to get really crazy, add some gruyere cheese and feel your arteries clog in one last meat- and cheese-laden blowout.  Imagine a ham and cheese sandwich on steroids, because that's what you'll end up with.

Roast Pork Loin with Shiitake and Leek Compote

I found a recipe allowing me to repurpose a single roasted pork loin dish into five other good sounding recipes, but the basic pork dish didn't sound like a winner.  So I went digging around until I found a good starting point that I would want to actually try.  This dish consists of a pork loin seared and roasted over a bed of leeks and mushrooms, fairly simple to prepare and loaded with flavor.  Plus, the pork is mildly flavored on its own, so you can use it for other dishes afterwards as you see fit.

The roast before boiling down the compote


Roast Pork Loin with Shiitake and Leek Compote
Gourmet, January 1995
  • 1 large leek (white and pale green parts only)
  • 1-pound center-cut boneless pork loin (mine was about 2 pounds, but I used it for other things afterwards)
  • 1 tablespoon plus 1 teaspoon chopped fresh parsley leaves
  • 1 teaspoon unsalted butter or olive oil
  • 1/2 pound fresh shiitake mushrooms, stems discarded, caps cut into 1/2-inch slices
  • 1/2 teaspoon salt
  • 1/2 cup dry red wine
  • 1/2 cup beef broth
  • Garnish: fresh parsley sprigs

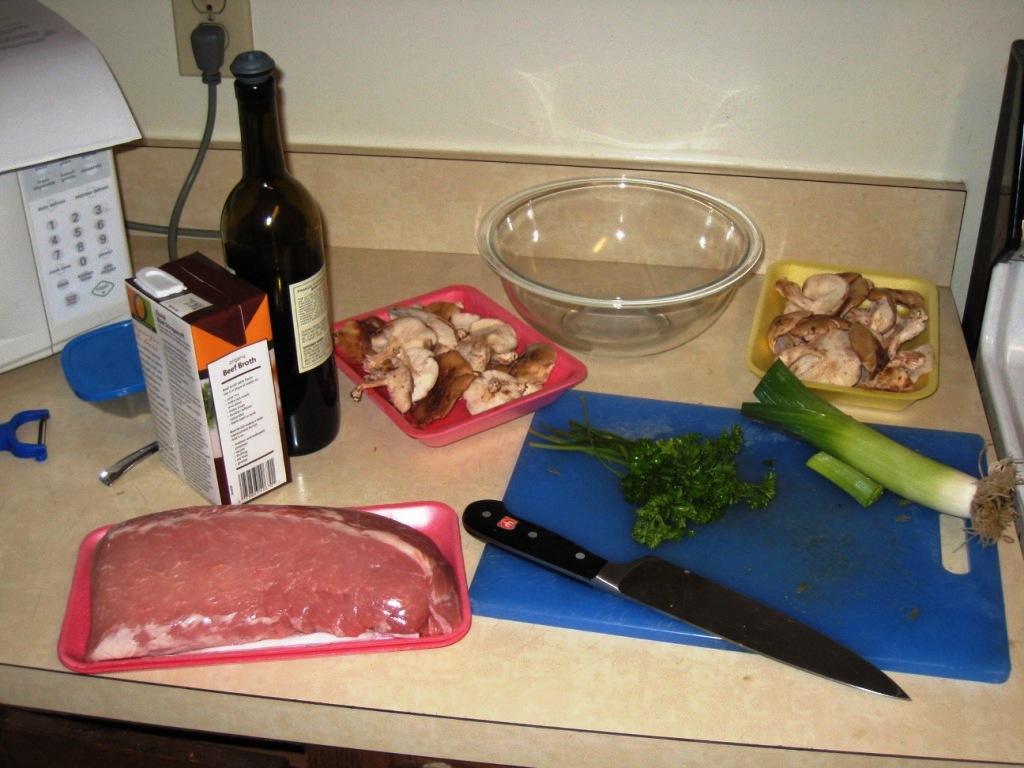
The setup.  I found shiitakes at an asian grocery store for much cheaper than the megamart

Cut leek crosswise into 1/2-inch slices and in a bowl soak in water to cover, agitating occasionally to dislodge any sand, 5 minutes. Lift leek out of water and drain in a colander.

Leeks are notoriously dirty.  Don't skip the step of soaking them, and then lift them out instead of dumping them out (the dirt will have sunk to the bottom of the bowl)

Trim any fat from pork. Season pork with salt and pepper and pat with 1 tablespoon chopped parsley. In a 10-inch oven-proof non-stick or cast-iron skillet heat butter or oil over moderately high heat until hot but not smoking and brown pork loin, turning it. Transfer pork to a plate.

Brown the pork loin.  Cast iron helps hold the heat for this.

Preheat oven to 425°F.

In fat remaining in skillet cook mushrooms and leek with salt over moderately high heat, stirring occasionally, until liquid mushrooms give off is evaporated, about 5 minutes. Add wine and broth and bring to a boil. Put pork on vegetables in skillet and roast in middle of oven 40 minutes, or until a thermometer inserted in center of pork registers 160°F.

Mushrooms and leeks before cooking

Mushrooms and leeks, after cooking.  Again, I highly recommend cast iron on this, or else they might stick/burn or require a ton of oil

Transfer pork to a cutting board and let stand 10 minutes. If vegetable compote is too thin, cook over high heat, stirring occasionally, until almost all liquid is evaporated. Stir remaining teaspoon chopped parsley into compote.

Pork and leek compote, served here with roasted vegetables

Slice pork thin and serve, garnished with parsley, with compote.

LinkWithin

Related Posts Plugin for WordPress, Blogger...